
Car doors, locks and windows Honda CR-V 2
.
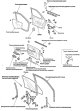
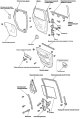

Removal and installation the front door panel
1. Using a flat-blade screwdriver wrapped in protective tape, pry up the cover (A) from the top and release the hooks (B), then remove the cover. 2. Remove the screws. 3. On the driver's door with power door lock...
1. Using a flat-blade screwdriver wrapped in protective tape, pry up the cover (A) from the top and release the hooks (B), then remove the cover. 2. Remove the screws. 3. On the driver's door with power door lock...
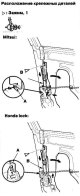
Replacing the front door outer handle
Note: Wear protective gloves. 1. Remove the following components: Door panel Plastic lid (if necessary) 2. Raise the glass fully. 3. Release the clamp and unhook the hook (A), then remove the lock rod protective cover...
Note: Wear protective gloves. 1. Remove the following components: Door panel Plastic lid (if necessary) 2. Raise the glass fully. 3. Release the clamp and unhook the hook (A), then remove the lock rod protective cover...
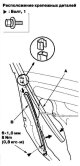
Replacing the front door lock
Note: Wear protective gloves. 1. Remove the following components: Door panel. Plastic lid (if necessary). Protective cover for the lock rod. Central lower guide on the driver's door with central locking. 2. Raise the...
Note: Wear protective gloves. 1. Remove the following components: Door panel. Plastic lid (if necessary). Protective cover for the lock rod. Central lower guide on the driver's door with central locking. 2. Raise the...
Replacing the glass and window regulator of the front door
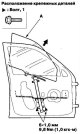
Note: Wear protective gloves. 1. Remove the following components: Door panel. Plastic lid (if necessary). 2. Carefully lift the glass (A) until you see the bolts. Turn them inside out. Carefully remove the glass from...
Note: Wear protective gloves. 1. Remove the following components: Door panel. Plastic lid (if necessary). 2. Carefully lift the glass (A) until you see the bolts. Turn them inside out. Carefully remove the glass from...
Replacing the outer seal of the front door glass
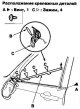
Note: Wear protective gloves. Don't scratch the door. 1. Remove the power mirror. To avoid scratching the power mirror and door, wrap the mirror in a napkin. There is no need to disconnect the connector from the...
Note: Wear protective gloves. Don't scratch the door. 1. Remove the power mirror. To avoid scratching the power mirror and door, wrap the mirror in a napkin. There is no need to disconnect the connector from the...
Replacing the front door seal
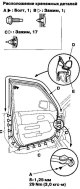
Note: Don't scratch the door. Remove the clamps using a clamp remover. 1. Remove the door stop mounting bolt (A) on the front pillar. 2. Remove the clips (B, C), then remove the door seal (D). 3. Installation is carried...
Note: Don't scratch the door. Remove the clamps using a clamp remover. 1. Remove the door stop mounting bolt (A) on the front pillar. 2. Remove the clips (B, C), then remove the door seal (D). 3. Installation is carried...

Replacing the waterproof film in the front door guides
Note: Prevent dust from entering the work area. When working at low temperatures, warm up the door guide and film using a hair dryer. Door guide: about 15°C Door guide film: about 30°C. When heating the door guide film,...
Note: Prevent dust from entering the work area. When working at low temperatures, warm up the door guide and film using a hair dryer. Door guide: about 15°C Door guide film: about 30°C. When heating the door guide film,...

Removal and installation the rear side door panel
1. Lower the window completely. 2. Remove the inner handle housing (A). Be careful not to scratch the door panel. Using a flat-blade screwdriver wrapped in protective tape, pry up the cover (B) from the top and release...
1. Lower the window completely. 2. Remove the inner handle housing (A). Be careful not to scratch the door panel. Using a flat-blade screwdriver wrapped in protective tape, pry up the cover (B) from the top and release...
Replacing the outer handle of the rear side door
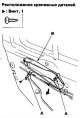
Note: Wear protective gloves. 1. Remove the following components: Door panel Plastic lid (if necessary) 2. Raise the glass fully. 3. Remove the screws and unhook the hooks (A), then remove the lock rod protective cover...
Note: Wear protective gloves. 1. Remove the following components: Door panel Plastic lid (if necessary) 2. Raise the glass fully. 3. Remove the screws and unhook the hooks (A), then remove the lock rod protective cover...

Replacing the rear side door lock
Note: Wear protective gloves. 1. Remove the following components: Door panel Plastic lid (if necessary) Protective cover of the lock rod 2. Raise the glass fully. 3. Remove the plug, then disconnect the outer handle...
Note: Wear protective gloves. 1. Remove the following components: Door panel Plastic lid (if necessary) Protective cover of the lock rod 2. Raise the glass fully. 3. Remove the plug, then disconnect the outer handle...
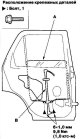
Replacing the glass and window regulator of the rear side door
Note: Wear protective gloves. 1. Remove the following components: Door panel Plastic lid (if necessary) Protective cover of the lock rod 2. Carefully lift the glass (A) until you see the bolts. Turn them inside out....
Note: Wear protective gloves. 1. Remove the following components: Door panel Plastic lid (if necessary) Protective cover of the lock rod 2. Carefully lift the glass (A) until you see the bolts. Turn them inside out....
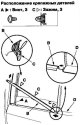
Replacing the outer seal of the rear side door glass
Note: Wear protective gloves. Don't scratch the door. 1. Remove the screw (A) from the front edge of the door. Pry up the outer door glass seal (B), starting from the front, release the clips (C) and separate the seal...
Note: Wear protective gloves. Don't scratch the door. 1. Remove the screw (A) from the front edge of the door. Pry up the outer door glass seal (B), starting from the front, release the clips (C) and separate the seal...
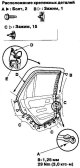
Replacing the rear side door seal
Note: Don't scratch the door. Remove the clamps using a clamp remover. 1. Remove the door stop mounting bolt (A) on the B-pillar. 2. Remove the clips (B, C), then remove the door seal (D). 3. Installation is carried out...
Note: Don't scratch the door. Remove the clamps using a clamp remover. 1. Remove the door stop mounting bolt (A) on the B-pillar. 2. Remove the clips (B, C), then remove the door seal (D). 3. Installation is carried out...

Replacing the rear side door center pillar seal
Note: Do not scratch the door. 1. Pull the door center pillar seal (A) and remove it. 2. After placing the seal on the top edge of the door opening, align the seal with the bottom edge of the door opening, then place...
Note: Do not scratch the door. 1. Pull the door center pillar seal (A) and remove it. 2. After placing the seal on the top edge of the door opening, align the seal with the bottom edge of the door opening, then place...

Replacing the waterproof film in the rear side door guides
Note: Prevent dust from entering the work area. When working at low temperatures, warm up the door guide and film using a hair dryer. Door guide: about 15°C Door guide film: about 30°C When heating the door guide film,...
Note: Prevent dust from entering the work area. When working at low temperatures, warm up the door guide and film using a hair dryer. Door guide: about 15°C Door guide film: about 30°C When heating the door guide film,...

Adjusting the position of the front and rear side door glass
Note: Check the seals and glass guide channel for damage or wear and replace if necessary. 1. Park your vehicle on a firm, level surface. 2. Remove the following components: Door panel of the front door, rear door....
Note: Check the seals and glass guide channel for damage or wear and replace if necessary. 1. Park your vehicle on a firm, level surface. 2. Remove the following components: Door panel of the front door, rear door....

Adjusting the position of the front and rear side door
The lower B-pillar contains the Supplemental Restraint System (SRS) components. Review the SRS component locations, precautions, and procedures before attempting repair or maintenance. Note: Make sure the door is flush...
The lower B-pillar contains the Supplemental Restraint System (SRS) components. Review the SRS component locations, precautions, and procedures before attempting repair or maintenance. Note: Make sure the door is flush...

Adjusting the position of the front and rear side door latch hinge
Make sure the door locks securely without slamming. If necessary, adjust the position of the latch hinge (A): The latch hinge nuts are fixed, but the hinge can be adjusted slightly up or down and in or out. 1. Loosen...
Make sure the door locks securely without slamming. If necessary, adjust the position of the latch hinge (A): The latch hinge nuts are fixed, but the hinge can be adjusted slightly up or down and in or out. 1. Loosen...


Replacing a power mirror
1. Lower the window completely. 2. Carefully pry up the mirror support cover (A) with your hand in the sequence shown. 3. Remove the door panel, 4. If necessary, remove the plastic cover, then remove the harness clamp...
1. Lower the window completely. 2. Carefully pry up the mirror support cover (A) with your hand in the sequence shown. 3. Remove the door panel, 4. If necessary, remove the plastic cover, then remove the harness clamp...
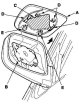
Replacing the mirror holder
1. Gently pull the bottom edge of the mirror holder (A) with your hand. Be careful not to scratch the mirror. 2. Separate the mirror holder from the drive (B) by slowly moving them apart. In doing so, remove the...
1. Gently pull the bottom edge of the mirror holder (A) with your hand. Be careful not to scratch the mirror. 2. Separate the mirror holder from the drive (B) by slowly moving them apart. In doing so, remove the...

Replacing the side mirror (on some models)
Note: To avoid damaging the mirror when using a screwdriver, wrap the flat blade with protective tape. 1. Using a flat-head screwdriver, carefully pry up the top edge of the mirror holder (A) and release the hook (B),...
Note: To avoid damaging the mirror when using a screwdriver, wrap the flat blade with protective tape. 1. Using a flat-head screwdriver, carefully pry up the top edge of the mirror holder (A) and release the hook (B),...

Replacing the rearview mirror
1. Slide the rearview mirror (A) down towards the windshield, then separate it from the spring (B) in the support (C) and remove the mirror. Be careful not to scratch the mirror base (D). 2. If necessary, remove the...
1. Slide the rearview mirror (A) down towards the windshield, then separate it from the spring (B) in the support (C) and remove the mirror. Be careful not to scratch the mirror base (D). 2. If necessary, remove the...
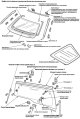
Windshield replacement
Component arrangement Note: Wear protective gloves. When removing glass using a string wire, wear safety glasses. To avoid damaging the seats, use covers. Use glass bonding kit, P/N 08C73-X0230N. 1. Remove the following...
Component arrangement Note: Wear protective gloves. When removing glass using a string wire, wear safety glasses. To avoid damaging the seats, use covers. Use glass bonding kit, P/N 08C73-X0230N. 1. Remove the following...
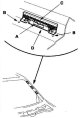
Replacing the windshield side trim clips
Note: Do not scratch the body. 1. Clean the surface of the car body where the fasteners will be glued with alcohol. 2. Peel off the protective backing from the sticky surface of the clips. 3. Align the clips (A) with...
Note: Do not scratch the body. 1. Clean the surface of the car body where the fasteners will be glued with alcohol. 2. Peel off the protective backing from the sticky surface of the clips. 3. Align the clips (A) with...
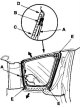
Replacing the glass of the small side window
Note: Wear protective gloves. To avoid damaging the seats, use covers. Use glass bonding kit, P/N 08C73-X0230N. 1. Remove the following components: Finishing of the small side window pillar. Finishing of the rear...
Note: Wear protective gloves. To avoid damaging the seats, use covers. Use glass bonding kit, P/N 08C73-X0230N. 1. Remove the following components: Finishing of the small side window pillar. Finishing of the rear...

Replacement of rear door glass/rear door glass support pillar
Note: Wear protective gloves. Be careful not to scratch the back door. Do not damage the wires and contacts of the rear window heater. 1. Remove the rear door side trim on both sides. 2. Remove the high brake light. 3....
Note: Wear protective gloves. Be careful not to scratch the back door. Do not damage the wires and contacts of the rear window heater. 1. Remove the rear door side trim on both sides. 2. Remove the high brake light. 3....

Disassembly/assembly of rear door glass
Note: Wear protective gloves. To avoid damage, place the rear door glass in a safe place. Do not damage the wires and contacts of the rear window heater. Disassemble the rear door glass as shown in the figure below,...
Note: Wear protective gloves. To avoid damage, place the rear door glass in a safe place. Do not damage the wires and contacts of the rear window heater. Disassemble the rear door glass as shown in the figure below,...

Replacing the rear window molding
Note: Wear protective gloves. To avoid damage, place the rear door glass in a safe place. Do not damage the wires and contacts of the rear window heater. 1. Remove the rear door glass. 2. Remove the rear door glass...
Note: Wear protective gloves. To avoid damage, place the rear door glass in a safe place. Do not damage the wires and contacts of the rear window heater. 1. Remove the rear door glass. 2. Remove the rear door glass...

Rear door glass adjustment
1. Remove the lower trim panel of the rear door. 2. With the help of a partner, remove the rear door glass support posts on both sides. Hold the glass when opening and closing it. 3. Slightly loosen the bolts, screws...
1. Remove the lower trim panel of the rear door. 2. With the help of a partner, remove the rear door glass support posts on both sides. Hold the glass when opening and closing it. 3. Slightly loosen the bolts, screws...

Replacement of the high brake light bracket/decorative channel of the electrical harness
Note: Wear protective gloves. To avoid damage, place the rear door glass in a safe place. Do not damage the wires and contacts of the rear window heater. 1. Remove the rear door glass. 2. Cut off the glued sections of...
Note: Wear protective gloves. To avoid damage, place the rear door glass in a safe place. Do not damage the wires and contacts of the rear window heater. 1. Remove the rear door glass. 2. Cut off the glued sections of...

Replacing the rear door glass seal
Note: Wear protective gloves. Be careful not to scratch the back door. 1. Remove the rear door side trim on both sides. 2. Remove the high brake light. 3. Disconnect the connectors from the rear window defogger and...
Note: Wear protective gloves. Be careful not to scratch the back door. 1. Remove the rear door side trim on both sides. 2. Remove the high brake light. 3. Disconnect the connectors from the rear window defogger and...

Table of signs of a faulty sunroof
Table of signs of malfunction Sign of malfunction Diagnostic procedure Water is leaking Check if the drain pipe is clogged. Check if there is a gap between the glass seal and the roof panel. Check for defects and...
Table of signs of malfunction Sign of malfunction Diagnostic procedure Water is leaking Check if the drain pipe is clogged. Check if there is a gap between the glass seal and the roof panel. Check for defects and...


Adjusting the height of the sunroof glass
The roof panel (A) must be flush with the glass seal (B) with an accuracy of 2+0.5/-1 mm at the center of the glass opening. If this is not the case, make the following adjustment: 1. Remove the bracket cover on both...
The roof panel (A) must be flush with the glass seal (B) with an accuracy of 2+0.5/-1 mm at the center of the glass opening. If this is not the case, make the following adjustment: 1. Remove the bracket cover on both...

Replacing the sunroof glass
1. Close the glass completely. 2. Slide the sunshade back. 3. Remove the screws (A), then remove the covers (B) from both brackets. Remove the nuts (C) and adjusting shims (D) from both glass brackets (E). 4. Remove the...
1. Close the glass completely. 2. Slide the sunshade back. 3. Remove the screws (A), then remove the covers (B) from both brackets. Remove the nuts (C) and adjusting shims (D) from both glass brackets (E). 4. Remove the...

Replacing the drain gutter
1. Remove the glass. 2. Using the sunroof key, move both glass brackets (A) to the position where the sunroof is normally closed and remove the screws securing the drain gutter (B). 3. Unhook the drain gutter (A) from...
1. Remove the glass. 2. Using the sunroof key, move both glass brackets (A) to the position where the sunroof is normally closed and remove the screws securing the drain gutter (B). 3. Unhook the drain gutter (A) from...
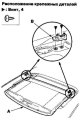
Replacing the sunshade
1. Remove the drain gutter. 2. Slide the sunshade (A) until you see both slider spacers (B). 3. Remove the screws, then remove both spacers. 4. While lifting the hood (A) by the front section, slide it forward until you...
1. Remove the drain gutter. 2. Slide the sunshade (A) until you see both slider spacers (B). 3. Remove the screws, then remove both spacers. 4. While lifting the hood (A) by the front section, slide it forward until you...
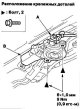
Replacing the sunroof motor
1. Remove the inner roof lining. 2. Put on protective gloves. Disconnect the connector (A) and unscrew the bolts, then remove the electric motor (B). 3. The electric motor is installed in the reverse order of removal,...
1. Remove the inner roof lining. 2. Put on protective gloves. Disconnect the connector (A) and unscrew the bolts, then remove the electric motor (B). 3. The electric motor is installed in the reverse order of removal,...

Replacement of frame and drain pipe
Note: Wear protective gloves. 1. Remove the following components: Inner roof lining. Glass of the sunroof. 2. Disconnect the sunroof connector (A) and drain pipes (B). The illustration above shows a left-hand drive...
Note: Wear protective gloves. 1. Remove the following components: Inner roof lining. Glass of the sunroof. 2. Disconnect the sunroof connector (A) and drain pipes (B). The illustration above shows a left-hand drive...
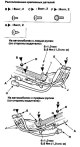
Replacing the drain chute slider and cables as an assembly
1. Remove the frame. 2. Remove the following components from the frame: Drainage gutter. Sun protection hood. Electric sunroof motor. 3. Put on protective gloves. On both sides of the frame (A), remove the screws (B,...
1. Remove the frame. 2. Remove the following components from the frame: Drainage gutter. Sun protection hood. Electric sunroof motor. 3. Put on protective gloves. On both sides of the frame (A), remove the screws (B,...

Adjusting the sunroof position switch
1. Remove the inner roof lining. 2. Close the glass (A) completely using the hatch key: Make sure that both lever cams (B) are parallel and in the position shown. Check the fit of the glass to the roof panel and the...
1. Remove the inner roof lining. 2. Close the glass (A) completely using the hatch key: Make sure that both lever cams (B) are parallel and in the position shown. Check the fit of the glass to the roof panel and the...

Checking the closing force and opening resistance of the hatch
1. Remove the inner roof lining. 2. Checking the closing force: Secure the spring balance (C) to the front edge of the glass (B), placing a napkin (A) underneath as shown in the figure. Have a partner press the switch...
1. Remove the inner roof lining. 2. Checking the closing force: Secure the spring balance (C) to the front edge of the glass (B), placing a napkin (A) underneath as shown in the figure. Have a partner press the switch...


Replacing the hood release cable
Note: Wear protective gloves. Avoid scratching the body and adjacent components. 1. Remove the following components: Front inner wing. Wing panel. 2. Disconnect the hood release cable (A) from the hood latch (B) and...
Note: Wear protective gloves. Avoid scratching the body and adjacent components. 1. Remove the following components: Front inner wing. Wing panel. 2. Disconnect the hood release cable (A) from the hood latch (B) and...

Replacing the fuel filler door opening cable
This area contains the Supplemental Restraint System (SRS) components. Review the SRS component locations, precautions, and procedures before performing repairs or maintenance. Note: Wear protective gloves. Avoid...
This area contains the Supplemental Restraint System (SRS) components. Review the SRS component locations, precautions, and procedures before performing repairs or maintenance. Note: Wear protective gloves. Avoid...

Replacing the hood latch
1. If equipped, disconnect the connector (A) from the hood latch switch and detach the harness clamp (B) from the body. 2. Remove the bolts, then remove the hood latch (A) from the body. 3. Disconnect the hood release...
1. If equipped, disconnect the connector (A) from the hood latch switch and detach the harness clamp (B) from the body. 2. Remove the bolts, then remove the hood latch (A) from the body. 3. Disconnect the hood release...

Replacing the rear door handle
Note: Be careful not to scratch the back door. Wear protective gloves. 1. Remove the rear door limiter assembly. 2. Disconnect the cylinder rod (A) and the rear door glass opening rod (B) from the rear door lock...
Note: Be careful not to scratch the back door. Wear protective gloves. 1. Remove the rear door limiter assembly. 2. Disconnect the cylinder rod (A) and the rear door glass opening rod (B) from the rear door lock...
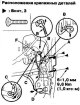
Replacing the rear door lock
Note: Be careful not to scratch the back door. Wear protective gloves. 1. Remove the lower trim panel of the rear door. 2. Remove the rear door lock. Disconnect the rear door lock rod (B) and the cylinder rod (C)....
Note: Be careful not to scratch the back door. Wear protective gloves. 1. Remove the lower trim panel of the rear door. 2. Remove the rear door lock. Disconnect the rear door lock rod (B) and the cylinder rod (C)....

Replacing the rear door limiter assembly
Note: Be careful not to scratch the back door. Wear protective gloves. 1. Remove the lower trim panel of the rear door. 2. Disconnect the lower end of the rear door rod (A) from the rear door lock. 3. Remove the bolt,...
Note: Be careful not to scratch the back door. Wear protective gloves. 1. Remove the lower trim panel of the rear door. 2. Disconnect the lower end of the rear door rod (A) from the rear door lock. 3. Remove the bolt,...
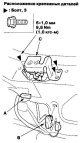
Replacing the rear door glass lock
Note: Be careful not to scratch the back door. Wear protective gloves. 1. Remove the lower trim panel of the rear door. 2. Disconnect the connector (A) from the rear door glass lock switch, the connector (B) from the...
Note: Be careful not to scratch the back door. Wear protective gloves. 1. Remove the lower trim panel of the rear door. 2. Disconnect the connector (A) from the rear door glass lock switch, the connector (B) from the...

Replacing the rear door glass drive
Note: Be careful not to scratch the back door. Wear protective gloves. 1. Remove the lower trim panel of the rear door. 2. Disconnect the rear door glass link (A), rear door glass opening link (B) and connector (C) from...
Note: Be careful not to scratch the back door. Wear protective gloves. 1. Remove the lower trim panel of the rear door. 2. Disconnect the rear door glass link (A), rear door glass opening link (B) and connector (C) from...
This section is available on: russian, bulgarian, belarusian, ukrainian, serbian, croatian, romanian, polish, slovak, hungarian
Link in different formats to this section
TEXTHTMLBB Code
- General information
- User manual
- Technical data
- Maintenance
- Power unit
- Engine repair
- Lubrication system
- Cooling system
- Exhaust system
- Fuel system
- Engine management
- Engine electrical equipment
- Transmission
- Clutch
- Manual gearbox
- Automatic gearbox
- Rear differential
- Drive shafts
- Chassis and running gear
- Steering
- Front suspension
- Rear suspension
- Brake system
- Body and interior
- Exterior (external elements)
- Interior (internal elements)
- Doors, locks and windows
- General information
- Maintenance
- Tips for car owner
- Power unit
- Engine repair
- Engine overhaul
- Cooling and lubrication system
- Engine electrical equipment
- Control system
- Fuel system
- Transmission
- Clutch and drive shafts
- Car gearbox
- Chassis and running gear
- Front suspension
- Rear suspension
- Steering
- Brake system
- Body and interior
- Body service
- Exterior (external elements)
- Interior (internal elements)
- Electrical equipment
- Equipment and devices
- Electrical circuits