
Exterior (external body elements) of car Honda CR-V 2
.

Removal and installation the front bumper
Note: When removing the front bumper, it's a good idea to have a partner. Avoid scratching the front bumper and body. Wear protective gloves. Remove the front bumper as shown in the picture. The bumper is installed in...
Note: When removing the front bumper, it's a good idea to have a partner. Avoid scratching the front bumper and body. Wear protective gloves. Remove the front bumper as shown in the picture. The bumper is installed in...

Removal and installation the rear bumper
Note: When removing the rear bumper, it is a good idea to have a partner. Avoid scratching the rear bumper and body. When pressing components with a flat-head screwdriver, wrap it with protective tape to avoid damage....
Note: When removing the rear bumper, it is a good idea to have a partner. Avoid scratching the rear bumper and body. When pressing components with a flat-head screwdriver, wrap it with protective tape to avoid damage....
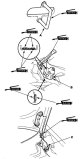
Adjusting the hood
1. Loosen the bolts slightly. 2. Adjust the hood fit (A) in the following sequence: Adjust the fit of the hood on the right and left, as well as at the front and rear, using the elongated holes on the hood hinges (B)....
1. Loosen the bolts slightly. 2. Adjust the hood fit (A) in the following sequence: Adjust the fit of the hood on the right and left, as well as at the front and rear, using the elongated holes on the hood hinges (B)....

Replacing the hood seal
1. Use a puller to remove the clips, then remove the hood seal (A). Be careful not to scratch the hood. 2. The seal is installed in the reverse order of removal. Replace damaged clamps.
1. Use a puller to remove the clips, then remove the hood seal (A). Be careful not to scratch the hood. 2. The seal is installed in the reverse order of removal. Replace damaged clamps.

Replacing the hood insulator
On some models 1. Use a puller to remove the clips, unhook the hooks (A), then remove the hood insulator (B). Be careful not to scratch the hood. 2. Installation of the insulator is performed in the reverse order of...
On some models 1. Use a puller to remove the clips, unhook the hooks (A), then remove the hood insulator (B). Be careful not to scratch the hood. 2. Installation of the insulator is performed in the reverse order of...

Removal and installation the radiator grille
Note: Wear protective gloves. 1. Remove the front bumper. 2. Remove the clips and separate the radiator grille (A) from the front bumper (B) by pulling it. Be careful not to scratch the front bumper. 3. If necessary,...
Note: Wear protective gloves. 1. Remove the front bumper. 2. Remove the clips and separate the radiator grille (A) from the front bumper (B) by pulling it. Be careful not to scratch the front bumper. 3. If necessary,...

Replacing the hood grille cover
Note: Left hand drive model shown; the layout on the right-hand drive model is symmetrical, with the exception of the windshield washer tubes. 1. Remove the windshield wiper arms. 2. Using a puller, separate the clips...
Note: Left hand drive model shown; the layout on the right-hand drive model is symmetrical, with the exception of the windshield washer tubes. 1. Remove the windshield wiper arms. 2. Using a puller, separate the clips...
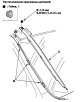
Windshield Side Trim Replacement
Note: When pressing components with a flat-head screwdriver, wrap it with protective tape to prevent damage and apply tape to adjacent components. Wear protective gloves. 1. Remove the front side roof trim. 2. Loosen...
Note: When pressing components with a flat-head screwdriver, wrap it with protective tape to prevent damage and apply tape to adjacent components. Wear protective gloves. 1. Remove the front side roof trim. 2. Loosen...

Replacing the front side roof trim
Note: Wear protective gloves. 1. Using a flat-blade screwdriver wrapped in protective tape, pry up the front cover (A) of the front side roof trim, release the hook (B) and remove the screw. 2. Using a flat-blade...
Note: Wear protective gloves. 1. Using a flat-blade screwdriver wrapped in protective tape, pry up the front cover (A) of the front side roof trim, release the hook (B) and remove the screw. 2. Using a flat-blade...

Replacing the rear side roof trim
Note: Wear protective gloves. 1. Remove the tail light. 2. Loosen the bolt (A) and remove the clip (B) at the rear of the rear roof side trim (C). 3. Using a flat-blade screwdriver wrapped in protective tape, pry up the...
Note: Wear protective gloves. 1. Remove the tail light. 2. Loosen the bolt (A) and remove the clip (B) at the rear of the rear roof side trim (C). 3. Using a flat-blade screwdriver wrapped in protective tape, pry up the...

Replacing the front wheel well protective lining
Note: Wear protective gloves. Avoid scratching the body. 1. Remove the screw, then remove the front bumper wheel arch outward. 2. On the back side of the wheel arch, unscrew the screw (A), then remove the front mudguard...
Note: Wear protective gloves. Avoid scratching the body. 1. Remove the screw, then remove the front bumper wheel arch outward. 2. On the back side of the wheel arch, unscrew the screw (A), then remove the front mudguard...

Replacing the rear wheel well protective lining
Note: Do not scratch the body. 1. Remove the screw, remove the rear bumper wheel arch outward, then open the rear side door. 2. Remove the screws (A) from the back of the wheel arch. Remove the bolt (B) using a T30 Torx...
Note: Do not scratch the body. 1. Remove the screw, remove the rear bumper wheel arch outward, then open the rear side door. 2. Remove the screws (A) from the back of the wheel arch. Remove the bolt (B) using a T30 Torx...
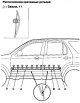
Replacing door moldings
Note: To avoid damaging the door, wrap the blade of the putty knife or flat-head screwdriver with protective tape. When pressing the components, do not insert the tool too deeply, otherwise you may bend the molding....
Note: To avoid damaging the door, wrap the blade of the putty knife or flat-head screwdriver with protective tape. When pressing the components, do not insert the tool too deeply, otherwise you may bend the molding....

Replacing the lower door trim
Note: Don't scratch the door. Wear protective gloves. 1. Open the front or rear side door fully, remove the plug (A) from the door, then remove the screw. 2. When removing the rear side door lower trim, close the rear...
Note: Don't scratch the door. Wear protective gloves. 1. Open the front or rear side door fully, remove the plug (A) from the door, then remove the screw. 2. When removing the rear side door lower trim, close the rear...

Replacing the door sill panel
1. Remove the door sill panel. Remove the mudguard (A). Pull back the inner wing (B) as far as necessary and remove the expansion clamp (C). Slide the door sill panel (D) forward and remove it. The side clamps will...
1. Remove the door sill panel. Remove the mudguard (A). Pull back the inner wing (B) as far as necessary and remove the expansion clamp (C). Slide the door sill panel (D) forward and remove it. The side clamps will...

Replacing the lower trim of the rear door
Note: Be careful not to scratch the back door. Wear protective gloves. 1. Remove the following components: License plate (on some models). Lower decorative panel of the rear door. 2. Remove the spare tire bracket (A)....
Note: Be careful not to scratch the back door. Wear protective gloves. 1. Remove the following components: License plate (on some models). Lower decorative panel of the rear door. 2. Remove the spare tire bracket (A)....

Replacing the rear window wiper shaft
1. Remove the lower trim panel of the rear door. 2. Remove the nut from inside the rear door, then remove the rear window wiper shaft (A) and seal (B). 3. The axle is installed in the reverse order of removal.
1. Remove the lower trim panel of the rear door. 2. Remove the nut from inside the rear door, then remove the rear window wiper shaft (A) and seal (B). 3. The axle is installed in the reverse order of removal.

Replacing the rear window wiper protective tape
1. Slowly roll off the old rear window wiper protective tape. 2. Clean the contact surface of the rear door with a sponge soaked in alcohol. After cleaning, do not allow oil, grease or water to come into contact with...
1. Slowly roll off the old rear window wiper protective tape. 2. Clean the contact surface of the rear door with a sponge soaked in alcohol. After cleaning, do not allow oil, grease or water to come into contact with...

Replacement of emblem/sticker
Note: Be careful not to scratch the body when removing the emblem/sticker. 1. To remove the front "H" emblem, remove the grille. 2. Clean the surface of the body using a sponge soaked in alcohol. After cleaning, do not...
Note: Be careful not to scratch the body when removing the emblem/sticker. 1. To remove the front "H" emblem, remove the grille. 2. Clean the surface of the body using a sponge soaked in alcohol. After cleaning, do not...
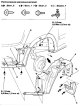
Front Inner Fender Replacement
Note: Do not scratch the body. 1. Remove the front inner fender (A). From inside the wheel arch, remove the screws (B), then remove the front mudguard (C). Using a T30 Torx head, remove the bolt (D) securing the front...
Note: Do not scratch the body. 1. Remove the front inner fender (A). From inside the wheel arch, remove the screws (B), then remove the front mudguard (C). Using a T30 Torx head, remove the bolt (D) securing the front...
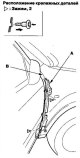
Replacing the front fender fairing
1. Remove the front inner fender. 2. To remove the front left fender fairing, remove the washer reservoir. 3. Open the front door. From the outside of the door, remove the upper clip and from the inside of the door,...
1. Remove the front inner fender. 2. To remove the front left fender fairing, remove the washer reservoir. 3. Open the front door. From the outside of the door, remove the upper clip and from the inside of the door,...
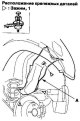
Replacing the fuel line protective lining
1. Remove the clamps, then remove the fuel pipe protective cover (A). Do not scratch the body. 2. Installation of the protective cover is performed in the reverse order of removal. Replace damaged clamps.
1. Remove the clamps, then remove the fuel pipe protective cover (A). Do not scratch the body. 2. Installation of the protective cover is performed in the reverse order of removal. Replace damaged clamps.

Replacing the rear exhaust port
1. Remove the rear bumper. 2. Unhook the hooks (A), then remove the rear outlet (B). Be careful not to scratch the body. 3. Install the outlet by pressing the hooks until they snap into place.
1. Remove the rear bumper. 2. Unhook the hooks (A), then remove the rear outlet (B). Be careful not to scratch the body. 3. Install the outlet by pressing the hooks until they snap into place.

Replacing the subframe
Front subframe tightening torques Note: After loosening the subframe mounting bolts, replace them with new ones.
Front subframe tightening torques Note: After loosening the subframe mounting bolts, replace them with new ones.

Rear subframe tightening torques
Note: After loosening the subframe mounting bolts, replace them with new ones.
Note: After loosening the subframe mounting bolts, replace them with new ones.

Replacement of frame stiffeners
Tightening torques for the front strut rod, longitudinal steering rod and rear frame tube
Tightening torques for the front strut rod, longitudinal steering rod and rear frame tube

Frame repair diagram
Top view Unit of measurement: mm (inches); ∅: Inner diameter a Subframe ∅ 16 B Engine mount ∅13 with Engine support ∅ 13 d Engine support ∅ 13 e1 Support MKP ∅ 13 e2 Support AKP ∅ 13 f1 Support manual transmission ∅ 13...
Top view Unit of measurement: mm (inches); ∅: Inner diameter a Subframe ∅ 16 B Engine mount ∅13 with Engine support ∅ 13 d Engine support ∅ 13 e1 Support MKP ∅ 13 e2 Support AKP ∅ 13 f1 Support manual transmission ∅ 13...
This section is available on: russian, bulgarian, belarusian, ukrainian, serbian, croatian, romanian, polish, slovak, hungarian
Link in different formats to this section
TEXTHTMLBB Code
- General information
- User manual
- Technical data
- Maintenance
- Power unit
- Engine repair
- Lubrication system
- Cooling system
- Exhaust system
- Fuel system
- Engine management
- Engine electrical equipment
- Transmission
- Clutch
- Manual gearbox
- Automatic gearbox
- Rear differential
- Drive shafts
- Chassis and running gear
- Steering
- Front suspension
- Rear suspension
- Brake system
- Body and interior
- Exterior (external elements)
- Interior (internal elements)
- Doors, locks and windows
- General information
- Maintenance
- Tips for car owner
- Power unit
- Engine repair
- Engine overhaul
- Cooling and lubrication system
- Engine electrical equipment
- Control system
- Fuel system
- Transmission
- Clutch and drive shafts
- Car gearbox
- Chassis and running gear
- Front suspension
- Rear suspension
- Steering
- Brake system
- Body and interior
- Body service
- Exterior (external elements)
- Interior (internal elements)
- Electrical equipment
- Equipment and devices
- Electrical circuits