
Rear suspension of the car Honda CR-V 2
.

Checking the rear wheel alignment
1. Remove the wheel cover and install the wheel alignment gauge (A) and the device for measuring the rear wheel camber angle and the longitudinal tilt angle of the steering axis on the wheel hub. 2. Read the camber...
1. Remove the wheel cover and install the wheel alignment gauge (A) and the device for measuring the rear wheel camber angle and the longitudinal tilt angle of the steering axis on the wheel hub. 2. Read the camber...

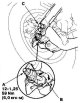
Checking/adjusting rear wheel alignment
1. Release the parking brake. 2. Check the alignment. If it differs from the norm, proceed to p. 3. Rear wheel alignment: 2±2 mm 3. Loosen the self-locking nut (A) to secure the adjusting bolt (B). Warning. Do not...
1. Release the parking brake. 2. Check the alignment. If it differs from the norm, proceed to p. 3. Rear wheel alignment: 2±2 mm 3. Loosen the self-locking nut (A) to secure the adjusting bolt (B). Warning. Do not...


Replacing the steering knuckle
1. Raise the rear of the vehicle and support it securely. Remove the rear wheels. 2. Release the parking brake lever. 3. Remove the mounting bolt (A) from the brake hose bracket. 4. Remove the mounting bolts (B) from...
1. Raise the rear of the vehicle and support it securely. Remove the rear wheels. 2. Release the parking brake lever. 3. Remove the mounting bolt (A) from the brake hose bracket. 4. Remove the mounting bolts (B) from...

Replacing a wheel bearing
1. Press the hub (A) out of the steering knuckle (B) using a special tool and a hydraulic press. Secure the steering knuckle using a hydraulic press (C) or equivalent special tool. Do not deform the mudguard. Hold the...
1. Press the hub (A) out of the steering knuckle (B) using a special tool and a hydraulic press. Secure the steering knuckle using a hydraulic press (C) or equivalent special tool. Do not deform the mudguard. Hold the...

Replacing the stabilizer bar
1. Raise the rear of the vehicle and support it securely. Remove the rear wheels. 2. Separate the stabilizer links from the stabilizer bar (A) on the right and left. 3. Remove the flange bolts and bushing holders (B),...
1. Raise the rear of the vehicle and support it securely. Remove the rear wheels. 2. Separate the stabilizer links from the stabilizer bar (A) on the right and left. 3. Remove the flange bolts and bushing holders (B),...

Replacing the stabilizer rod
1. Raise the rear of the vehicle and support it securely. Remove the rear wheels. 2. Loosen the self-locking nut (A) and flange nut (B) while holding the corresponding ball joint pin (C) with an Allen key (D), and...
1. Raise the rear of the vehicle and support it securely. Remove the rear wheels. 2. Loosen the self-locking nut (A) and flange nut (B) while holding the corresponding ball joint pin (C) with an Allen key (D), and...

Replacing the upper control arm
1. Raise the rear of the vehicle and support it securely. Remove the rear wheels. 2. Place a jack under the trailing arm and support the suspension. 3. Remove the wheel sensor wiring harness bracket (A) from the upper...
1. Raise the rear of the vehicle and support it securely. Remove the rear wheels. 2. Place a jack under the trailing arm and support the suspension. 3. Remove the wheel sensor wiring harness bracket (A) from the upper...

Replacing the trailing arm
1. Raise the rear of the vehicle and support it securely. Remove the rear wheels. 2. Remove the steering knuckle. 3. Place a jack under the trailing arm (A) and support it. 4. Unscrew the flange nut (B) and separate the...
1. Raise the rear of the vehicle and support it securely. Remove the rear wheels. 2. Remove the steering knuckle. 3. Place a jack under the trailing arm (A) and support it. 4. Unscrew the flange nut (B) and separate the...
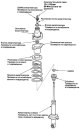
Shock Absorber/Spring Replacement — Removal
Rear shock absorber disassembled 1. Raise the rear of the vehicle and support it securely. Remove the rear wheels. 2. Remove the flange bolt (A) from the bottom of the shock absorber. 3. Remove the flange nuts (A) from...
Rear shock absorber disassembled 1. Raise the rear of the vehicle and support it securely. Remove the rear wheels. 2. Remove the flange bolt (A) from the bottom of the shock absorber. 3. Remove the flange nuts (A) from...
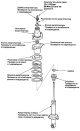
Shock absorber/spring replacement — disassembly/inspection
Rear shock absorber disassembled 1. Compress the shock absorber spring with a strut spring compressor (A) according to the manufacturer's instructions, then loosen the self-locking nut (B) while securing the shock...
Rear shock absorber disassembled 1. Compress the shock absorber spring with a strut spring compressor (A) according to the manufacturer's instructions, then loosen the self-locking nut (B) while securing the shock...
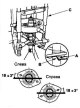
Shock Absorber/Spring Replacement — Assembly
1. Install all components except the shock absorber washer and self-locking nut onto the shock absorber assembly, referring to the exploded view (A). Insert the bottom of the spring (A) into the ledge on the lower...
1. Install all components except the shock absorber washer and self-locking nut onto the shock absorber assembly, referring to the exploded view (A). Insert the bottom of the spring (A) into the ledge on the lower...
Shock Absorber/Spring Replacement — Installation
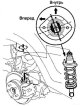
1. Fasten the shock absorber assembly to the body. Observe the installation direction of the shock absorber base with the small dot mark facing the inside of the vehicle. 2. Fit the flange nuts (A) onto the top of the...
1. Fasten the shock absorber assembly to the body. Observe the installation direction of the shock absorber base with the small dot mark facing the inside of the vehicle. 2. Fit the flange nuts (A) onto the top of the...
This section is available on: russian, bulgarian, belarusian, ukrainian, serbian, croatian, romanian, polish, slovak, hungarian
Link in different formats to this section
TEXTHTMLBB Code
- General information
- User manual
- Technical data
- Maintenance
- Power unit
- Engine repair
- Lubrication system
- Cooling system
- Exhaust system
- Fuel system
- Engine management
- Engine electrical equipment
- Transmission
- Clutch
- Manual gearbox
- Automatic gearbox
- Rear differential
- Drive shafts
- Chassis and running gear
- Steering
- Front suspension
- Rear suspension
- Brake system
- Body and interior
- Exterior (external elements)
- Interior (internal elements)
- Doors, locks and windows
- General information
- Maintenance
- Tips for car owner
- Power unit
- Engine repair
- Engine overhaul
- Cooling and lubrication system
- Engine electrical equipment
- Control system
- Fuel system
- Transmission
- Clutch and drive shafts
- Car gearbox
- Chassis and running gear
- Front suspension
- Rear suspension
- Steering
- Brake system
- Body and interior
- Body service
- Exterior (external elements)
- Interior (internal elements)
- Electrical equipment
- Equipment and devices
- Electrical circuits