


Interior (interior elements of the cabin) of car Honda CR-V 2
.


Removal and installation trim — door section
Note: Wear protective gloves. When pressing components with a flat-head screwdriver, wrap it with protective tape to avoid damage. Avoid bending or scratching the trim and panels. Remove the trim as shown in the...
Note: Wear protective gloves. When pressing components with a flat-head screwdriver, wrap it with protective tape to avoid damage. Avoid bending or scratching the trim and panels. Remove the trim as shown in the...

Removal and installation trim — rear side section
Note: Wear protective gloves. When pressing components with a flat-head screwdriver, wrap it with protective tape to avoid damage. Avoid bending or scratching the trim and panels. Remove the following components, then...
Note: Wear protective gloves. When pressing components with a flat-head screwdriver, wrap it with protective tape to avoid damage. Avoid bending or scratching the trim and panels. Remove the following components, then...

Removal and installation trim — rear side pillar section
Note: Wear protective gloves. When pressing components with a flat-head screwdriver, wrap it with protective tape to avoid damage. Avoid bending or scratching the trim and panels. Remove the trim as shown in the...
Note: Wear protective gloves. When pressing components with a flat-head screwdriver, wrap it with protective tape to avoid damage. Avoid bending or scratching the trim and panels. Remove the trim as shown in the...

Removal and installation trim — luggage compartment
Note: Wear protective gloves. When pressing components with a flat-head screwdriver, wrap it with protective tape to avoid damage. Avoid bending or scratching the trim and panels. Remove the trim as shown in the...
Note: Wear protective gloves. When pressing components with a flat-head screwdriver, wrap it with protective tape to avoid damage. Avoid bending or scratching the trim and panels. Remove the trim as shown in the...

Removal and installation trim — rear door
Note: Wear protective gloves. When pressing components with a flat-head screwdriver, wrap it with protective tape to avoid damage. Avoid bending or scratching the trim and panels. Remove the trim as shown in the...
Note: Wear protective gloves. When pressing components with a flat-head screwdriver, wrap it with protective tape to avoid damage. Avoid bending or scratching the trim and panels. Remove the trim as shown in the...
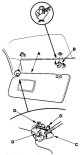
Removal and installation the inner roof lining
Note: When pressing components with a flat-head screwdriver, wrap it with protective tape to avoid damage. Do not bend or scratch the inner roof lining. Avoid damaging the instrument panel or other interior trim. 1....
Note: When pressing components with a flat-head screwdriver, wrap it with protective tape to avoid damage. Do not bend or scratch the inner roof lining. Avoid damaging the instrument panel or other interior trim. 1....

Replacing carpet
This area contains the Supplemental Restraint System (SRS) components. Review the SRS component locations, precautions, and procedures before performing repairs or maintenance. Note: Wear protective gloves. Do not...
This area contains the Supplemental Restraint System (SRS) components. Review the SRS component locations, precautions, and procedures before performing repairs or maintenance. Note: Wear protective gloves. Do not...

Removal and installation the instrument panel
Note: When pressing components with a flat-head screwdriver, wrap it with protective tape to avoid damage and apply tape to adjacent components. Avoid scratching the instrument panel and adjacent components. The picture...
Note: When pressing components with a flat-head screwdriver, wrap it with protective tape to avoid damage and apply tape to adjacent components. Avoid scratching the instrument panel and adjacent components. The picture...

Removal and installation the lower instrument panel cover on the driver's side
Note: Avoid scratching the instrument panel and adjacent components. The picture shows a left-hand drive model; the arrangement on the right-hand drive model is symmetrical. 1. Remove the screws (A) from the driver's...
Note: Avoid scratching the instrument panel and adjacent components. The picture shows a left-hand drive model; the arrangement on the right-hand drive model is symmetrical. 1. Remove the screws (A) from the driver's...

Removal and installation the lower dashboard panel on the driver's side
Note: Avoid scratching the instrument panel and adjacent components. The picture shows a left-hand drive model; the arrangement on the right-hand drive model is symmetrical . 1. Remove the driver's side lower instrument...
Note: Avoid scratching the instrument panel and adjacent components. The picture shows a left-hand drive model; the arrangement on the right-hand drive model is symmetrical . 1. Remove the driver's side lower instrument...

Removal and installation the central section of the instrument panel
Note: Avoid scratching the instrument panel and adjacent components. The picture shows a left-hand drive model; the arrangement on the right-hand drive model is symmetrical. 1. Remove the screws from the bottom of the...
Note: Avoid scratching the instrument panel and adjacent components. The picture shows a left-hand drive model; the arrangement on the right-hand drive model is symmetrical. 1. Remove the screws from the bottom of the...
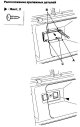
Removal and installation the central tray of the instrument panel
Note: Wear protective gloves. When pressing components with a flat-head screwdriver, wrap it with protective tape to avoid damage and apply tape to adjacent components. Avoid scratching the instrument panel and adjacent...
Note: Wear protective gloves. When pressing components with a flat-head screwdriver, wrap it with protective tape to avoid damage and apply tape to adjacent components. Avoid scratching the instrument panel and adjacent...

Removal and installation the heater control panel
Note: Avoid scratching the instrument panel and adjacent components. The picture shows a left-hand drive model; the arrangement on the right-hand drive model is symmetrical. 1. Remove the center dashboard tray. 2....
Note: Avoid scratching the instrument panel and adjacent components. The picture shows a left-hand drive model; the arrangement on the right-hand drive model is symmetrical. 1. Remove the center dashboard tray. 2....

Removal and installation the lower cover of the central section of the instrument panel — models with automatic transmission
This area contains the Supplemental Restraint System (SRS) components. Review the SRS component locations, precautions, and procedures before performing repairs or maintenance. Note: Avoid scratching the instrument...
This area contains the Supplemental Restraint System (SRS) components. Review the SRS component locations, precautions, and procedures before performing repairs or maintenance. Note: Avoid scratching the instrument...
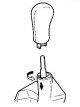
Removal/installing the lower cover of the central section of the instrument panel — models with manual transmission
This area contains the Supplemental Restraint System (SRS) components. Review the SRS component locations, precautions, and procedures before performing repairs or maintenance. Note: When pressing components with a...
This area contains the Supplemental Restraint System (SRS) components. Review the SRS component locations, precautions, and procedures before performing repairs or maintenance. Note: When pressing components with a...

Removal and installation the lower shield on the passenger side
Note: Avoid scratching the instrument panel and adjacent components. The picture shows a left-hand drive model; the arrangement on the right-hand drive model is symmetrical. 1. Remove the passenger side instrument panel...
Note: Avoid scratching the instrument panel and adjacent components. The picture shows a left-hand drive model; the arrangement on the right-hand drive model is symmetrical. 1. Remove the passenger side instrument panel...

Removal and installation the glove box
This area contains the Supplemental Restraint System (SRS) components. Review the SRS component locations, precautions, and procedures before performing repairs or maintenance. Note: Avoid scratching the instrument...
This area contains the Supplemental Restraint System (SRS) components. Review the SRS component locations, precautions, and procedures before performing repairs or maintenance. Note: Avoid scratching the instrument...

Removal and installation side vent grilles
1. To avoid damage, wrap the flat head of the screwdriver with protective tape and stick the tape on adjacent components. Carefully insert a flat-blade screwdriver near the clip (A) and separate the clips by prying up...
1. To avoid damage, wrap the flat head of the screwdriver with protective tape and stick the tape on adjacent components. Carefully insert a flat-blade screwdriver near the clip (A) and separate the clips by prying up...
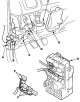
Removal and installation the instrument panel
This area contains the Supplemental Restraint System (SRS) components. Review the SRS component locations, precautions, and procedures before performing repairs or maintenance. Note: When pressing components with a...
This area contains the Supplemental Restraint System (SRS) components. Review the SRS component locations, precautions, and procedures before performing repairs or maintenance. Note: When pressing components with a...

Replacing the steering bracket beam
Note: It is a good idea to have a partner when removing and installing the steering bracket beam. Avoid scratching the dashboard. Wear protective gloves. The picture shows a left-hand drive model; the arrangement on the...
Note: It is a good idea to have a partner when removing and installing the steering bracket beam. Avoid scratching the dashboard. Wear protective gloves. The picture shows a left-hand drive model; the arrangement on the...
This section is available on: russian, bulgarian, belarusian, ukrainian, serbian, croatian, romanian, polish, slovak, hungarian
Link in different formats to this section
TEXTHTMLBB Code
- General information
- User manual
- Technical data
- Maintenance
- Power unit
- Engine repair
- Lubrication system
- Cooling system
- Exhaust system
- Fuel system
- Engine management
- Engine electrical equipment
- Transmission
- Clutch
- Manual gearbox
- Automatic gearbox
- Rear differential
- Drive shafts
- Chassis and running gear
- Steering
- Front suspension
- Rear suspension
- Brake system
- Body and interior
- Exterior (external elements)
- Interior (internal elements)
- Doors, locks and windows
- General information
- Maintenance
- Tips for car owner
- Power unit
- Engine repair
- Engine overhaul
- Cooling and lubrication system
- Engine electrical equipment
- Control system
- Fuel system
- Transmission
- Clutch and drive shafts
- Car gearbox
- Chassis and running gear
- Front suspension
- Rear suspension
- Steering
- Brake system
- Body and interior
- Body service
- Exterior (external elements)
- Interior (internal elements)
- Electrical equipment
- Equipment and devices
- Electrical circuits