


Gasoline car engines Honda CR-V 1

General notes on engine repair
This chapter covers engine overhaul operations, including cylinder head and cylinder block components. The chapter includes recommendations concerning the organization and preparation of engine overhaul work, the...
This chapter covers engine overhaul operations, including cylinder head and cylinder block components. The chapter includes recommendations concerning the organization and preparation of engine overhaul work, the...
Repair work possible without removing the engine from the vehicle
Many basic repairs can be performed without removing the engine from the vehicle. Before starting any work, it is highly advisable to flush the engine compartment and engine with a jet of water. It is easier to work...
Many basic repairs can be performed without removing the engine from the vehicle. Before starting any work, it is highly advisable to flush the engine compartment and engine with a jet of water. It is easier to work...
Engine Overhaul — General Notes
It is not always easy to come to a conclusion about the advisability of an engine overhaul, since it is necessary to rely on a number of indicators. High mileage is not a sufficient indicator of the need for major...
It is not always easy to come to a conclusion about the advisability of an engine overhaul, since it is necessary to rely on a number of indicators. High mileage is not a sufficient indicator of the need for major...
Engine Overhaul — Alternatives
When performing major repairs yourself, various options are possible. The decision to replace the cylinder block, connecting rod and piston group and crankshaft depends on a number of factors, the most important of...
When performing major repairs yourself, various options are possible. The decision to replace the cylinder block, connecting rod and piston group and crankshaft depends on a number of factors, the most important of...
Engine Dismantling — Methods and Safety Precautions
If a decision has been made to dismantle the engine for major repairs or repairs of the main components, then certain preparatory measures must be carried out. It is extremely important to mark the place where the work...
If a decision has been made to dismantle the engine for major repairs or repairs of the main components, then certain preparatory measures must be carried out. It is extremely important to mark the place where the work...
Engine Overhaul — Disassembly Sequence
1. It is easiest to disassemble the engine and perform all types of work on a portable stand. Before mounting the engine on the stand, it is necessary to remove the flywheel with the clutch mechanism. 2. If there is no...
1. It is easiest to disassemble the engine and perform all types of work on a portable stand. Before mounting the engine on the stand, it is necessary to remove the flywheel with the clutch mechanism. 2. If there is no...
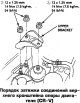
Engine Removal and Installation (CR-V Models)
On these models, the engine is removed from the vehicle along with the transmission. Removal 1. Mark the position of the hinges and remove the hood. 2. Remove the battery with the tray. 3. Remove the front lower engine...
On these models, the engine is removed from the vehicle along with the transmission. Removal 1. Mark the position of the hinges and remove the hood. 2. Remove the battery with the tray. 3. Remove the front lower engine...
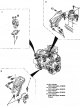
Engine Removal and Installation (4-Cylinder Odyssey)
On these cars, the engine and gearbox are lowered down and removed from under the car. When installing, replace all bolts and nuts of the powertrain suspension support supports/brackets. Removal 1. Mark the position of...
On these cars, the engine and gearbox are lowered down and removed from under the car. When installing, replace all bolts and nuts of the powertrain suspension support supports/brackets. Removal 1. Mark the position of...

Engine Removal and Installation (Odyssey V6 Models)
On these models, the engine is lowered and removed from under the car along with the transmission. To raise the engine high enough to remove the subframe, you will need a hydraulic lift or a strong hoist and equipment...
On these models, the engine is lowered and removed from under the car along with the transmission. To raise the engine high enough to remove the subframe, you will need a hydraulic lift or a strong hoist and equipment...

Cylinder Head Cover — Removal and Installation
CR-V and 4-cylinder Odyssey Removal 1. Mark and disconnect the high-voltage wires from the spark plugs. 2. Unscrew the bolts (starting with the bolts on the periphery of the cover and moving towards the center). 3....
CR-V and 4-cylinder Odyssey Removal 1. Mark and disconnect the high-voltage wires from the spark plugs. 2. Unscrew the bolts (starting with the bolts on the periphery of the cover and moving towards the center). 3....

Rocker Arms and Rocker Arm Shafts (CR-V Models)
Removal 1. Disconnect the battery from ground. 2. Remove the cylinder head cover. 3. Turn the crankshaft counterclockwise, align the marks on the crankshaft pulleys with the pointers, while the UP marks on the camshaft...
Removal 1. Disconnect the battery from ground. 2. Remove the cylinder head cover. 3. Turn the crankshaft counterclockwise, align the marks on the crankshaft pulleys with the pointers, while the UP marks on the camshaft...

Rocker Arms and Rocker Shafts (4-cylinder Odyssey)
Removal 1. Disconnect the battery from ground. 2. Remove the cylinder head cover and upper camshaft belt cover. 3. Set the piston of the 1st cylinder to TDC of the compression stroke, aligning the marks. Violation of...
Removal 1. Disconnect the battery from ground. 2. Remove the cylinder head cover and upper camshaft belt cover. 3. Set the piston of the 1st cylinder to TDC of the compression stroke, aligning the marks. Violation of...

Rocker Arms and Rocker Arm Shafts (Odyssey V6 Models)
Removal 1. Disconnect the battery from ground. 2. Set the piston of the 1st cylinder to TDC of the compression stroke, aligning the marks. Violation of the alignment of marks during disassembly is not permitted. 3....
Removal 1. Disconnect the battery from ground. 2. Set the piston of the 1st cylinder to TDC of the compression stroke, aligning the marks. Violation of the alignment of marks during disassembly is not permitted. 3....

Thermostat — removal and installation
Removal 1. Disconnect the battery from ground. 2. Drain the coolant. 3. Loosen the bolts and remove the thermostat. Installation 6. Install the thermostat so that the vent faces upward. Replace the gasket. 7. Open the...
Removal 1. Disconnect the battery from ground. 2. Drain the coolant. 3. Loosen the bolts and remove the thermostat. Installation 6. Install the thermostat so that the vent faces upward. Replace the gasket. 7. Open the...

Intake manifold (CR-V models)
Removal 1. Disconnect the battery from ground. 2. Drain the coolant. 3. Decompress the fuel system (Chapter 5). 4. Disconnect the cruise control cable. 5. Mark and disconnect all connectors from the throttle body and...
Removal 1. Disconnect the battery from ground. 2. Drain the coolant. 3. Decompress the fuel system (Chapter 5). 4. Disconnect the cruise control cable. 5. Mark and disconnect all connectors from the throttle body and...

Intake Manifold (4-cylinder Odyssey)
Removal 1. Disconnect the battery from ground. 2. Drain the coolant. 3. Disconnect the cooling hoses and wiring connectors from the manifold and throttle body. 4. Disconnect the throttle and cruise control cables from...
Removal 1. Disconnect the battery from ground. 2. Drain the coolant. 3. Disconnect the cooling hoses and wiring connectors from the manifold and throttle body. 4. Disconnect the throttle and cruise control cables from...

Intake Manifold (Odyssey V6 Models)
Removal 1. Disconnect the battery from ground. 2. Remove the air duct by disconnecting the hoses. 3. Remove the manifold and ignition coil covers. 4. Disconnect the throttle and cruise control cables from the throttle...
Removal 1. Disconnect the battery from ground. 2. Remove the air duct by disconnecting the hoses. 3. Remove the manifold and ignition coil covers. 4. Disconnect the throttle and cruise control cables from the throttle...

Exhaust manifold — removal and installation
1. Disconnect the battery from ground. 2. Unscrew the nuts and disconnect from the manifold (or both collectors) front exhaust pipe. On V6 engines, you must additionally unscrew the bolt and disconnect the pipe bracket....
1. Disconnect the battery from ground. 2. Unscrew the nuts and disconnect from the manifold (or both collectors) front exhaust pipe. On V6 engines, you must additionally unscrew the bolt and disconnect the pipe bracket....

Cylinder Head (CR-V Models)
When dismantling the cylinder head, follow the description of the procedures for removing various parts, components and assemblies set out in the relevant sections of this Chapter (for example, camshaft belt, belt...
When dismantling the cylinder head, follow the description of the procedures for removing various parts, components and assemblies set out in the relevant sections of this Chapter (for example, camshaft belt, belt...

Cylinder Head (4-cylinder Odyssey)
Removal 1. Disconnect the battery from ground. 2. Remove the cylinder head cover and upper camshaft belt cover. 3. Set the piston of the 1st cylinder to TDC of the compression stroke by turning the crankshaft until the...
Removal 1. Disconnect the battery from ground. 2. Remove the cylinder head cover and upper camshaft belt cover. 3. Set the piston of the 1st cylinder to TDC of the compression stroke by turning the crankshaft until the...

Cylinder Head (Odyssey V6 Models)
Removal 1. Disconnect the battery from ground. 2. Drain the coolant. 3. Disconnect the ventilation hoses from the throttle body. 4. Remove the air duct by disconnecting the hoses. 5. Remove the cover from the ignition...
Removal 1. Disconnect the battery from ground. 2. Drain the coolant. 3. Disconnect the ventilation hoses from the throttle body. 4. Remove the air duct by disconnecting the hoses. 5. Remove the cover from the ignition...

Oil pan — removal and installation
CR-V 1. Disconnect the battery from ground. 2. Raise the car. 3. Drain the oil from the engine. 4. Unscrew the nuts and bolts securing the pan diagonally and remove the pan. If necessary, trim the seal or move the tray...
CR-V 1. Disconnect the battery from ground. 2. Raise the car. 3. Drain the oil from the engine. 4. Unscrew the nuts and bolts securing the pan diagonally and remove the pan. If necessary, trim the seal or move the tray...

Crankshaft pulley — removal and installation
1. Disconnect the battery from ground. 2. Raise the vehicle and remove the lower engine shield. 3. Remove all accessory drive belts. 4. Set the piston of the 1st cylinder to TDC of the compression stroke (in this case,...
1. Disconnect the battery from ground. 2. Raise the vehicle and remove the lower engine shield. 3. Remove all accessory drive belts. 4. Set the piston of the 1st cylinder to TDC of the compression stroke (in this case,...
Timing Belt Covers — Removal and Installation
Top cover 1. Disconnect the battery from ground. 2. Remove the cylinder head cover, remove the upper belt cover. 3. Remove the seal from the groove in the lid. 4. When assembling, secure the seal in the groove,...
Top cover 1. Disconnect the battery from ground. 2. Remove the cylinder head cover, remove the upper belt cover. 3. Remove the seal from the groove in the lid. 4. When assembling, secure the seal in the groove,...
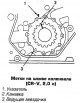
Timing Belt and Sprockets (CR-V Models)
If the belt breaks, serious damage may occur due to the valve heads colliding with the piston bottoms. It is recommended to change the belt after 168,000 km or once every 7 years. Removal 1. Disconnect the battery from...
If the belt breaks, serious damage may occur due to the valve heads colliding with the piston bottoms. It is recommended to change the belt after 168,000 km or once every 7 years. Removal 1. Disconnect the battery from...

Timing Belt and Sprockets (4-cylinder Odyssey)
Removal 1. Disconnect the battery from ground. 2. Remove the cylinder head cover. 3. Set the piston of the 1st cylinder to TDC of the compression stroke, aligning the marks. In this position, the white mark on the...
Removal 1. Disconnect the battery from ground. 2. Remove the cylinder head cover. 3. Set the piston of the 1st cylinder to TDC of the compression stroke, aligning the marks. In this position, the white mark on the...

Timing Belt and Sprockets (Odyssey V6 Models)
Removal 1. Disconnect the battery from ground. 2. Remove the cylinder head cover. 3. Turn the crankshaft so that the white mark on the crankshaft pulley aligns with the pointer on the oil pump cover. 4. Unscrew the...
Removal 1. Disconnect the battery from ground. 2. Remove the cylinder head cover. 3. Turn the crankshaft so that the white mark on the crankshaft pulley aligns with the pointer on the oil pump cover. 4. Unscrew the...

Camshaft — removal and installation
On the vehicles in question, the camshafts are installed in beds machined directly into the cylinder head. In case of wear or damage to the beds, the cylinder head is replaced. Gas distribution mechanism (4-cylinder...
On the vehicles in question, the camshafts are installed in beds machined directly into the cylinder head. In case of wear or damage to the beds, the cylinder head is replaced. Gas distribution mechanism (4-cylinder...

Camshaft — check
Check the condition of the bearing journals and cams. If inspection reveals wear on the journals and cams, replace the camshaft. If the journals are significantly worn, also replace the cylinder head. If the condition...
Check the condition of the bearing journals and cams. If inspection reveals wear on the journals and cams, replace the camshaft. If the journals are significantly worn, also replace the cylinder head. If the condition...

Balance Shaft (4-cylinder Odyssey models)
Balance shaft belt and tensioner (4-cylinder Odyssey): 1. Front balance shaft drive sprocket; 2. Rear balance shaft drive sprocket; 3. Balance shaft drive sprocket; 4. Align the groove on the front pulley with the...
Balance shaft belt and tensioner (4-cylinder Odyssey): 1. Front balance shaft drive sprocket; 2. Rear balance shaft drive sprocket; 3. Balance shaft drive sprocket; 4. Align the groove on the front pulley with the...

Rear oil seal — removal and installation
1. On CR-V and 4-cylinder Odyssey models, remove the transmission; on V6 Odyssey models, remove the powertrain and remove the transmission. 2. Remove the drive disc (on cars with automatic transmission), or flywheel (on...
1. On CR-V and 4-cylinder Odyssey models, remove the transmission; on V6 Odyssey models, remove the powertrain and remove the transmission. 2. Remove the drive disc (on cars with automatic transmission), or flywheel (on...

Flywheel/drive disc — removal and installation
1. Remove the transmission ( see Ch. 7 ). On Odyssey V6 models, the engine must be removed to remove the transmission. 2. Remove the clutch and release bearing (for cars with manual transmission). 3. Mark the position...
1. Remove the transmission ( see Ch. 7 ). On Odyssey V6 models, the engine must be removed to remove the transmission. 2. Remove the clutch and release bearing (for cars with manual transmission). 3. Mark the position...

Exhaust system — inspection and repair
Check the condition of the exhaust system, from the engine to the muffler. Perform the check on a cold engine, at least 1 hour after driving. To check, it is best to lift the car to ensure unobstructed access to all...
Check the condition of the exhaust system, from the engine to the muffler. Perform the check on a cold engine, at least 1 hour after driving. To check, it is best to lift the car to ensure unobstructed access to all...
This section is available on: russian, bulgarian, belarusian, ukrainian, serbian, croatian, romanian, polish, slovak, hungarian
Link in different formats to this section
TEXTHTMLBB Code
- General information
- User manual
- Technical data
- Maintenance
- Power unit
- Engine repair
- Lubrication system
- Cooling system
- Exhaust system
- Fuel system
- Engine management
- Engine electrical equipment
- Transmission
- Clutch
- Manual gearbox
- Automatic gearbox
- Rear differential
- Drive shafts
- Chassis and running gear
- Steering
- Front suspension
- Rear suspension
- Brake system
- Body and interior
- Exterior (external elements)
- Interior (internal elements)
- Doors, locks and windows
- General information
- Maintenance
- Tips for car owner
- Power unit
- Engine repair
- Engine overhaul
- Cooling and lubrication system
- Engine electrical equipment
- Control system
- Fuel system
- Transmission
- Clutch and drive shafts
- Car gearbox
- Chassis and running gear
- Front suspension
- Rear suspension
- Steering
- Brake system
- Body and interior
- Body service
- Exterior (external elements)
- Interior (internal elements)
- Electrical equipment
- Equipment and devices
- Electrical circuits