
Brake system of the car Honda CR-V 1

Vacuum Brake Booster — Leak Test
1. Start the engine and stop it after one minute, wait 1 minute after stopping. 2. Check for vacuum by pressing the pedal several times. The pedal travel should decrease with each press. Checking the system operation 1....
1. Start the engine and stop it after one minute, wait 1 minute after stopping. 2. Check for vacuum by pressing the pedal several times. The pedal travel should decrease with each press. Checking the system operation 1....

Brake light switch — removal and installation
Removal 1. Disconnect the wires from the switch. 2. Loosen the lock nut. 3. Unscrew the switch. Installation 4. Install and adjust the switch, turning it up to the pedal limiter (the switch stem should not be visible)....
Removal 1. Disconnect the wires from the switch. 2. Loosen the lock nut. 3. Unscrew the switch. Installation 4. Install and adjust the switch, turning it up to the pedal limiter (the switch stem should not be visible)....

Adjusting the brake pedal
The pedal height is adjusted by rotating the push rod (CR-V): 1. Piston lock nut; 2. Brake light switch lock nut; 3. Measurement point; 4. Brake pedal pad; 5. Pedal height; 6. Brake light switch The free travel of the...
The pedal height is adjusted by rotating the push rod (CR-V): 1. Piston lock nut; 2. Brake light switch lock nut; 3. Measurement point; 4. Brake pedal pad; 5. Pedal height; 6. Brake light switch The free travel of the...

Brake Master Cylinder — Removal and Installation
Brake Master Cylinder: 1. Central valve A; 2, 3. Channel; 4. Secondary chamber piston; 5. Central valve B; 6. Primary chamber piston Typical view of the master cylinder (CR-V): 1. Bushings; 2. Gasket. Check for wear and...
Brake Master Cylinder: 1. Central valve A; 2, 3. Channel; 4. Secondary chamber piston; 5. Central valve B; 6. Primary chamber piston Typical view of the master cylinder (CR-V): 1. Bushings; 2. Gasket. Check for wear and...

Vacuum booster — removal and installation
Removal 1. Disconnect the battery from ground. 2. Disconnect the wiring from the master cylinder. 3. Remove fluid from the master cylinder, disconnect the pipes. 4. Remove the master cylinder from the booster. 5....
Removal 1. Disconnect the battery from ground. 2. Disconnect the wiring from the master cylinder. 3. Remove fluid from the master cylinder, disconnect the pipes. 4. Remove the master cylinder from the booster. 5....
Metering valve (rear brake pressure regulator)
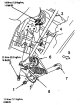
Attention! The metering valve provides pressure regulation in the rear brakes. After removing and installing the rear suspension part, it is necessary to check and adjust the length of the metering valve spring....
Attention! The metering valve provides pressure regulation in the rear brakes. After removing and installing the rear suspension part, it is necessary to check and adjust the length of the metering valve spring....

Brake Hydraulic Hoses and Lines — Removal and Installation
1. Disconnect the battery from ground. 2. Raise the car. 3. To access the hydraulic drive line, remove the wheels. 4. Clean the connection to be disassembled. 5. Remove the hydraulic hoses or tube by removing the clamps...
1. Disconnect the battery from ground. 2. Raise the car. 3. To access the hydraulic drive line, remove the wheels. 4. Clean the connection to be disassembled. 5. Remove the hydraulic hoses or tube by removing the clamps...

Bleeding the brake system
Attention! The fluid in the brake hydraulic drive should be changed after 72,000 km or every 3 years. When removing or replacing the modulator (valve block) ABS systems require air to be removed from each modulator...
Attention! The fluid in the brake hydraulic drive should be changed after 72,000 km or every 3 years. When removing or replacing the modulator (valve block) ABS systems require air to be removed from each modulator...

Front disc brake pads
Checking the brake pads should be combined with changing the engine oil. If you hear a grinding noise when braking, check the condition of the brake pads immediately. The brake pads and linings are changed only in pairs...
Checking the brake pads should be combined with changing the engine oil. If you hear a grinding noise when braking, check the condition of the brake pads immediately. The brake pads and linings are changed only in pairs...

Rear disc brake pads
These cars have disc rear brakes, with a drum for the parking brake in the central part of the disc. Rear disc brake pads: 1. Piston; 2. Lubricate both sides of the gaskets with Molykote M77 grease; 3. Inner lining B;...
These cars have disc rear brakes, with a drum for the parking brake in the central part of the disc. Rear disc brake pads: 1. Piston; 2. Lubricate both sides of the gaskets with Molykote M77 grease; 3. Inner lining B;...

Support — removal and installation
Brake caliper (CR-V): 1. Inner lining B; 2. Inner lining A; 3. Wear indicator; 4, 13. Bolts; 5. Bracket; 6. Staples; 7, 19. Cover; 8. Piston; 9. Piston seal; 10. Support; 11. Spring; 12. Pads; 14. Bleeding nipple; 15....
Brake caliper (CR-V): 1. Inner lining B; 2. Inner lining A; 3. Wear indicator; 4, 13. Bolts; 5. Bracket; 6. Staples; 7, 19. Cover; 8. Piston; 9. Piston seal; 10. Support; 11. Spring; 12. Pads; 14. Bleeding nipple; 15....

Brake disc — removal and installation
1. Remove some of the liquid from the tank. 2. Raise the car and remove the wheel. 3. Remove the caliper. Loosen the bolts and remove the caliper bracket. 4. Loosen the screws and remove the disc by pushing it off the...
1. Remove some of the liquid from the tank. 2. Raise the car and remove the wheel. 3. Remove the caliper. Loosen the bolts and remove the caliper bracket. 4. Loosen the screws and remove the disc by pushing it off the...
Drum brakes — removal and installation
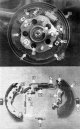
Rear drum brakes are standard on CR-V and Odyssey V6 models. Drum brake parts: 1. Brake shoe adjuster spring; 2. Lower spring; 3. Regulator lever; 4. Emphasis B; 5. Upper spring; 6. Manual brake pad drive lever; 7....
Rear drum brakes are standard on CR-V and Odyssey V6 models. Drum brake parts: 1. Brake shoe adjuster spring; 2. Lower spring; 3. Regulator lever; 4. Emphasis B; 5. Upper spring; 6. Manual brake pad drive lever; 7....

Drum brake shoes — removal and installation
Parking brake parts: 1. Split washer; 2. Spring washer; 3. Axis; 4. Lever Drum brake parts (the regulator is inserted inside the upper spring): 1. Regulator lever; 2. Upper spring; 3. Brake shoe drive lever; 4....
Parking brake parts: 1. Split washer; 2. Spring washer; 3. Axis; 4. Lever Drum brake parts (the regulator is inserted inside the upper spring): 1. Regulator lever; 2. Upper spring; 3. Brake shoe drive lever; 4....

Wheel cylinders of drum brakes — removal and installation
Examination The cylinder is replaced if a leak is detected under the dust seals. Removal and installation 1. Remove the brake drums and shoes. 2. Clamp the brake hose and disconnect the hose. If there is no special...
Examination The cylinder is replaced if a leak is detected under the dust seals. Removal and installation 1. Remove the brake drums and shoes. 2. Clamp the brake hose and disconnect the hose. If there is no special...

Parking brake parts
Typical design details of the parking brake of Honda vehicles (cR-V model): 1, 2. Cable; 3. Leveling bar; 4. Parking brake indicator lamp switch; 5. Lubricate the rubbing surface; 6. Lever (check the smoothness of the...
Typical design details of the parking brake of Honda vehicles (cR-V model): 1, 2. Cable; 3. Leveling bar; 4. Parking brake indicator lamp switch; 5. Lubricate the rubbing surface; 6. Lever (check the smoothness of the...

Parking brake cables — removal and installation
1. Raise the vehicle. 2. On CR-V and 4-cylinder Odyssey models, remove the screws and parking brake lever trim, disconnect the connector, disconnect the cable from the lever, and remove the lever. 3. On 6-cylinder...
1. Raise the vehicle. 2. On CR-V and 4-cylinder Odyssey models, remove the screws and parking brake lever trim, disconnect the connector, disconnect the cable from the lever, and remove the lever. 3. On 6-cylinder...

Parking brake — adjustment
Before adjusting the parking brake on CR-V and 6-cylinder Odyssey models, check the condition of the shoes and drums. Typical signs that the parking brake needs adjustment include an increase in pedal height (or an...
Before adjusting the parking brake on CR-V and 6-cylinder Odyssey models, check the condition of the shoes and drums. Typical signs that the parking brake needs adjustment include an increase in pedal height (or an...

Disc Brake Pads — Replacement (4-Cylinder Odyssey)
1. Release the parking brake lever. 2. Raise the rear of the vehicle and remove the rear wheels. 3. Remove the brake disc by unscrewing 2 bolts MB (if necessary, screw in 2 M8 bolts and, rotating them evenly, remove the...
1. Release the parking brake lever. 2. Raise the rear of the vehicle and remove the rear wheels. 3. Remove the brake disc by unscrewing 2 bolts MB (if necessary, screw in 2 M8 bolts and, rotating them evenly, remove the...
Anti-lock braking system (ABS) — general information
The ABS system is designed to improve the controllability and stability of the vehicle during sudden braking by monitoring the pressure in the hydraulic drive line of each wheel. When the system's devices are triggered...
The ABS system is designed to improve the controllability and stability of the vehicle during sudden braking by monitoring the pressure in the hydraulic drive line of each wheel. When the system's devices are triggered...

Valve block (pressure modulator) — removal and installation
The valve block provides pressure regulation in the brake circuit. The unit has a built-in solenoid valve, pump and receiver. Valve Block (CR-V): 1. Electric pump connector; 2. Valve block connector; 3. Brake pipe...
The valve block provides pressure regulation in the brake circuit. The unit has a built-in solenoid valve, pump and receiver. Valve Block (CR-V): 1. Electric pump connector; 2. Valve block connector; 3. Brake pipe...

ABS control unit — removal and installation
1. Disconnect the battery from ground. 2. On CR-V and 6-cylinder Odyssey models, remove the passenger side wheel well panel. 3. On 4-cylinder Odysseys, the control unit is mounted under the instrument panel on the...
1. Disconnect the battery from ground. 2. On CR-V and 6-cylinder Odyssey models, remove the passenger side wheel well panel. 3. On 4-cylinder Odysseys, the control unit is mounted under the instrument panel on the...

Speed sensor — replacement and testing
The speed sensor is contactless, inductive type, consists of a coil and a rotor (capstan). 1. Turn off the ignition and raise the vehicle. 2. Disconnect the connector from the sensor. It should be noted that the front...
The speed sensor is contactless, inductive type, consists of a coil and a rotor (capstan). 1. Turn off the ignition and raise the vehicle. 2. Disconnect the connector from the sensor. It should be noted that the front...

Technical data of brakes
Technical data of brakes (dimensions are given in inches, 1 inch = 25.4 mm) NA - no information F - front R - rear 1 - for parking brake drum (in rear disc brakes) 2 - thickness of new parking brake pads (in rear disc...
Technical data of brakes (dimensions are given in inches, 1 inch = 25.4 mm) NA - no information F - front R - rear 1 - for parking brake drum (in rear disc brakes) 2 - thickness of new parking brake pads (in rear disc...
Anti-lock braking system is a natural choice
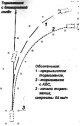
The purpose of ABS is simple to formulate - it prevents the wheels from locking during braking. Is the brake pedal pressed too hard? No problem - the electronics, comparing the signals from the speed sensors on each...
The purpose of ABS is simple to formulate - it prevents the wheels from locking during braking. Is the brake pedal pressed too hard? No problem - the electronics, comparing the signals from the speed sensors on each...
Brake system malfunctions
Are your brake pads wearing out too quickly? Are your brake discs beating? Don't be too quick to blame the brakes. Often, it is in seemingly extraneous phenomena that one should look for the true reasons for the failure...
Are your brake pads wearing out too quickly? Are your brake discs beating? Don't be too quick to blame the brakes. Often, it is in seemingly extraneous phenomena that one should look for the true reasons for the failure...
This section is available on: russian, bulgarian, belarusian, ukrainian, serbian, croatian, romanian, polish, slovak, hungarian
Link in different formats to this section
TEXTHTMLBB Code
- General information
- User manual
- Technical data
- Maintenance
- Power unit
- Engine repair
- Lubrication system
- Cooling system
- Exhaust system
- Fuel system
- Engine management
- Engine electrical equipment
- Transmission
- Clutch
- Manual gearbox
- Automatic gearbox
- Rear differential
- Drive shafts
- Chassis and running gear
- Steering
- Front suspension
- Rear suspension
- Brake system
- Body and interior
- Exterior (external elements)
- Interior (internal elements)
- Doors, locks and windows
- General information
- Maintenance
- Tips for car owner
- Power unit
- Engine repair
- Engine overhaul
- Cooling and lubrication system
- Engine electrical equipment
- Control system
- Fuel system
- Transmission
- Clutch and drive shafts
- Car gearbox
- Chassis and running gear
- Front suspension
- Rear suspension
- Steering
- Brake system
- Body and interior
- Body service
- Exterior (external elements)
- Interior (internal elements)
- Electrical equipment
- Equipment and devices
- Electrical circuits