
Fuel system of the car Honda CR-V 2
.

Fuel pressure relief
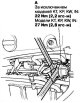
Before disconnecting fuel lines or hoses, relieve system pressure by loosening the fuel pulsation damper on top of the fuel rail. 1. Make sure you have the security code for your car radio. Also write down the...
Before disconnecting fuel lines or hoses, relieve system pressure by loosening the fuel pulsation damper on top of the fuel rail. 1. Make sure you have the security code for your car radio. Also write down the...
Checking fuel pressure
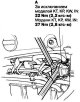
1. Make sure you have the security code for your car radio. Also write down the frequencies of the radio stations with fixed tuning. 2. Disconnect the cable from the negative battery terminal. 3. Remove the filler cap...
1. Make sure you have the security code for your car radio. Also write down the frequencies of the radio stations with fixed tuning. 2. Disconnect the cable from the negative battery terminal. 3. Remove the filler cap...

Checking fuel lines
Check fuel lines, hoses and fuel filter for damage, leaks or failure and replace if necessary. Models KG, KS, KE, KR Except for models KG, KS, KE, KR, KZ: Model KZ:
Check fuel lines, hoses and fuel filter for damage, leaks or failure and replace if necessary. Models KG, KS, KE, KR Except for models KG, KS, KE, KR, KZ: Model KZ:

Precautions when handling fuel pipes/quick couplings
The fuel pipes/quick connectors connect the fuel rail (A) to the fuel feed hose (B), the fuel feed hose (B) to the fuel pipe (C), the fuel pipe (D) to the fuel tank sender (E), and the fuel pipe (F) to the fuel filter...
The fuel pipes/quick connectors connect the fuel rail (A) to the fuel feed hose (B), the fuel feed hose (B) to the fuel pipe (C), the fuel pipe (D) to the fuel tank sender (E), and the fuel pipe (F) to the fuel filter...

Disconnecting fuel pipes and quick-release fittings
1. Relieve fuel pressure. 2. Check the quick-release fittings for contamination and clean if necessary. 3. While holding the coupling (A) in one hand, squeeze the locking tabs (B) with the other hand and release them...
1. Relieve fuel pressure. 2. Check the quick-release fittings for contamination and clean if necessary. 3. While holding the coupling (A) in one hand, squeeze the locking tabs (B) with the other hand and release them...

Connecting fuel pipes and quick-release fittings
1. Check the contact area (A) of the tube (B) for dirt and damage and clean if necessary. 2. Insert a new retainer (A) into the coupling (B) if the retainer is damaged or after: replacement of fuel distribution line;...
1. Check the contact area (A) of the tube (B) for dirt and damage and clean if necessary. 2. Insert a new retainer (A) into the coupling (B) if the retainer is damaged or after: replacement of fuel distribution line;...

Replacing the fuel pressure regulator
Except for KZ model: 1. Remove the fuel pump. 2. Remove the clamp (A). 3. Remove the fuel pressure regulator (B). 4. Install the regulator in the reverse order of removal, installing new O-rings (C). Model KZ 1. Remove...
Except for KZ model: 1. Remove the fuel pump. 2. Remove the clamp (A). 3. Remove the fuel pressure regulator (B). 4. Install the regulator in the reverse order of removal, installing new O-rings (C). Model KZ 1. Remove...
Replacing the fuel filter
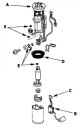
The fuel filter should be changed when the fuel pressure drops below the standard 330-380 kPa (3.4-3.9 kgf/cm²), model KZ: 320-370 kPa (3.3-3.8 kgf/cm²), making sure the fuel pump and fuel pressure regulator are in good...
The fuel filter should be changed when the fuel pressure drops below the standard 330-380 kPa (3.4-3.9 kgf/cm²), model KZ: 320-370 kPa (3.3-3.8 kgf/cm²), making sure the fuel pump and fuel pressure regulator are in good...
Replacing the fuel pump/fuel level gauge sensor
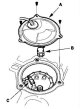
Except for KZ model: 1. Relieve fuel pressure. 2. Remove the fuel tank filler cap. 3. Fold the rear seats forward and roll up the carpet until the viewing panel is accessible. 4. Remove the inspection panel (A) in the...
Except for KZ model: 1. Relieve fuel pressure. 2. Remove the fuel tank filler cap. 3. Fold the rear seats forward and roll up the carpet until the viewing panel is accessible. 4. Remove the inspection panel (A) in the...
Replacing the fuel tank
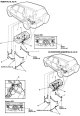
Except for the KZ model 1. Empty the fuel tank: Remove the fuel pump assembly. Drain the gasoline into a suitable container using a hand pump and hose. 2. Raise the vehicle with a jack and secure it to safety stands. 3....
Except for the KZ model 1. Empty the fuel tank: Remove the fuel pump assembly. Drain the gasoline into a suitable container using a hand pump and hose. 2. Raise the vehicle with a jack and secure it to safety stands. 3....
Testing the fuel gauge sensor
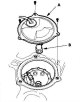
1. Before testing, check the METER fuse (7.5A) in the under-dash fuse/relay box. 2. Perform a check of the indicator excitation circuit. If the fuel gauge needle moves from the minimum scale division to the maximum and...
1. Before testing, check the METER fuse (7.5A) in the under-dash fuse/relay box. 2. Perform a check of the indicator excitation circuit. If the fuel gauge needle moves from the minimum scale division to the maximum and...

Testing the Low Fuel Warning Light
1. Test the fuel gauge sensor. If the system is OK, proceed to step. 2. If there are any problems with the system, fix them. 2. Turn the ignition switch to the OFF position. Remove fuse #9 BACK UP (10 A) from the...
1. Test the fuel gauge sensor. If the system is OK, proceed to step. 2. If there are any problems with the system, fix them. 2. Turn the ignition switch to the OFF position. Remove fuse #9 BACK UP (10 A) from the...


Troubleshooting the IMRC System
1. Start the engine and let it idle. 2. Disconnect the vacuum hose (A) from the intake manifold regulator (IMRC) actuator (B) and connect a vacuum pump/gauge (C) to the hose. Is there a vacuum? Yes Proceed to p. 10. No...
1. Start the engine and let it idle. 2. Disconnect the vacuum hose (A) from the intake manifold regulator (IMRC) actuator (B) and connect a vacuum pump/gauge (C) to the hose. Is there a vacuum? Yes Proceed to p. 10. No...
Testing the Throttle Body with a HONDA PGM Scanner or Tester
Note: Do not adjust the throttle stop screw. It is produced at the manufacturing plant. If the Malfunction Indicator Lamp (MIL) comes on, check for a Diagnostic Trouble Code (DTC). 1. Check the operation of the throttle...
Note: Do not adjust the throttle stop screw. It is produced at the manufacturing plant. If the Malfunction Indicator Lamp (MIL) comes on, check for a Diagnostic Trouble Code (DTC). 1. Check the operation of the throttle...

Testing the air supply bypass thermostat valve
1. Start the engine and let it idle. Note: Engine coolant temperature must be below 65°C. 2. Disconnect the vacuum hose (A) from the air intake and connect a vacuum pump/gauge (B) to the hose. 3. Increase and decrease...
1. Start the engine and let it idle. Note: Engine coolant temperature must be below 65°C. 2. Disconnect the vacuum hose (A) from the air intake and connect a vacuum pump/gauge (B) to the hose. 3. Increase and decrease...

Replacing the air cleaner
1. Remove the clamp (A), unscrew the nuts (B) and bolts (C). 2. Remove the air cleaner (D). 3. Installation is performed in the reverse order of removal.
1. Remove the clamp (A), unscrew the nuts (B) and bolts (C). 2. Remove the air cleaner (D). 3. Installation is performed in the reverse order of removal.

Replacing the air cleaner filter element
1. Disconnect the PCV hose (A). Open the air cleaner housing cover (B). 2. Remove the air cleaner (C) from the housing (D). 3. Installation is performed in the reverse order of removal.
1. Disconnect the PCV hose (A). Open the air cleaner housing cover (B). 2. Remove the air cleaner (C) from the housing (D). 3. Installation is performed in the reverse order of removal.

Adjusting the throttle cable
1. Remove the plug (A) from the throttle linkage cover. 2. Check the free play of the cable on the throttle linkage. The cable should deflect by 10-12 mm. 3. If it bends too much, remove the cover (A) from the throttle...
1. Remove the plug (A) from the throttle linkage cover. 2. Check the free play of the cable on the throttle linkage. The cable should deflect by 10-12 mm. 3. If it bends too much, remove the cover (A) from the throttle...

Removal/installing the throttle cable
1. Remove the cover (A) from the throttle linkage. 2. Open the throttle valve fully, then remove the throttle cable (A) from the rod (B). 3. Remove the cable cover (C) from the bracket (D). 4. Disconnect the throttle...
1. Remove the cover (A) from the throttle linkage. 2. Open the throttle valve fully, then remove the throttle cable (A) from the rod (B). 3. Remove the cable cover (C) from the bracket (D). 4. Disconnect the throttle...

Removal/installing the throttle body
Note Do not adjust the throttle stop screw. After assembly, adjust the throttle cable. The throttle position sensor is non-removable type.
Note Do not adjust the throttle stop screw. After assembly, adjust the throttle cable. The throttle position sensor is non-removable type.


IMRC Valve Replacement
1. Remove the intake manifold. 2. Disconnect the vacuum hose (A). 3. Unscrew the bolts (B). 4. Remove the IMRC actuator assembly (C). Note. When installing the IMRC actuator, check if necessary that the bearing (E) is...
1. Remove the intake manifold. 2. Disconnect the vacuum hose (A). 3. Unscrew the bolts (B). 4. Remove the IMRC actuator assembly (C). Note. When installing the IMRC actuator, check if necessary that the bearing (E) is...
Catalytic converter system
Checking Trouble Codes (DTC) Code DTCP0420 (67-1): Neutralizer efficiency below threshold Note: If any of the following DTCs are stored in memory at the same time as DTC P0420, check these DTCs first and then return to...
Checking Trouble Codes (DTC) Code DTCP0420 (67-1): Neutralizer efficiency below threshold Note: If any of the following DTCs are stored in memory at the same time as DTC P0420, check these DTCs first and then return to...

Checking the catalytic converter
If you suspect excessive exhaust backpressure, remove the TWC converter from the vehicle. Using a flashlight (A) and a cork (B) (models KG, KS, KE, KR, KU, KZ, FO, KQ) perform a visual inspection for blockages, melting...
If you suspect excessive exhaust backpressure, remove the TWC converter from the vehicle. Using a flashlight (A) and a cork (B) (models KG, KS, KE, KR, KU, KZ, FO, KQ) perform a visual inspection for blockages, melting...

Exhaust toxicity test
1. Connect the tachometer. 2. Start the engine. Maintain RPM at 3000 rpm (min⁻¹) without load (in Park or Neutral position), until the radiator fan comes on, then let it idle. 3. Check the idle speed. 4. Warm up and...
1. Connect the tachometer. 2. Start the engine. Maintain RPM at 3000 rpm (min⁻¹) without load (in Park or Neutral position), until the radiator fan comes on, then let it idle. 3. Check the idle speed. 4. Warm up and...

Positive Crankcase Ventilation (PCV) System
Checking and testing the PCV valve 1. Check the PCV valve (A), hoses (B) and fittings for leaks or blockages. 2. Check that at idle speed, when lightly pinching (A) the hose between the PCV valve and the intake manifold...
Checking and testing the PCV valve 1. Check the PCV valve (A), hoses (B) and fittings for leaks or blockages. 2. Check that at idle speed, when lightly pinching (A) the hose between the PCV valve and the intake manifold...


Testing the EVAP 2-Way Valve
1. Remove the fuel tank filler cap. 2. Disconnect the vapor bleed tube from the EVAP two-way valve (A) and connect it to the tee (B) from the vacuum gauge (C) and vacuum pump (D) as shown in the illustration. 3. Slowly...
1. Remove the fuel tank filler cap. 2. Disconnect the vapor bleed tube from the EVAP two-way valve (A) and connect it to the tee (B) from the vacuum gauge (C) and vacuum pump (D) as shown in the illustration. 3. Slowly...
Replacing the EVAP carbon filter
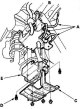
1. Disconnect the vacuum hoses (A) and drain hose (B). 2. Remove the cover (C). Except for KZ model: Model KZ: 3. Unscrew the bolt (D). 4. Remove the EVAP carbon canister (E). 5. Installation is carried out in the...
1. Disconnect the vacuum hoses (A) and drain hose (B). 2. Remove the cover (C). Except for KZ model: Model KZ: 3. Unscrew the bolt (D). 4. Remove the EVAP carbon canister (E). 5. Installation is carried out in the...
This section is available on: russian, bulgarian, belarusian, ukrainian, serbian, croatian, romanian, polish, slovak, hungarian
Link in different formats to this section
TEXTHTMLBB Code
- General information
- User manual
- Technical data
- Maintenance
- Power unit
- Engine repair
- Lubrication system
- Cooling system
- Exhaust system
- Fuel system
- Engine management
- Engine electrical equipment
- Transmission
- Clutch
- Manual gearbox
- Automatic gearbox
- Rear differential
- Drive shafts
- Chassis and running gear
- Steering
- Front suspension
- Rear suspension
- Brake system
- Body and interior
- Exterior (external elements)
- Interior (internal elements)
- Doors, locks and windows
- General information
- Maintenance
- Tips for car owner
- Power unit
- Engine repair
- Engine overhaul
- Cooling and lubrication system
- Engine electrical equipment
- Control system
- Fuel system
- Transmission
- Clutch and drive shafts
- Car gearbox
- Chassis and running gear
- Front suspension
- Rear suspension
- Steering
- Brake system
- Body and interior
- Body service
- Exterior (external elements)
- Interior (internal elements)
- Electrical equipment
- Equipment and devices
- Electrical circuits