
HondaBook.ru
Auto companies Volkswagen Auto companies Ford Auto companies Lada Auto companies Skoda Auto companies BMW Auto companies Mazda Auto companies Peugeot
English Русский
Български
Беларускі
Український
Српски
Hrvatski
Română
Polski
Slovenský
Magyar
Bookmark Contacts Sitemap   


Accord Civic Fit / Jazz CR-V HR-V Others Articles
CR-V 1 (1995-2001, petrol) CR-V 2 (2002-2006, petrol)

Replacement of the high brake light bracket/decorative channel of the electrical harness (Honda CR-V 2)

  • Main
  • Honda CR-V
  • 2 (2002-2006, petrol)
  • Body and interior
  • Doors, locks and windows
  • Replacement of the high brake light bracket/decorative channel of the electrical harness
0
Note:
  • Wear protective gloves.
  • To avoid damage, place the rear door glass in a safe place.
  • Do not damage the wires and contacts of the rear window heater.


1. Remove the rear door glass.

2. Cut off the glued sections of the high-mounted brake light brackets (A) and the decorative channel of the electrical harness (B) with a knife and remove them. Avoid scratching the rear door glass.
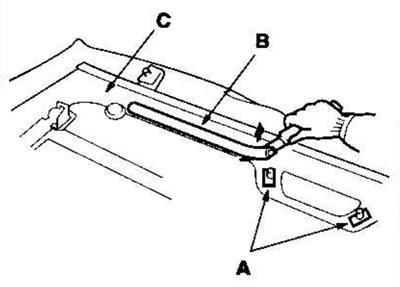
2. Cut off the glued sections of the high-mounted…


3. Use a putty knife to scrape off all traces of old glue and tape from the rear door glass. Clean the inside surface of the glass with isopropyl alcohol where the new bracket and channel will be glued. Make sure there is no water, oil or grease on the contact surface.

4. Apply primer (YOKOHAMA RUBBER MS-90 or equivalent) on the inner surface of the rear door glass (A):
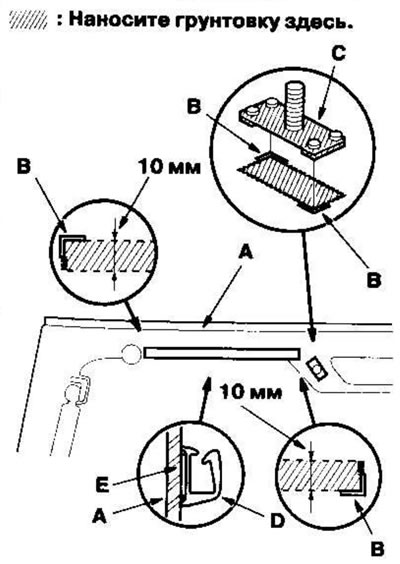
4. Apply primer (YOKOHAMA RUBBER MS-90 or…

  • Align the primer with the alignment marks (B).
  • Avoid touching the areas of the rear door glass where the primer will be applied.

5. Apply primer (SAKAI CHEMISTRY SL-8861 or equivalent) on the back side of the high brake light brackets (C).


6. Adhere the brackets to the rear door glass with urethane adhesive and adhere the channel (D) to the rear door glass with adhesive tape (E). Make sure the brackets and channel are aligned with the alignment marks.

7. Scrape off or wipe off excess glue with a spatula or napkin. Remove the adhesive from the rear door glass with a soft cloth soaked in alcohol.

8. Allow the glue to dry for at least 1 hour.

9. Install the rear door glass.

[The article was taken from the website «www.hondabook.ru»]
This article is available at: russian, bulgarian, belarusian, ukrainian, serbian, croatian, romanian, polish, slovak, hungarian
This information has been verified: Mikhail Kopasov
Share with friends:
◀ Previous
CR-V 2: Doors, locks and windows
Next ▶

Rear door glass adjustment
Replacing the rear window molding
Disassembly/assembly of rear door glass
Replacement of rear door glass/rear door glass support pillar
Replacing the glass of the small side window
Replacing the rear door glass seal
Table of signs of a faulty sunroof
Location of sunroof components
Adjusting the height of the sunroof glass
Replacing the sunroof glass
See also other articles from Honda manuals:
Brake light switch — removal and installation Honda Accord 3 (1985-1989)
Brake light switch — inspection, replacement and adjustment Honda Civic 3 and 4 (1983-1991)
Brake light diagrams Honda Fit 1 (2001-2008)
High Brake Light Replacement Honda HR-V 1 (1998-2006, petrol)
Parking brake Honda Avancier 1 (1999-2003, petrol)
Link in different formats to this article
Comments and feedback from visitors
No comments yet


How much will 28 + 12 ?


CR-V 2 (2002-2006, petrol) 
  • General information
  • User manual
  • Technical data
  • Maintenance
  • Power unit
  • Engine repair
  • Lubrication system
  • Cooling system
  • Exhaust system
  • Fuel system
  • Engine management
  • Engine electrical equipment
  • Transmission
  • Clutch
  • Manual gearbox
  • Automatic gearbox
  • Rear differential
  • Drive shafts
  • Chassis and running gear
  • Steering
  • Front suspension
  • Rear suspension
  • Brake system
  • Body and interior
  • Exterior (external elements)
  • Interior (internal elements)
  • Doors, locks and windows
CR-V 1 (1995-2001, petrol) 
  • General information
  • Maintenance
  • Tips for car owner
  • Power unit
  • Engine repair
  • Engine overhaul
  • Cooling and lubrication system
  • Engine electrical equipment
  • Control system
  • Fuel system
  • Transmission
  • Clutch and drive shafts
  • Car gearbox
  • Chassis and running gear
  • Front suspension
  • Rear suspension
  • Steering
  • Brake system
  • Body and interior
  • Body service
  • Exterior (external elements)
  • Interior (internal elements)
  • Electrical equipment
  • Equipment and devices
  • Electrical circuits
HondaBook.ru © 2018–2026 • Mobile version • Sitemap: EN BG BY UA RS HR RO PL SK HU • Feedback • Driver Information • Search system • Bookmark
Accord 3 (1985-1989) • Accord 6 (1997-2002) • Civic 3 and 4 (1983-1991) • Civic 5 and 6 (1991-2000) • Civic 6 (1995-2000) • Civic 7 (2000-2005) • Civic 8 (2005-2011) • Fit 1 (2001-2008) • CR-V 1 (1995-2001) • CR-V 2 (2002-2006) • HR-V 1 (1998-2006) • Avancier 1 (1999-2003) •
 
This website uses cookies to ensure proper functioning. By clicking "OK," you agree.