


Car clutch and drive shafts Honda CR-V 1

Half shafts — inspection, removal and installation
When operating the car in harsh conditions, the CV joint grease should be changed after 160,000 km. To do this, remove the covers, which should be replaced during assembly. It should be borne in mind that the outer CV...
When operating the car in harsh conditions, the CV joint grease should be changed after 160,000 km. To do this, remove the covers, which should be replaced during assembly. It should be borne in mind that the outer CV...

CV joints — removal and installation
To replace the grease in the joint, or to replace the joint itself, you must remove the axle shaft. On cars produced since 1998, the axle shaft is non-separable and if the CV joint fails, the axle shaft must be...
To replace the grease in the joint, or to replace the joint itself, you must remove the axle shaft. On cars produced since 1998, the axle shaft is non-separable and if the CV joint fails, the axle shaft must be...
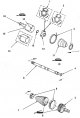
Disassembling the CV joint
Disassembling the CV joint, cleaning and replacing the grease is required when replacing the joint boot due to damage. During disassembly and assembly, all cover clamps are also changed. If the outer joint fails on...
Disassembling the CV joint, cleaning and replacing the grease is required when replacing the joint boot due to damage. During disassembly and assembly, all cover clamps are also changed. If the outer joint fails on...

CV joint assembly
9. Wrap the splines with tape, put the outer joint cover, support, inner joint cover together with small clamps on the axle shaft (the clamps must be loosened). 10. If the outer joint was removed from the axle shaft, do...
9. Wrap the splines with tape, put the outer joint cover, support, inner joint cover together with small clamps on the axle shaft (the clamps must be loosened). 10. If the outer joint was removed from the axle shaft, do...

Clutch — removal and installation
When disassembling and removing the gearbox, it is recommended to replace all clutch parts (including basket, friction disc, guide bearing and clutch release parts). If traces of severe damage are found on the flywheel,...
When disassembling and removing the gearbox, it is recommended to replace all clutch parts (including basket, friction disc, guide bearing and clutch release parts). If traces of severe damage are found on the flywheel,...

Free play of the clutch pedal
Clutch pedal - parts and adjustment data: 1. Locknut A; 2. Locking switch; 3. Cruise control switch (or limiter); 4. Lock nut A; 5. The pedal touches the switch; 6. Locknut C; 7. Pusher; 8. Master cylinder 1. Loosen the...
Clutch pedal - parts and adjustment data: 1. Locknut A; 2. Locking switch; 3. Cruise control switch (or limiter); 4. Lock nut A; 5. The pedal touches the switch; 6. Locknut C; 7. Pusher; 8. Master cylinder 1. Loosen the...

Clutch Master Cylinder — Removal and Installation
1. Remove fluid from the clutch reservoir. 2. Disconnect the tube and hose from the master cylinder. 3. Remove the necessary parts from the bottom of the instrument panel to access the cylinder pushrod, split the pin...
1. Remove fluid from the clutch reservoir. 2. Disconnect the tube and hose from the master cylinder. 3. Remove the necessary parts from the bottom of the instrument panel to access the cylinder pushrod, split the pin...

Slave cylinder — removal and installation
1. Disconnect the tube from the cylinder and drain the liquid. 2. Loosen the bolts and remove the cylinder from the clutch housing. 3. Installation is carried out in reverse order. Bleed the clutch hydraulic system.
1. Disconnect the tube from the cylinder and drain the liquid. 2. Loosen the bolts and remove the cylinder from the clutch housing. 3. Installation is carried out in reverse order. Bleed the clutch hydraulic system.
Bleeding the Clutch Hydraulic Drive
1. Remove the used liquid with a bulb and rinse the tank. 2. Attach the bleed hose to the cylinder nipple. 3. Fill the reservoir with fresh fluid and fill the reservoir halfway with fresh DOT 3 or DOT 4 brake fluid 4....
1. Remove the used liquid with a bulb and rinse the tank. 2. Attach the bleed hose to the cylinder nipple. 3. Fill the reservoir with fresh fluid and fill the reservoir halfway with fresh DOT 3 or DOT 4 brake fluid 4....
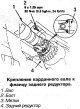
Cardan shaft — removal and installation
1. Mark the position of the propeller shaft on the flanges of the transfer case and rear gearbox. 2. Remove the shaft guard ring. 3. For safety, tie the shaft with wire. 4. Unscrew the bolts securing the propeller shaft...
1. Mark the position of the propeller shaft on the flanges of the transfer case and rear gearbox. 2. Remove the shaft guard ring. 3. For safety, tie the shaft with wire. 4. Unscrew the bolts securing the propeller shaft...
Rear axle shaft — removal and installation
1. Unlock the axle nut by bending the flange of the nut out of the axle groove. Loosen the nut. 2. Raise the vehicle and remove the rear wheel. 3. Remove the axle shafts from the rear differential (see below). 4. Remove...
1. Unlock the axle nut by bending the flange of the nut out of the axle groove. Loosen the nut. 2. Raise the vehicle and remove the rear wheel. 3. Remove the axle shafts from the rear differential (see below). 4. Remove...
Rear gearbox oil seal — replacement
1. Disconnect the propeller shaft. 2. Unlock and unscrew the gearbox flange nut, remove the flange and washers (note the original orientation of these parts). Replace the seal. Press the new seal into place using a...
1. Disconnect the propeller shaft. 2. Unlock and unscrew the gearbox flange nut, remove the flange and washers (note the original orientation of these parts). Replace the seal. Press the new seal into place using a...

Rear gearbox — removal and installation
1. Drain the fluid from the gearbox. 2. Disconnect the cardan shaft from the gearbox. 3. Install a jack trolley on the gearbox and remove the left and right brackets. 4. Disconnect the breather hose from the fitting on...
1. Drain the fluid from the gearbox. 2. Disconnect the cardan shaft from the gearbox. 3. Install a jack trolley on the gearbox and remove the left and right brackets. 4. Disconnect the breather hose from the fitting on...
Tightening torques for threaded connections
Tightening torques for threaded connections (Nm) Clutch CR-V Flywheel bolt 103 Casing bolt (leading disk) clutches 25 Clutch housing cover bolts M6x1 12 M8x1.25 x 24 M12x1.25 29 I Working cylinder mounting bolt 22...
Tightening torques for threaded connections (Nm) Clutch CR-V Flywheel bolt 103 Casing bolt (leading disk) clutches 25 Clutch housing cover bolts M6x1 12 M8x1.25 x 24 M12x1.25 29 I Working cylinder mounting bolt 22...
This section is available on: russian, bulgarian, belarusian, ukrainian, serbian, croatian, romanian, polish, slovak, hungarian
Link in different formats to this section
TEXTHTMLBB Code
- General information
- User manual
- Technical data
- Maintenance
- Power unit
- Engine repair
- Lubrication system
- Cooling system
- Exhaust system
- Fuel system
- Engine management
- Engine electrical equipment
- Transmission
- Clutch
- Manual gearbox
- Automatic gearbox
- Rear differential
- Drive shafts
- Chassis and running gear
- Steering
- Front suspension
- Rear suspension
- Brake system
- Body and interior
- Exterior (external elements)
- Interior (internal elements)
- Doors, locks and windows
- General information
- Maintenance
- Tips for car owner
- Power unit
- Engine repair
- Engine overhaul
- Cooling and lubrication system
- Engine electrical equipment
- Control system
- Fuel system
- Transmission
- Clutch and drive shafts
- Car gearbox
- Chassis and running gear
- Front suspension
- Rear suspension
- Steering
- Brake system
- Body and interior
- Body service
- Exterior (external elements)
- Interior (internal elements)
- Electrical equipment
- Equipment and devices
- Electrical circuits