
Front suspension of the car Honda CR-V 2
.


Wheel alignment angles
Suspension adjustments include: front wheel camber, front wheel toe-in, and rear wheel toe-in. However, all these adjustments are interconnected. For example, when adjusting the toe-in, the camber value changes....
Suspension adjustments include: front wheel camber, front wheel toe-in, and rear wheel toe-in. However, all these adjustments are interconnected. For example, when adjusting the toe-in, the camber value changes....

Checking the longitudinal tilt of the front wheel steering axis
1. Raise the car and place the steering angle measuring stands under the front wheels, and place boards of the same thickness as the stands under the rear wheels, then lower the car. Note: Make sure that the vehicle...
1. Raise the car and place the steering angle measuring stands under the front wheels, and place boards of the same thickness as the stands under the rear wheels, then lower the car. Note: Make sure that the vehicle...

Checking the front wheel alignment
1. Set the front wheels to the straight-ahead position. 2. Remove the wheel cover and install the wheel angle tester (A) and the camber angle meter for the front wheels and the longitudinal tilt angle of the steering...
1. Set the front wheels to the straight-ahead position. 2. Remove the wheel cover and install the wheel angle tester (A) and the camber angle meter for the front wheels and the longitudinal tilt angle of the steering...

Front wheel alignment adjustments
Front camber adjustment can be accomplished by replacing one or both shock absorber pinch bolts with smaller diameter adjusting bolts. The difference between the diameter of the adjusting bolt and the diameter of the...
Front camber adjustment can be accomplished by replacing one or both shock absorber pinch bolts with smaller diameter adjusting bolts. The difference between the diameter of the adjusting bolt and the diameter of the...

Checking/adjusting front wheel alignment
1. Center the steering wheel spokes. 2. Check the alignment. If it differs from the norm, proceed to p. 3. Front wheel alignment: 0±2 mm 3. Loosen the lock nut (A) to secure the tie rod end (B). 4. Rotate the tie rod...
1. Center the steering wheel spokes. 2. Check the alignment. If it differs from the norm, proceed to p. 3. Front wheel alignment: 0±2 mm 3. Loosen the lock nut (A) to secure the tie rod end (B). 4. Rotate the tie rod...

Checking the rotation angles
1. Raise the car and place the steering angle measuring stands under the front wheels, and place boards of the same thickness as the stands under the rear wheels, then lower the car. Note: Make sure that the vehicle...
1. Raise the car and place the steering angle measuring stands under the front wheels, and place boards of the same thickness as the stands under the rear wheels, then lower the car. Note: Make sure that the vehicle...

Checking the axial play of the bearing
1. Raise the vehicle and support it securely. Remove the wheels. 2. Install suitable flat washers (A) and wheel nuts and tighten the nuts to the specified torque until the brake disc is securely pressed against the hub....
1. Raise the vehicle and support it securely. Remove the wheels. 2. Install suitable flat washers (A) and wheel nuts and tighten the nuts to the specified torque until the brake disc is securely pressed against the hub....

Checking wheel runout
1. Raise the vehicle and support it securely. 2. Make sure the wheels are not bent or deformed. 3. Fix the indicator as shown in the figure and measure the axial runout by rotating the wheel. Axial runout of front and...
1. Raise the vehicle and support it securely. 2. Make sure the wheels are not bent or deformed. 3. Fix the indicator as shown in the figure and measure the axial runout by rotating the wheel. Axial runout of front and...

Removal ball joints
Warning. Always separate the ball joint using a puller. Avoid striking the housing or other parts of the ball joint. 1. Thread the hex nut (A) onto the ball joint thread (B). To avoid damaging the threaded ball joint...
Warning. Always separate the ball joint using a puller. Avoid striking the housing or other parts of the ball joint. 1. Thread the hex nut (A) onto the ball joint thread (B). To avoid damaging the threaded ball joint...

Disposal of shock absorbers
Warning: The shock absorbers contain nitrogen gas and oil under pressure. To avoid explosion and possible injury when scrapping, pressure must be released before disposal. Warning. To avoid metal shavings getting into...
Warning: The shock absorbers contain nitrogen gas and oil under pressure. To avoid explosion and possible injury when scrapping, pressure must be released before disposal. Warning. To avoid metal shavings getting into...

Replacing steering knuckle/hub/wheel bearing
Replacing the steering knuckle/hub 1. Raise the front of the vehicle and support it securely. 2. Remove the wheel cap, unscrew the wheel nuts and remove the front wheel. 3. Remove the mounting bolt (A) from the brake...
Replacing the steering knuckle/hub 1. Raise the front of the vehicle and support it securely. 2. Remove the wheel cap, unscrew the wheel nuts and remove the front wheel. 3. Remove the mounting bolt (A) from the brake...

Replacing a wheel bearing
1. Press the hub (A) out of the steering knuckle (B) using a special tool and a hydraulic press. Secure the steering knuckle using a hydraulic press (C) or equivalent special tool. Do not deform the mudguard. Hold the...
1. Press the hub (A) out of the steering knuckle (B) using a special tool and a hydraulic press. Secure the steering knuckle using a hydraulic press (C) or equivalent special tool. Do not deform the mudguard. Hold the...

Replacing the ball joint boot
1. Remove the cover. Check if there is a gap (A) between the ball joint and the steering knuckle. If there is a gap, replace the steering knuckle assembly. Do not press the ball joint back into the steering knuckle. 2....
1. Remove the cover. Check if there is a gap (A) between the ball joint and the steering knuckle. If there is a gap, replace the steering knuckle assembly. Do not press the ball joint back into the steering knuckle. 2....

Replacing the stabilizer rod
1. Raise the front of the vehicle and support it securely. Remove the front wheels. 2. Loosen the self-locking nut (A) and flange nut (B) while holding the corresponding ball joint pin (C) with an Allen key (D), and...
1. Raise the front of the vehicle and support it securely. Remove the front wheels. 2. Loosen the self-locking nut (A) and flange nut (B) while holding the corresponding ball joint pin (C) with an Allen key (D), and...

Replacing the stabilizer bar
1. Raise the front of the vehicle and support it securely. Remove the front wheels. 2. Separate the stabilizer links from the stabilizer bar on the right and left. 3. Remove the flange bolts (A) and bushing holders (B),...
1. Raise the front of the vehicle and support it securely. Remove the front wheels. 2. Separate the stabilizer links from the stabilizer bar on the right and left. 3. Remove the flange bolts (A) and bushing holders (B),...

Replacing lower suspension arms
1. Raise the front of the vehicle and support it securely. Remove the front wheels. 2. Loosen the flange nut (A) while holding the hinge pin (B) with the Allen key (C) and separate the stabilizer link (D) from the lower...
1. Raise the front of the vehicle and support it securely. Remove the front wheels. 2. Loosen the flange nut (A) while holding the hinge pin (B) with the Allen key (C) and separate the stabilizer link (D) from the lower...
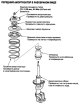
Shock Absorber/Spring Replacement — Removal
1. Raise the front of the vehicle and support it securely. Remove the front wheels. 2. Remove the cotter pin (A) from the ball joint of the tie rod end and unscrew the nut (B). 3. Separate the tie rod end from the...
1. Raise the front of the vehicle and support it securely. Remove the front wheels. 2. Remove the cotter pin (A) from the ball joint of the tie rod end and unscrew the nut (B). 3. Separate the tie rod end from the...
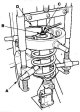
Shock absorber/spring replacement — disassembly/inspection
1. Compress the shock absorber spring with a strut spring compressor (A) according to the manufacturer's instructions, then loosen the self-locking nut (B) while securing the shock absorber rod (C) with a hex key (D)....
1. Compress the shock absorber spring with a strut spring compressor (A) according to the manufacturer's instructions, then loosen the self-locking nut (B) while securing the shock absorber rod (C) with a hex key (D)....

Shock Absorber/Spring Replacement — Assembly
Note: When assembling, please refer to the exploded view image. 1. Install the upper spring rubber seat (A) onto the upper spring seat (B), aligning the tab (C) on the seat with the notch (D) in the seat. 2. Insert the...
Note: When assembling, please refer to the exploded view image. 1. Install the upper spring rubber seat (A) onto the upper spring seat (B), aligning the tab (C) on the seat with the notch (D) in the seat. 2. Insert the...
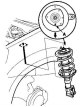
Shock Absorber/Spring Replacement — Installation
1. Lower the lower arm and secure the shock absorber assembly to the body. Turn the shock absorber base with the "L" mark (A) towards the outside of the vehicle. 2. Fit the flange nuts (B) onto the top of the shock...
1. Lower the lower arm and secure the shock absorber assembly to the body. Turn the shock absorber base with the "L" mark (A) towards the outside of the vehicle. 2. Fit the flange nuts (B) onto the top of the shock...
This section is available on: russian, bulgarian, belarusian, ukrainian, serbian, croatian, romanian, polish, slovak, hungarian
Link in different formats to this section
TEXTHTMLBB Code
- General information
- User manual
- Technical data
- Maintenance
- Power unit
- Engine repair
- Lubrication system
- Cooling system
- Exhaust system
- Fuel system
- Engine management
- Engine electrical equipment
- Transmission
- Clutch
- Manual gearbox
- Automatic gearbox
- Rear differential
- Drive shafts
- Chassis and running gear
- Steering
- Front suspension
- Rear suspension
- Brake system
- Body and interior
- Exterior (external elements)
- Interior (internal elements)
- Doors, locks and windows
- General information
- Maintenance
- Tips for car owner
- Power unit
- Engine repair
- Engine overhaul
- Cooling and lubrication system
- Engine electrical equipment
- Control system
- Fuel system
- Transmission
- Clutch and drive shafts
- Car gearbox
- Chassis and running gear
- Front suspension
- Rear suspension
- Steering
- Brake system
- Body and interior
- Body service
- Exterior (external elements)
- Interior (internal elements)
- Electrical equipment
- Equipment and devices
- Electrical circuits