


Doors, locks and windows of the car Honda Fit/Jazz 1

Front door — adjustment
1. Adjust the position of the front door if necessary. a) To adjust the vertical and horizontal position of the door, loosen the bolts (C and D) securing the door hinge as shown in the figure. Note: Place a jack (A)...
1. Adjust the position of the front door if necessary. a) To adjust the vertical and horizontal position of the door, loosen the bolts (C and D) securing the door hinge as shown in the figure. Note: Place a jack (A)...

Front door — disassembly and assembly
Disassembly and assembly of the front door. 1 - door glass trim panel, 2 - door molding, 3 - door hinge, 4 - door opening limiter, 5 - front door, 6 - speaker, 7 - door seal, 8 - technological hole cover, 9 - lower door...
Disassembly and assembly of the front door. 1 - door glass trim panel, 2 - door molding, 3 - door hinge, 4 - door opening limiter, 5 - front door, 6 - speaker, 7 - door seal, 8 - technological hole cover, 9 - lower door...

Rear side door — adjustment
1. Adjust the position of the rear side door if necessary. a) To adjust the vertical and horizontal position of the door, loosen the bolts (C and D) securing the door hinge as shown in the figure. Note: Place a jack (A)...
1. Adjust the position of the rear side door if necessary. a) To adjust the vertical and horizontal position of the door, loosen the bolts (C and D) securing the door hinge as shown in the figure. Note: Place a jack (A)...

Rear side door — disassembly and assembly
Note: Assembly is carried out in the reverse order of disassembly, taking into account the following: (Right hand drive models without electric windows) Install the window control handle as shown in the figure. Door...
Note: Assembly is carried out in the reverse order of disassembly, taking into account the following: (Right hand drive models without electric windows) Install the window control handle as shown in the figure. Door...

Rear door — adjustment
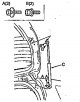
1. Adjust the position of the rear door if necessary. a) To adjust the vertical and horizontal position of the door (C), loosen the bolts (B) securing the door hinge (D) as shown in the illustration "Adjusting the rear...
1. Adjust the position of the rear door if necessary. a) To adjust the vertical and horizontal position of the door (C), loosen the bolts (B) securing the door hinge (D) as shown in the illustration "Adjusting the rear...
Rear door — disassembly and assembly
Note: Assembly is carried out in the reverse order of disassembly. Rear door pillars 1. Loosen the bolts (A) and disconnect the pillar (C) from the body. 2. Remove the bolts (B) and detach the pillar from the rear door....
Note: Assembly is carried out in the reverse order of disassembly. Rear door pillars 1. Loosen the bolts (A) and disconnect the pillar (C) from the body. 2. Remove the bolts (B) and detach the pillar from the rear door....

Fuel filler flap — adjustment
Adjust the position of the hatch if necessary. a) To adjust, loosen the fuel filler cap mounting screws. b) Tighten the screws after adjustment.
Adjust the position of the hatch if necessary. a) To adjust, loosen the fuel filler cap mounting screws. b) Tighten the screws after adjustment.

Fuel filler flap — removal and installation
Note: Installation is carried out in the reverse order of removal (left-hand drive models). 1. Disconnect the retainer (A) and remove the plug (B) by turning it counterclockwise. 2. Loosen the screw (C). 3. Remove the...
Note: Installation is carried out in the reverse order of removal (left-hand drive models). 1. Disconnect the retainer (A) and remove the plug (B) by turning it counterclockwise. 2. Loosen the screw (C). 3. Remove the...

Fuel filler flap — disassembly and assembly (left-hand drive models)
Note: Assembly is carried out in the reverse order of disassembly, taking into account the following: Align the alignment mark (C) on the door (A) with the mark (E) on the hinge (B) of the access door by turning the...
Note: Assembly is carried out in the reverse order of disassembly, taking into account the following: Align the alignment mark (C) on the door (A) with the mark (E) on the hinge (B) of the access door by turning the...

Windshield — Removal
1. Remove the interior rearview mirror (see section " Side and interior rear view mirror "). 2. Remove the wiper arms and blades (see chapter " Body electrical equipment "). 3. Remove the hood ventilation grille (see...
1. Remove the interior rearview mirror (see section " Side and interior rear view mirror "). 2. Remove the wiper arms and blades (see chapter " Body electrical equipment "). 3. Remove the hood ventilation grille (see...

Windshield — installation
Caution: To avoid damaging your hands with sharp edges, wear gloves when working. 1. Clean the contact surface of the body from glue, leaving 1-2 mm of glue on the surface. Note: If all the glue was removed during...
Caution: To avoid damaging your hands with sharp edges, wear gloves when working. 1. Clean the contact surface of the body from glue, leaving 1-2 mm of glue on the surface. Note: If all the glue was removed during...

Front glass — removal
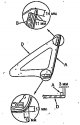
Front glass. 1 - upper piston, 2 - piston, 3 - glass seal, 4 - lower piston, 5 - front glass, 6 - glass finishing. 1. Remove the front pillar trim (see section " Interior trim "). 2. Using a knife (A), cut off the layer...
Front glass. 1 - upper piston, 2 - piston, 3 - glass seal, 4 - lower piston, 5 - front glass, 6 - glass finishing. 1. Remove the front pillar trim (see section " Interior trim "). 2. Using a knife (A), cut off the layer...
Front glass — installation
Caution: To avoid damaging your hands on sharp edges, wear gloves. 1. Clean the contact surface of the body from glue, leaving 1-2 mm of glue on the surface. Note: If all the glue was removed during cutting, clean the...
Caution: To avoid damaging your hands on sharp edges, wear gloves. 1. Clean the contact surface of the body from glue, leaving 1-2 mm of glue on the surface. Note: If all the glue was removed during cutting, clean the...

Rear Door Glass — Removal
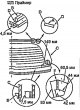
Rear door glass. 1 - upper glass seal, 2 - upper stopper, 3 - lower stopper, 4 - rear door glass, 5 - lower glass seal. 1. Remove the rear door interior trim (see section " Back door "). 2. (Some models are left-hand...
Rear door glass. 1 - upper glass seal, 2 - upper stopper, 3 - lower stopper, 4 - rear door glass, 5 - lower glass seal. 1. Remove the rear door interior trim (see section " Back door "). 2. (Some models are left-hand...
Rear Door Glass — Installation
Caution: To avoid damaging your hands on sharp edges, wear gloves. 1. Clean the contact surface of the body from glue, leaving 1-2 mm of glue on the surface. Note: If all the glue was removed during cutting, clean the...
Caution: To avoid damaging your hands on sharp edges, wear gloves. 1. Clean the contact surface of the body from glue, leaving 1-2 mm of glue on the surface. Note: If all the glue was removed during cutting, clean the...

Rear side glass — removal
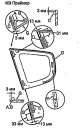
Rear side glass. 1 - upper front glass seal, 2 - upper piston, 3 - front seal, 4 - rear side glass, 5 - lower piston, 6 - rear piston, 7 - rear glass seal. 1. Remove the rear pillar trim (see section " Interior trim ")....
Rear side glass. 1 - upper front glass seal, 2 - upper piston, 3 - front seal, 4 - rear side glass, 5 - lower piston, 6 - rear piston, 7 - rear glass seal. 1. Remove the rear pillar trim (see section " Interior trim ")....
Rear side glass — installation
Caution: To avoid damaging your hands on sharp edges, wear gloves. 1. Clean the contact surface of the body from glue, leaving 1-2 mm of glue on the surface. Note: If all the glue was removed during cutting, clean the...
Caution: To avoid damaging your hands on sharp edges, wear gloves. 1. Clean the contact surface of the body from glue, leaving 1-2 mm of glue on the surface. Note: If all the glue was removed during cutting, clean the...

Hatch — adjustment
1. Close the hatch completely. 2. Measure the gap between the glass (A), the sunroof and the body (B) and compare the obtained values with those given below. a — 1.0-2.5 mm 3. Adjust the position of the hatch if...
1. Close the hatch completely. 2. Measure the gap between the glass (A), the sunroof and the body (B) and compare the obtained values with those given below. a — 1.0-2.5 mm 3. Adjust the position of the hatch if...

Hatch — disassembly and assembly
1. When disassembling the hatch, follow the assembly drawing "Disassembling and assembling the hatch". 2. Assembly is carried out in the reverse order of disassembly. Disassembling and assembling the hatch. 1 - sunroof...
1. When disassembling the hatch, follow the assembly drawing "Disassembling and assembling the hatch". 2. Assembly is carried out in the reverse order of disassembly. Disassembling and assembling the hatch. 1 - sunroof...

Removal and installation the rear drain gutter
1. Remove the sunroof glass. 2. Loosen the screws (C) and detach the drain channel (B) from the glass brackets (A). 3. Disconnect the clamps (B) of the drain gutter (A). 4. Remove the drain channel (A) as shown in the...
1. Remove the sunroof glass. 2. Loosen the screws (C) and detach the drain channel (B) from the glass brackets (A). 3. Disconnect the clamps (B) of the drain gutter (A). 4. Remove the drain channel (A) as shown in the...
Removal and installation the sunroof drive cable
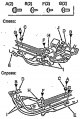
1. Remove the subframe, curtain and sunroof electric drive. 2. Loosen the screws (A and B), detach the stoppers (C) and brackets (D) from the sunroof subframe (E). 3. Loosen the screws (F and G) securing the sunroof...
1. Remove the subframe, curtain and sunroof electric drive. 2. Loosen the screws (A and B), detach the stoppers (C) and brackets (D) from the sunroof subframe (E). 3. Loosen the screws (F and G) securing the sunroof...

Removal and installation the sunroof subframe and drain hoses
1. Remove the roof trim (see section " Roof finishing "). 2. Remove the sunroof glass. 3. Disconnect the connectors (A, B, C and D), front (E) and rear (F) drain hoses and relay (G) (see figure " Removal the sunroof...
1. Remove the roof trim (see section " Roof finishing "). 2. Remove the sunroof glass. 3. Disconnect the connectors (A, B, C and D), front (E) and rear (F) drain hoses and relay (G) (see figure " Removal the sunroof...

Removal and installation sunroof glass
1. Close the sunroof glass completely. 2. Open the sunroof curtains. 3. Disconnect the clamps, unscrew the screw (A), then remove the decorative covers (B). 4. Unscrew the nuts (D) of the glass bracket (C) and remove...
1. Close the sunroof glass completely. 2. Open the sunroof curtains. 3. Disconnect the clamps, unscrew the screw (A), then remove the decorative covers (B). 4. Unscrew the nuts (D) of the glass bracket (C) and remove...

Removal and installation the sunroof electric drive
1. Remove the roof trim (see section " Roof finishing "). 2. Disconnect the connector (A) from the sunroof subframe. Note: When removing and installing the sunroof electric drive, you may injure your hands, wear gloves....
1. Remove the roof trim (see section " Roof finishing "). 2. Disconnect the connector (A) from the sunroof subframe. Note: When removing and installing the sunroof electric drive, you may injure your hands, wear gloves....

Removal and installation the sunroof curtain
1. Remove the sunroof glass and drain gutter. 2. Loosen the screws (C) and disconnect the bushings (A) from the sunroof curtain (B). 3. Slide the curtain (A) forward to the end of the guides. 4. Loosen the screws (C)...
1. Remove the sunroof glass and drain gutter. 2. Loosen the screws (C) and disconnect the bushings (A) from the sunroof curtain (B). 3. Slide the curtain (A) forward to the end of the guides. 4. Loosen the screws (C)...
Removal and installation the sunroof deflector
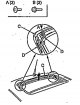
1. Open the sunroof glass completely. 2. Loosen the screws (A and B), disconnect the clamp (D) and remove the sunroof deflector (C). Tightening torque - 4 Nm 3. Installation is carried out in the reverse order of...
1. Open the sunroof glass completely. 2. Loosen the screws (A and B), disconnect the clamp (D) and remove the sunroof deflector (C). Tightening torque - 4 Nm 3. Installation is carried out in the reverse order of...
This section is available on: russian, bulgarian, belarusian, ukrainian, serbian, croatian, romanian, polish, slovak, hungarian
Link in different formats to this section
TEXTHTMLBB Code
- General information
- User manual
- Maintenance
- Power unit
- Engine repair
- Cooling and lubrication system
- Injection and power system
- Control system
- Engine electrical equipment
- Transmission
- Clutch
- Mechanical gearbox
- Automatic gearbox
- Variator (CVT)
- Drive shafts and gearbox
- Chassis and running gear
- Car suspension
- Steering
- Brake system
- Body and interior
- Exterior (external elements)
- Interior (internal elements)
- Doors, locks and windows
- Heater and air conditioner
- Safety system
- Electrical equipment
- Equipment and devices
- Wiring diagrams (since 06.2001)
- Wiring diagrams (since 06.2004)