
Note:
- Wear protective gloves.
- To avoid damaging the seats, use covers.
- Use glass bonding kit, P/N 08C73-X0230N.
1. Remove the following components:
- Finishing of the small side window pillar.
- Finishing of the rear pillar.
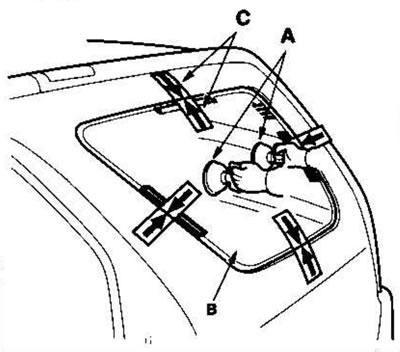
2. Cut off the glue (B) from the inside of the car along the entire perimeter using a knife (A):
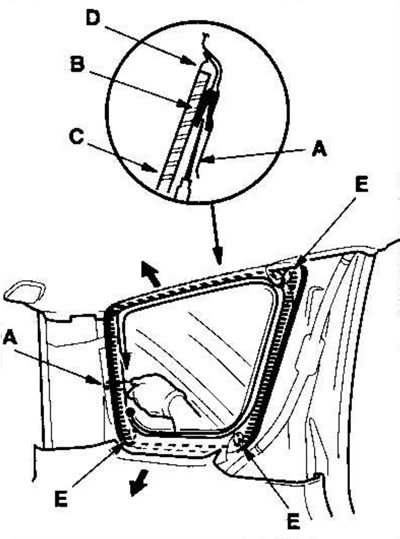
- When reinstalling the old small side window glass (C), be careful not to damage the molding (D).
- If the molding is damaged, replace the small side window glass, molding and clips (E) as an assembly.
- If any of the clips are broken, the small side window glass can be reinstalled using butyl tape (see item 7).
- Apply protective tape along the edge around the perimeter of the small side window glass opening.
3. Carefully remove the small side window glass and check if the molding is damaged. Replace the small side window glass if necessary.
4. Using a knife, evenly scrape off the old glue, leaving about 2 mm on the contact surface around the entire perimeter of the small side window glass opening:
- Do not scrape off the adhesive down to the paintwork of the car body; damaged coating will prevent quality adhesion.
- Remove the clamps and fasteners from the body.
5. Clean the contact surface on the body using a sponge soaked in alcohol. After cleaning, do not allow oil, grease or water to come into contact with the clean surface.
6. If you are reinstalling the old glass of a small side window, use a spatula to scrape off all traces of old glue, broken clips and fasteners from the glass. Clean the inside surface and edge of the glass with alcohol where the new adhesive will be applied. Make sure there is no water, oil or grease on the contact surface.
7. If the old glass of the small side window is reinstalled (and any of the clamps broke off from the molding), apply a thin coat of primer (C-100 or equivalent), then glue the butyl tape (A) to the molding (B) as shown in the picture. Glue the fastener (C) to the inside of the glass of the small side window (D):
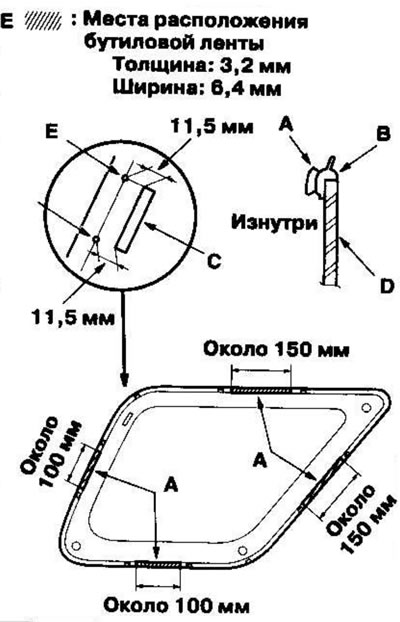
- Make sure the fastener is aligned with the alignment marks (E).
- Avoid touching the areas on the small side window glass where the adhesive will be applied.
- Do not unwind the separator from the butyl tape.
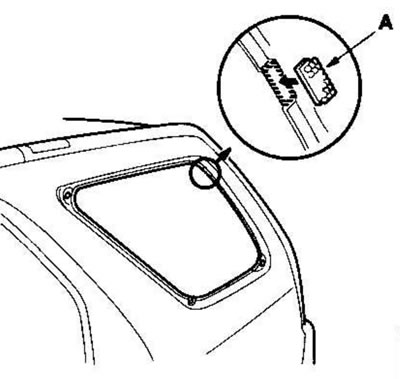
8. If installing a new small side window glass, glue the fastener (A) to the body. Make sure that the fastener is aligned with the contour of the body.
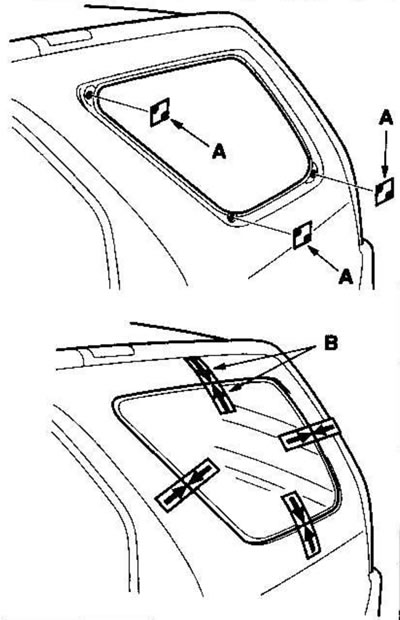
9. If the old glass of the small side window is reinstalled (and any of the clamps broke off from the molding), seal the holes in the body with pieces of urethane tape (A). Then insert the small side window glass vertically into the opening and make alignment marks (B) on the glass and body with a felt-tip pen at the three indicated points. Avoid touching the areas on the small side window glass where the adhesive will be applied.
10. Remove the small side window glass.
11. Using a sponge, apply a thin layer of glass primer to the inside surface of the small side window glass (A) as shown in the figure, then wipe it lightly with gauze:
- Do not apply body primer to the small side window glass and do not mix up the body primer and glass primer sponges.
- Do not touch the primed surfaces with your hands, otherwise the adhesive may not adhere to the small side window glass properly and water will leak through the small side window glass after it is installed.
- Avoid contact with water, dust and abrasive materials on the primed surface.
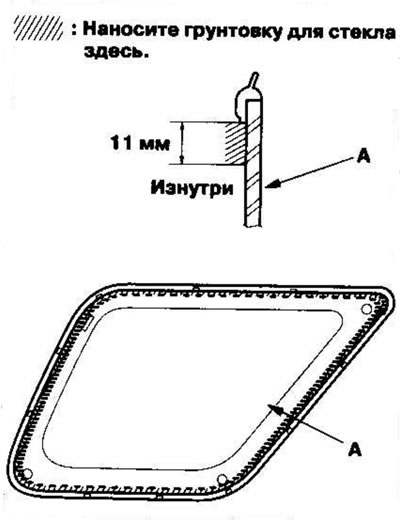
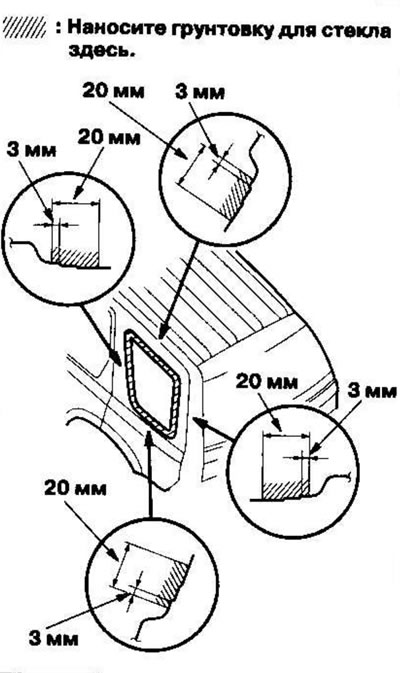
12. Using a sponge, apply a thin layer of body primer to the old glue remaining around the perimeter of the small side window glass opening. Allow the body primer to dry for at least 10 minutes:
- Do not apply glass primer to the body and do not mix up the sponges used to apply glass primer and body primer.
- Do not touch primed surfaces with your hands.
- Cover the interior trim before painting the opening.
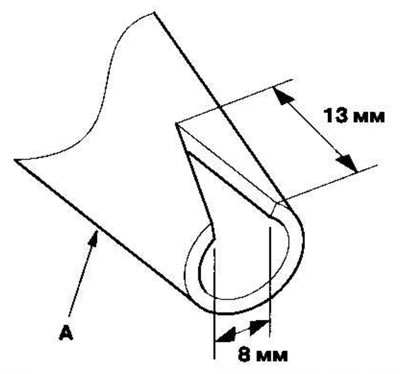
13. Before filling the tube, make a V-shaped cut on the end of the nozzle (A) as shown in the figure.
14. Fill the tube with glue without air pockets to ensure continuous application. Insert the tube into the syringe and apply a bead of adhesive (A) around the perimeter of the edge of the small side window glass (B) as shown in the figure.
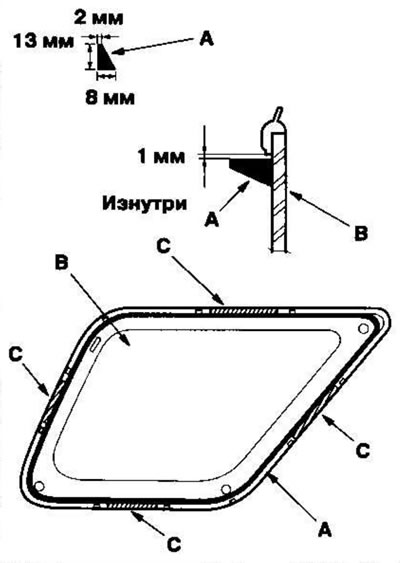
- After applying the adhesive, roll the separator off the butyl tape (C).
- Apply adhesive within 30 minutes after applying glass primer. Make the strip thicker at the corners.
15. Hold the glass of the small side window (B) above the opening using suction cups, align it with the clamps or marks (C) applied in step. 9, and lower it onto the glue. Apply gentle pressure to the small side window glass until its edges are completely seated in the adhesive around the entire perimeter. Do not open or close the doors until the glue has dried.
16. Scrape off or wipe off excess glue with a spatula or napkin. Remove adhesive from the paintwork or glass of the small side window with a soft cloth dampened with alcohol.
17. Allow the glue to dry for at least 1 hour, then spray the small side window glass with water and check for leaks. Mark the leak areas and allow the small side window glass to dry, then seal with sealant. Allow the vehicle to sit for at least 4 hours after installing the small side window glass. If you must use the car within the first 4 hours, drive it slowly.
18. Install all other removed components. For 2-3 days it is not recommended:
- Slam the doors with all the windows closed.
- Excessive bending of the body (when entering or leaving roads at an angle or when driving on uneven roads).
(Full version on the source website: HONDABOOK)