
HondaBook.ru
Auto companies Volkswagen Auto companies Ford Auto companies Lada Auto companies Skoda Auto companies BMW Auto companies Mazda Auto companies Peugeot
English Русский
Български
Беларускі
Український
Српски
Hrvatski
Română
Polski
Slovenský
Magyar
Bookmark Contacts Sitemap   


Accord Civic Fit / Jazz CR-V HR-V Others Articles
CR-V 1 (1995-2001, petrol) CR-V 2 (2002-2006, petrol)

Replacing the drain chute slider and cables as an assembly (Honda CR-V 2)

  • Main
  • Honda CR-V
  • 2 (2002-2006, petrol)
  • Body and interior
  • Doors, locks and windows
  • Replacing the drain chute slider and cables as an assembly
0
1. Remove the frame.

2. Remove the following components from the frame:
  • Drainage gutter.
  • Sun protection hood.
  • Electric sunroof motor.

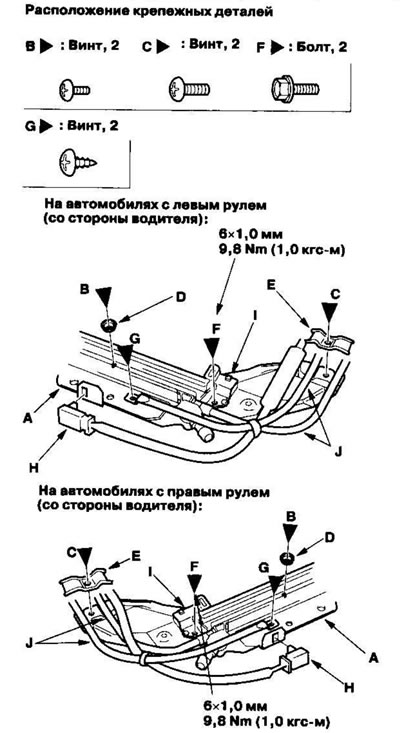
3. Put on protective gloves. On both sides of the frame (A), remove the screws (B, C), then remove the travel stops (D) and the rear cable tube brackets (E) and remove the mounting bolts (F) from the side cable tube brackets and the mounting screws (G) from the cable tubes.
3. Put on protective gloves. On both sides of the…


4. On the driver's side, disconnect the sunroof connector (H) from the frame.

5. Remove the side cable tube brackets (I) and cable tubes (J) from both sides of the frame.

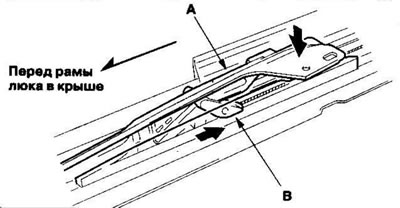
6. Rotate the glass bracket (A) downwards by moving the lever cam (B) back, then move both glass brackets back with the lever cam.
6. Rotate the glass bracket (A) downwards by…


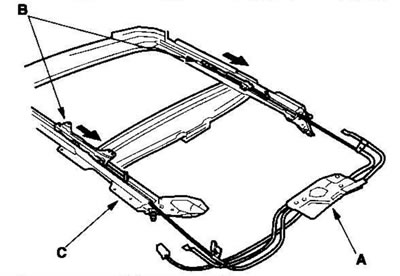
7. Slide the cable assemblies (A) and both glass brackets (B) back, then remove them from the frame (C).


7. Slide the cable assemblies (A) and both glass…


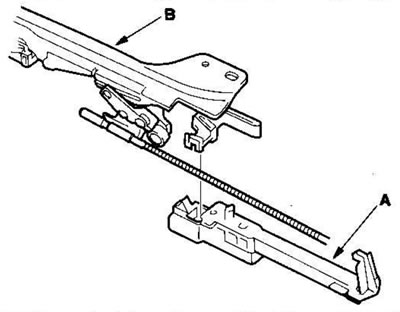
8. Remove the drain gutter sliders (A) from the glass brackets (B) on both sides.
8. Remove the drain gutter sliders (A) from the…


9. Installation of the slider and cables as an assembly is performed in the reverse order of removal, taking into account the following:
  • Replace damaged components.
  • Apply multi-purpose grease to the glass bracket (A) and the frame guide area (B) indicated by the arrows.
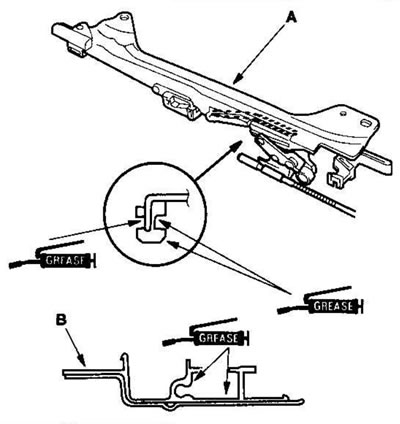
Apply multi-purpose grease to the glass bracket…

  • Before installing the electric motor, make sure that both cams of the levers are parallel and in the fully closed position.
  • Before installing the motor, install the frame and glass, then check the opening resistance.


(You will find the original on the portal hondabook.ru)
This article is available at: russian, bulgarian, belarusian, ukrainian, serbian, croatian, romanian, polish, slovak, hungarian
This information has been verified: Mikhail Kopasov
Share with friends:
◀ Previous
CR-V 2: Doors, locks and windows
Next ▶

Replacement of frame and drain pipe
Replacing the sunroof motor
Replacing the sunshade
Replacing the drain gutter
Replacing the sunroof glass
Adjusting the sunroof position switch
Checking the closing force and opening resistance of the hatch
Opening devices
Replacing the hood release cable
Replacing the fuel filler door opening cable
See also other articles from Honda manuals:
Replacing the parking brake cables Honda Accord 6 (1997-2002)
Battery Cables — Checking and Replacing Honda Civic 3 and 4 (1983-1991)
Replacing the cabin filter Honda Fit 1 (2001-2008)
Replacing the drain pipe Honda HR-V 1 (1998-2006, petrol)
Checking and replacing fuses Honda Avancier 1 (1999-2003, petrol)
Link in different formats to this article
Comments and feedback from visitors
No comments yet


How much will 17 + 18 ?


CR-V 2 (2002-2006, petrol) 
  • General information
  • User manual
  • Technical data
  • Maintenance
  • Power unit
  • Engine repair
  • Lubrication system
  • Cooling system
  • Exhaust system
  • Fuel system
  • Engine management
  • Engine electrical equipment
  • Transmission
  • Clutch
  • Manual gearbox
  • Automatic gearbox
  • Rear differential
  • Drive shafts
  • Chassis and running gear
  • Steering
  • Front suspension
  • Rear suspension
  • Brake system
  • Body and interior
  • Exterior (external elements)
  • Interior (internal elements)
  • Doors, locks and windows
CR-V 1 (1995-2001, petrol) 
  • General information
  • Maintenance
  • Tips for car owner
  • Power unit
  • Engine repair
  • Engine overhaul
  • Cooling and lubrication system
  • Engine electrical equipment
  • Control system
  • Fuel system
  • Transmission
  • Clutch and drive shafts
  • Car gearbox
  • Chassis and running gear
  • Front suspension
  • Rear suspension
  • Steering
  • Brake system
  • Body and interior
  • Body service
  • Exterior (external elements)
  • Interior (internal elements)
  • Electrical equipment
  • Equipment and devices
  • Electrical circuits
HondaBook.ru © 2018–2026 • Mobile version • Sitemap: EN BG BY UA RS HR RO PL SK HU • Feedback • Driver Information • Search system • Bookmark
Accord 3 (1985-1989) • Accord 6 (1997-2002) • Civic 3 and 4 (1983-1991) • Civic 5 and 6 (1991-2000) • Civic 6 (1995-2000) • Civic 7 (2000-2005) • Civic 8 (2005-2011) • Fit 1 (2001-2008) • CR-V 1 (1995-2001) • CR-V 2 (2002-2006) • HR-V 1 (1998-2006) • Avancier 1 (1999-2003) •
 
This website uses cookies to ensure proper functioning. By clicking "OK," you agree.