
Vehicle electrical equipment and instruments Honda CR-V 1
The electrical equipment is designed to be powered from the positive pole of a 12 V battery, the negative pole is connected to ground. When working with any element of electrical equipment, disconnect the battery from the ground by turning off all consumers and turning off the ignition.

SRS Air Safety System — Precautions
The SRS air safety system of the vehicles in question includes an airbag, sensors, a control unit and a control lamp on the instrument panel. When handling the pillow container, always keep the lined side of the...
The SRS air safety system of the vehicles in question includes an airbag, sensors, a control unit and a control lamp on the instrument panel. When handling the pillow container, always keep the lined side of the...

Disabling the pneumatic safety system
Attention! After disconnecting the battery, you can start work after at least 3 minutes. Otherwise, a failure code will be entered into the control box memory and the system control lamp will be constantly lit. From the...
Attention! After disconnecting the battery, you can start work after at least 3 minutes. Otherwise, a failure code will be entered into the control box memory and the system control lamp will be constantly lit. From the...
Bringing the pneumatic safety system into a state of readiness
From the driver's side 1. On CR-V, Odyssey 2.3L and V6 models, connect the plug on the passenger side. 2. On 2.2L Odyssey models, remove the jumper from the connector and immediately connect to the mating connector....
From the driver's side 1. On CR-V, Odyssey 2.3L and V6 models, connect the plug on the passenger side. 2. On 2.2L Odyssey models, remove the jumper from the connector and immediately connect to the mating connector....
Front Fan Motor — Removal and Installation
The fan is mounted in the passenger footwell. 1. Remove the lower right section of the instrument panel. 2. Disconnect the connector, unscrew the screws and remove the fan by lowering it. 3. Installation is carried out...
The fan is mounted in the passenger footwell. 1. Remove the lower right section of the instrument panel. 2. Disconnect the connector, unscrew the screws and remove the fan by lowering it. 3. Installation is carried out...
Rear Fan Motor — Removal and Installation
Odyssey 4-cylinder models 1. Remove the left and right covers on both sides of the air handling unit at the top of the door opening by prying them up and off the latches. 2. Carefully press the air conditioner switch...
Odyssey 4-cylinder models 1. Remove the left and right covers on both sides of the air handling unit at the top of the door opening by prying them up and off the latches. 2. Carefully press the air conditioner switch...
Heater radiator — removal and installation
1. Depressurize the air conditioner and remove the refrigerant by contacting a car service center. It is prohibited to disassemble the air conditioner connections on your own. 2. Turn on the ignition, move the heater...
1. Depressurize the air conditioner and remove the refrigerant by contacting a car service center. It is prohibited to disassemble the air conditioner connections on your own. 2. Turn on the ignition, move the heater...

Heater tap — removal and installation
1. Turn on the ignition, move the heater lever to the maximum heat output position and turn off the ignition. 2. Drain the liquid from the radiator of the cooling system, or pinch the heater hoses. 3. Squeeze and remove...
1. Turn on the ignition, move the heater lever to the maximum heat output position and turn off the ignition. 2. Drain the liquid from the radiator of the cooling system, or pinch the heater hoses. 3. Squeeze and remove...
Heater Control Panel — Removal and Installation
1. On 4-cylinder Odysseys, disconnect the cable from the blend door. 2. Remove the center floor section ( see Ch. 10 ). 3. Remove the screws from the control panel to the center floor section. 4. Installation is carried...
1. On 4-cylinder Odysseys, disconnect the cable from the blend door. 2. Remove the center floor section ( see Ch. 10 ). 3. Remove the screws from the control panel to the center floor section. 4. Installation is carried...
Cruise control system
The cruise control system starts working at a speed of over 40 km/h. The system is switched on by a switch on the cruise control panel. The on state is indicated by a glowing lamp on the switch. When the switch is...
The cruise control system starts working at a speed of over 40 km/h. The system is switched on by a switch on the cruise control panel. The on state is indicated by a glowing lamp on the switch. When the switch is...

Receiver/radio — removal and installation
CR-V Models 1. Remove the glove box and the lower section of the instrument panel under the steering wheel ( see Ch. 10 ). 2. Remove the lower part of the center section of the instrument panel. 3. Remove the cup holder...
CR-V Models 1. Remove the glove box and the lower section of the instrument panel under the steering wheel ( see Ch. 10 ). 2. Remove the lower part of the center section of the instrument panel. 3. Remove the cup holder...

Speakers — Removal and Installation
1. Using a thin tool inserted into the rectangular recess on the speaker grille, pry up and remove the door speaker grille. 2. Remove 3 screws and remove the speaker from the door frame. 3. Disconnect the connector from...
1. Using a thin tool inserted into the rectangular recess on the speaker grille, pry up and remove the door speaker grille. 2. Remove 3 screws and remove the speaker from the door frame. 3. Disconnect the connector from...

Windscreen wiper arms — removal and installation
Windscreen wiper arms 1. Unscrew the lever axle nut. 2. Mark the position of the lever on the axle. 3. Press the lever several times approximately 100 mm from the axle until the lever comes off the axle cone. 4. While...
Windscreen wiper arms 1. Unscrew the lever axle nut. 2. Mark the position of the lever on the axle. 3. Press the lever several times approximately 100 mm from the axle until the lever comes off the axle cone. 4. While...

Windscreen wiper blade — removal and installation
1. Lift the lever and press on the latches, and, moving downwards, remove the brush. 2. When assembling, insert the brush until the latches click into place.
1. Lift the lever and press on the latches, and, moving downwards, remove the brush. 2. When assembling, insert the brush until the latches click into place.

Windshield Wiper Motor — Removal and Installation
1. Set the wipers to the parked position, turn on the ignition if necessary and turn the wipers on/off. 2. Remove the brushes from the levers. 3. Remove the latch caps from the cover that covers the windshield wiper...
1. Set the wipers to the parked position, turn on the ignition if necessary and turn the wipers on/off. 2. Remove the brushes from the levers. 3. Remove the latch caps from the cover that covers the windshield wiper...
Rear Window Wiper Motor — Removal and Installation
1. Set the wiper blades to the parked position, turn on the ignition if necessary and turn the wiper blade on/off. 2. Remove the inner cover of the brush arm axle and unscrew the axle nut. 3. Mark the orientation of the...
1. Set the wiper blades to the parked position, turn on the ignition if necessary and turn the wiper blade on/off. 2. Remove the inner cover of the brush arm axle and unscrew the axle nut. 3. Mark the orientation of the...
Windscreen washer pump — removal and installation
The windshield washer reservoir is mounted on the left or right side behind the front bumper. On CR-V models, the front bumper must be removed to access the windshield washer reservoir. 1. On CR-V models, remove the...
The windshield washer reservoir is mounted on the left or right side behind the front bumper. On CR-V models, the front bumper must be removed to access the windshield washer reservoir. 1. On CR-V models, remove the...

Instrument cluster — removal and installation
CR-V Models 1. Remove the 2 screws at the top of the instrument panel trim. 2. Remove the trim by pushing its lower part and removing it from the latches. 3. Unscrew the 2 upper and 2 lower instrument panel mounting...
CR-V Models 1. Remove the 2 screws at the top of the instrument panel trim. 2. Remove the trim by pushing its lower part and removing it from the latches. 3. Unscrew the 2 upper and 2 lower instrument panel mounting...

Pointers — removal and installation
On 6-cylinder Odysseys, if one of the gauges fails, the entire instrument cluster must be replaced. CR-V and 4-cylinder Odyssey 1. Remove the instrument panel. 2. Remove the lens from the instrument panel. 3. Loosen the...
On 6-cylinder Odysseys, if one of the gauges fails, the entire instrument cluster must be replaced. CR-V and 4-cylinder Odyssey 1. Remove the instrument panel. 2. Remove the lens from the instrument panel. 3. Loosen the...
Reverse signal switch — removal and installation
Manual transmission 1. The switch is screwed into the transmission housing. 2. Turn the switch counterclockwise. 3. Installation is carried out in reverse order. Replace the switch gasket. Automatic transmission The...
Manual transmission 1. The switch is screwed into the transmission housing. 2. Turn the switch counterclockwise. 3. Installation is carried out in reverse order. Replace the switch gasket. Automatic transmission The...

Headlights — Bulb Replacement
1. On 4-cylinder Odysseys, to replace the passenger side headlight bulb, remove the air cleaner cover. 2. On 6-cylinder Odysseys, to replace the driver's side headlight bulb, remove the air cleaner cover. 3. Squeeze the...
1. On 4-cylinder Odysseys, to replace the passenger side headlight bulb, remove the air cleaner cover. 2. On 6-cylinder Odysseys, to replace the driver's side headlight bulb, remove the air cleaner cover. 3. Squeeze the...

Headlight beam adjustment
Headlight adjustment should be checked every 12 months, when replacing a headlight or after repairs to the front end. It should be noted that the described procedure only allows you to record the initial adjustment of...
Headlight adjustment should be checked every 12 months, when replacing a headlight or after repairs to the front end. It should be noted that the described procedure only allows you to record the initial adjustment of...

Front direction indicators and side lights
CR-V and 6-cylinder Odyssey 1. Turn the wheel so that you have access to the desired light (indicator). 2. Using a flat-blade screwdriver, remove the inner wheel arch panel fasteners and move the panel trim aside. 3....
CR-V and 6-cylinder Odyssey 1. Turn the wheel so that you have access to the desired light (indicator). 2. Using a flat-blade screwdriver, remove the inner wheel arch panel fasteners and move the panel trim aside. 3....

Rear direction indicators and side lights
1. Open the rear body cover. 2. On CR-V models, remove the fasteners and remove the rear cluster lamp assembly. 3. On 4-cylinder Odysseys, remove the rear deck lid. 4. On 6-cylinder Odysseys, pry up and remove the...
1. Open the rear body cover. 2. On CR-V models, remove the fasteners and remove the rear cluster lamp assembly. 3. On 4-cylinder Odysseys, remove the rear deck lid. 4. On 6-cylinder Odysseys, pry up and remove the...

Side turn signal repeater (CR-V models only)
1. Remove the rear mud deflector. 2. Remove the holder with the lamp by turning it 1/4 turn counterclockwise. 3. The rear turn signal lamp is removed directly from the socket. 4. Installation is carried out in reverse...
1. Remove the rear mud deflector. 2. Remove the holder with the lamp by turning it 1/4 turn counterclockwise. 3. The rear turn signal lamp is removed directly from the socket. 4. Installation is carried out in reverse...

Upper brake lights
CR-V Models 1. Open the rear body cover. 2. Press the side release buttons and remove the third brake light cover. 3. Disconnect the connector from the lamp by turning it 1/4 turn counterclockwise. 4. Pull and remove...
CR-V Models 1. Open the rear body cover. 2. Press the side release buttons and remove the third brake light cover. 3. Disconnect the connector from the lamp by turning it 1/4 turn counterclockwise. 4. Pull and remove...

Interior light
1. Using a small screwdriver, pry up and remove the diffuser. 2. Remove the lamp from the spring contacts. If the lamp has conical ends, then slightly separate the contacts and remove the lamp. 3. Clean the contacts and...
1. Using a small screwdriver, pry up and remove the diffuser. 2. Remove the lamp from the spring contacts. If the lamp has conical ends, then slightly separate the contacts and remove the lamp. 3. Clean the contacts and...
License plate light
CR-V Models 1. Pry up and open the hatch in the back cover. 2. Remove the holder with the lamp by turning it 1/4 turn counterclockwise. 3. Remove the lamp. 4. Install the lamp in reverse order. 4-cylinder Odyssey 1....
CR-V Models 1. Pry up and open the hatch in the back cover. 2. Remove the holder with the lamp by turning it 1/4 turn counterclockwise. 3. Remove the lamp. 4. Install the lamp in reverse order. 4-cylinder Odyssey 1....

Fuses and Fuse Links — Replacement
Fuses are installed in the fuse box inside the passenger compartment and in the engine compartment. Some of the fuses are located on the relay panel. 1. To access the fuse, remove the cover of the mounting block. 2. A...
Fuses are installed in the fuse box inside the passenger compartment and in the engine compartment. Some of the fuses are located on the relay panel. 1. To access the fuse, remove the cover of the mounting block. 2. A...
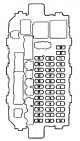
Location of fuses
Location of fuses in the passenger compartment fuse box under the instrument panel on the driver's side (CR-V) № Current Chain 1,2,29,38 - Not used 3 10A Rear window wiper and washer 4 10A Right headlight high beam 5...
Location of fuses in the passenger compartment fuse box under the instrument panel on the driver's side (CR-V) № Current Chain 1,2,29,38 - Not used 3 10A Rear window wiper and washer 4 10A Right headlight high beam 5...
This section is available on: russian, bulgarian, belarusian, ukrainian, serbian, croatian, romanian, polish, slovak, hungarian
Link in different formats to this section
TEXTHTMLBB Code
- General information
- User manual
- Technical data
- Maintenance
- Power unit
- Engine repair
- Lubrication system
- Cooling system
- Exhaust system
- Fuel system
- Engine management
- Engine electrical equipment
- Transmission
- Clutch
- Manual gearbox
- Automatic gearbox
- Rear differential
- Drive shafts
- Chassis and running gear
- Steering
- Front suspension
- Rear suspension
- Brake system
- Body and interior
- Exterior (external elements)
- Interior (internal elements)
- Doors, locks and windows
- General information
- Maintenance
- Tips for car owner
- Power unit
- Engine repair
- Engine overhaul
- Cooling and lubrication system
- Engine electrical equipment
- Control system
- Fuel system
- Transmission
- Clutch and drive shafts
- Car gearbox
- Chassis and running gear
- Front suspension
- Rear suspension
- Steering
- Brake system
- Body and interior
- Body service
- Exterior (external elements)
- Interior (internal elements)
- Electrical equipment
- Equipment and devices
- Electrical circuits