


Doors, locks and windows of the car Honda Avancier 1


Removal and installation front door trim
Attention. Avoid damaging the door panel and components being removed during work. Do not kink the cable. When using a screwdriver, cover the components with protective tape or cloth. Also, wrap the screwdriver with...
Attention. Avoid damaging the door panel and components being removed during work. Do not kink the cable. When using a screwdriver, cover the components with protective tape or cloth. Also, wrap the screwdriver with...

Removal and installation the outer front door handle
Attention. Carry out work wearing gloves. Avoid damaging the door panel and components being removed during work. Do not bend the rods or over-kink the cables. Remove the door trim and remove the components in the...
Attention. Carry out work wearing gloves. Avoid damaging the door panel and components being removed during work. Do not bend the rods or over-kink the cables. Remove the door trim and remove the components in the...
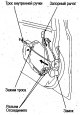
Removal and installation the front door lock
Attention. Carry out work wearing gloves. Avoid damaging the door panel and components being removed during work. Do not bend the rods or over-kink the cable. Remove the outer handle (see above). Install in the reverse...
Attention. Carry out work wearing gloves. Avoid damaging the door panel and components being removed during work. Do not bend the rods or over-kink the cable. Remove the outer handle (see above). Install in the reverse...

Removal and installation front door glass/window lifter
Attention. Carry out work wearing gloves. Avoid damaging the door panel and components being removed during work. Do not drop the glass inside the door. Remove the following components: Door trim (see above). Plastic...
Attention. Carry out work wearing gloves. Avoid damaging the door panel and components being removed during work. Do not drop the glass inside the door. Remove the following components: Door trim (see above). Plastic...
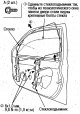
Removal and installation the front door molding
Carry out work wearing gloves. Avoid damaging the door panel and removable components during work. Remove the following components: Outside rearview mirror (see below). Door trim (see above). Gradually lift the molding,...
Carry out work wearing gloves. Avoid damaging the door panel and removable components during work. Remove the following components: Outside rearview mirror (see below). Door trim (see above). Gradually lift the molding,...
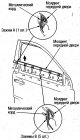
Removal and installation the front door glass guide trim
Carry out work wearing gloves. During the work, do not damage the molding, glass guide and removed components. When removing clamps, use a puller. Install in the reverse order of removal. Check the clamps for damage and...
Carry out work wearing gloves. During the work, do not damage the molding, glass guide and removed components. When removing clamps, use a puller. Install in the reverse order of removal. Check the clamps for damage and...
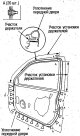
Removal and installation the front door seal
Avoid damaging the door panel and components being removed during work. When removing clamps, use a puller. Install in the reverse order of removal. Check the clamps for damage and replace them if necessary.
Avoid damaging the door panel and components being removed during work. When removing clamps, use a puller. Install in the reverse order of removal. Check the clamps for damage and replace them if necessary.

Removal and installation rear side door trim
Attention. Avoid damaging the door panel and components being removed during work. Do not kink the cable. When using a screwdriver, protect the components with protective tape or cloth. Also, wrap the screwdriver with...
Attention. Avoid damaging the door panel and components being removed during work. Do not kink the cable. When using a screwdriver, protect the components with protective tape or cloth. Also, wrap the screwdriver with...

Removal and installation the outer handle of the rear side door
Attention. Carry out work wearing gloves. Avoid damaging the door panel and components being removed during work. Do not bend the rods or over-kink the cable. Remove the following components: Door finishing. Plastic...
Attention. Carry out work wearing gloves. Avoid damaging the door panel and components being removed during work. Do not bend the rods or over-kink the cable. Remove the following components: Door finishing. Plastic...

Removal and installation the rear side door lock
Attention. Carry out work wearing gloves. Avoid damaging the door panel and components being removed during work. Do not bend the rods and do not bend the cable. Remove the outer handle (see above) and remove the...
Attention. Carry out work wearing gloves. Avoid damaging the door panel and components being removed during work. Do not bend the rods and do not bend the cable. Remove the outer handle (see above) and remove the...

Removal and installation rear side door glass/window lifter
Attention. Carry out work wearing gloves. Avoid damaging the door panel and components being removed during work. Do not drop the glass inside the door. Remove the following components: Door trim (see above). Plastic...
Attention. Carry out work wearing gloves. Avoid damaging the door panel and components being removed during work. Do not drop the glass inside the door. Remove the following components: Door trim (see above). Plastic...
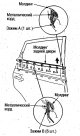
Removal and installation the rear side door molding
Attention. Carry out work wearing gloves. Avoid damaging the door panel and components being removed during work. Remove the door trim (see above), gradually lift the molding starting from the front end and remove it....
Attention. Carry out work wearing gloves. Avoid damaging the door panel and components being removed during work. Remove the door trim (see above), gradually lift the molding starting from the front end and remove it....
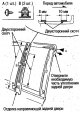
Removal and installation the rear side door glass guide trim
Attention. Carry out work wearing gloves. Avoid damaging the molding, glass guide and removable components during work. When removing clamps, use a puller. Install in the reverse order of removal. Check the clamps for...
Attention. Carry out work wearing gloves. Avoid damaging the molding, glass guide and removable components during work. When removing clamps, use a puller. Install in the reverse order of removal. Check the clamps for...
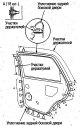
Removal and installation the rear side door seal
Caution: Avoid damaging the door panel and components being removed during work. When removing clamps, use a puller. Install in the reverse order of removal. Check the clamps for damage and replace them if necessary....
Caution: Avoid damaging the door panel and components being removed during work. When removing clamps, use a puller. Install in the reverse order of removal. Check the clamps for damage and replace them if necessary....

Replacing guide tapes
Attention: Perform work in dust-free areas. In winter (at low temperatures), warm up the guides and tapes using a hair dryer. Guide temperature: approx. 15°C Tape temperature: approx. 30°C To prevent the tape from...
Attention: Perform work in dust-free areas. In winter (at low temperatures), warm up the guides and tapes using a hair dryer. Guide temperature: approx. 15°C Tape temperature: approx. 30°C To prevent the tape from...

Adjusting the door glass
Carry out work on a horizontal area. Check the window opening gutter and seal for damage. If there is significant damage, replace. 1. Remove the following components. Door trim (see above). Plastic film (required part)...
Carry out work on a horizontal area. Check the window opening gutter and seal for damage. If there is significant damage, replace. 1. Remove the following components. Door trim (see above). Plastic film (required part)...

Adjusting the door position
Attention. You are performing work on a horizontal section. If the door is supported by a jack, place cloth and rubber pads between the door and the jack. 1. Adjust the door position. Loosen the door mounting bolts,...
Attention. You are performing work on a horizontal section. If the door is supported by a jack, place cloth and rubber pads between the door and the jack. 1. Adjust the door position. Loosen the door mounting bolts,...

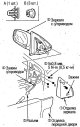
Removal and installation a mirror with electric drive
Caution: Do not damage the door panel or removed components during the work. Remove in the order shown in the figure. Install in the reverse order of removal. Install the mirror without gaps. Connect the connectors...
Caution: Do not damage the door panel or removed components during the work. Remove in the order shown in the figure. Install in the reverse order of removal. Install the mirror without gaps. Connect the connectors...

Removal and installation the mirror holder
Attention. Wear gloves when working. During the work, do not damage the mirror and the removed components. When using a screwdriver, protect the components with protective tape or cloth. Also, wrap the screwdriver with...
Attention. Wear gloves when working. During the work, do not damage the mirror and the removed components. When using a screwdriver, protect the components with protective tape or cloth. Also, wrap the screwdriver with...

Removal and installation the interior rearview mirror
Attention: Do not damage the components being removed during the work. 1. Move the mirror towards the front of the car. 2. Release the mirror support from the spring and remove the mirror. 3. If necessary, remove the...
Attention: Do not damage the components being removed during the work. 1. Move the mirror towards the front of the car. 2. Release the mirror support from the spring and remove the mirror. 3. If necessary, remove the...


Glass Glue — General Information
Types of adhesives Attention. Use the recommended primer, do not mix different primers. Primer plays an important role and helps to increase the efficiency of the glue. There are two types of primers: for the body and...
Types of adhesives Attention. Use the recommended primer, do not mix different primers. Primer plays an important role and helps to increase the efficiency of the glue. There are two types of primers: for the body and...
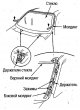
Windshield removal and installation procedure
The pictures show an example of removing and installing a windshield. Install the various components on the glass according to the installation order description corresponding to each component. Attention. Do not...
The pictures show an example of removing and installing a windshield. Install the various components on the glass according to the installation order description corresponding to each component. Attention. Do not...

Removal and installation the windshield
For information on the procedure for removing and installing the glass, see the section "Procedure for removing and installing the windshield" above. Removable components Before removing the glass, remove the following...
For information on the procedure for removing and installing the glass, see the section "Procedure for removing and installing the windshield" above. Removable components Before removing the glass, remove the following...

Removal and installation rear door glass
For information on the procedure for removing and installing the glass, see the section "Procedure for removing and installing the windshield" above. Removable components Before removing the glass, remove the following...
For information on the procedure for removing and installing the glass, see the section "Procedure for removing and installing the windshield" above. Removable components Before removing the glass, remove the following...

Removal and installation the upper rear door glass
The molding and clamps are not replaced separately, but are replaced together with the glass assembly. If the glass is being reused, cut away the adhesive without damaging the molding. For the procedure for removing and...
The molding and clamps are not replaced separately, but are replaced together with the glass assembly. If the glass is being reused, cut away the adhesive without damaging the molding. For the procedure for removing and...

Removal and installation the rear fixed glass
Separate replacement of the molding and clamps is not possible and they are replaced together with the glass assembly. If the glass is being reused, cut away the adhesive without damaging the molding. If the clamps...
Separate replacement of the molding and clamps is not possible and they are replaced together with the glass assembly. If the glass is being reused, cut away the adhesive without damaging the molding. If the clamps...
This section is available on: russian, bulgarian, belarusian, ukrainian, serbian, croatian, romanian, polish, slovak, hungarian
Link in different formats to this section
TEXTHTMLBB Code
- General information
- Controls and instruments
- User manual
- Power unit
- Engine maintenance
- Engine repair
- Cooling system
- Engine management
- Power and exhaust system
- Transmission
- Automatic gearbox
- Drive shafts and differential
- Chassis and running gear
- Steering
- Car suspension
- Brake system
- Body and interior
- Doors, locks and windows
- Interior (internal elements)
- Exterior (external elements)
- Air conditioner
- Electrical equipment
- Power devices
- Equipment and devices
- Headlights and lighting
- Electrical circuits