
Contents: Adjustment ⇊ Removal and installation ⇊ Front door trim panel ⇊ Front door outer handle ⇊ Door lock ⇊ Door glass and window lift mechanism ⇊ Front door glass trim panel ⇊ External seal of the front door glass ⇊ Front door seal ⇊ Upper inner seal front door (sedan) ⇊ Front door lower inner seal ⇊ Disassembly and assembly ⇊
Adjustment
1. Adjust the position of the front door if necessary.
a) To adjust the vertical and horizontal position of the door, loosen the door hinge mounting bolts as shown in the figure.
Place a jack under the open door, placing a towel or other cloth on it first to avoid damaging the painted surfaces of the door.
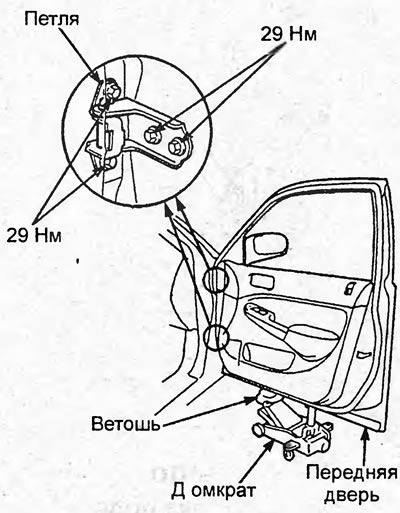
b) Tighten the bolts after adjustment.
Tightening torque: 29 Nm
c) Adjust the height of the door protrusion relative to the body by turning the cushions as shown in the figure.
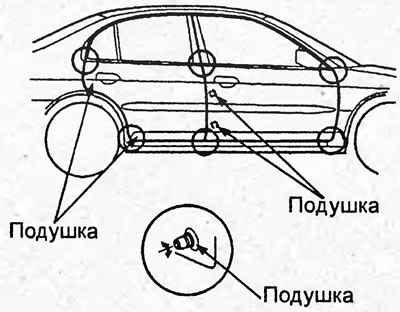
Sedan.
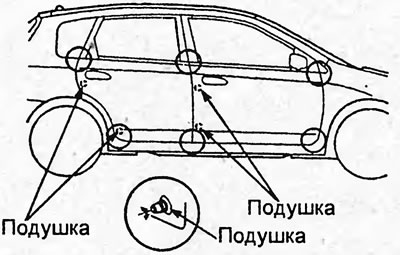
Hatchback.
2. If necessary, adjust the position of the door lock bracket.
a) Loosen the screws securing the door lock bracket.
b) Adjust the position of the bracket by tapping it with a plastic-headed hammer.
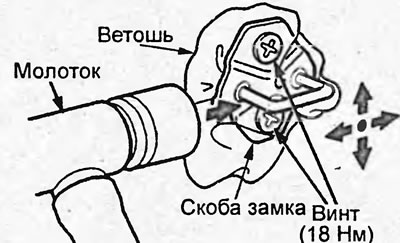
c) Tighten the screws after adjustment.
Tightening torque - 18 Nm
Removal and installation
Note: Installation is carried out in the reverse order of removal.
Front door trim panel
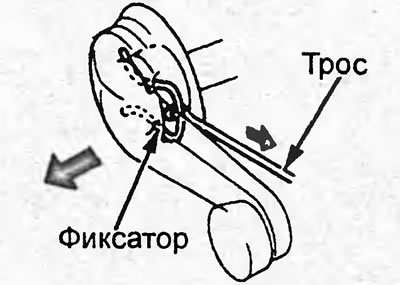
1. (Sedan) Remove the window lift handle as shown in the figure.
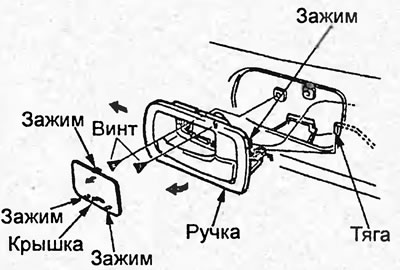
2. Remove the inner handle.
a) Using a screwdriver, disconnect the clamps and remove the cover.
Note: Please wrap the screwdriver with protective tape before use.
b) Loosen the screws.
c) Pull the inner handle towards you and release the clamp.
d) Disconnect the rod from the handle.
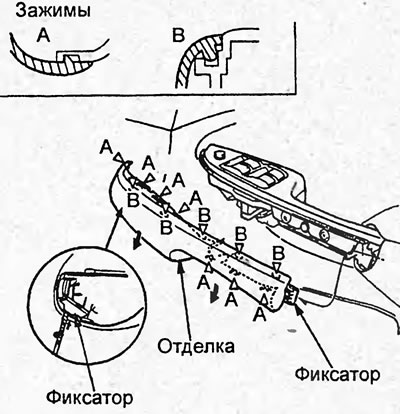
3. (Sedan) Remove the auxiliary handle trim.
a) Using a screwdriver, lift the cover and detach the retainer.
b) Disconnect clamps "A".
c) Disconnect the "B" clips, the retainer and remove the auxiliary handle trim.
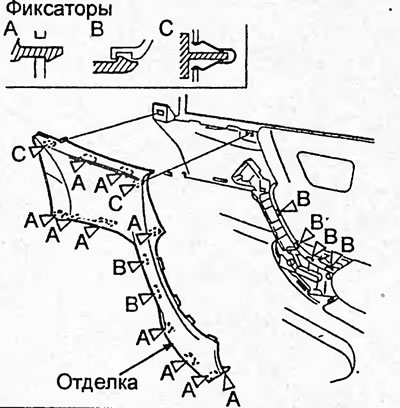
4. (Hatchback) Remove the assist handle trim.
a) Disconnect the upper clamps and fasteners.
b) Disconnect the lower clamps. Then remove the auxiliary handle trim.
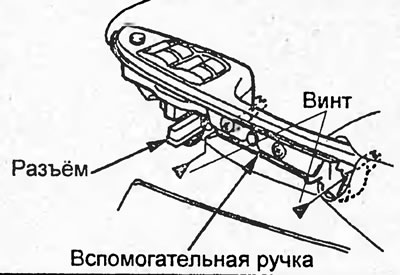
5. (Sedan, driver's side) Disconnect the connector. Then unscrew the screws securing the auxiliary handle.
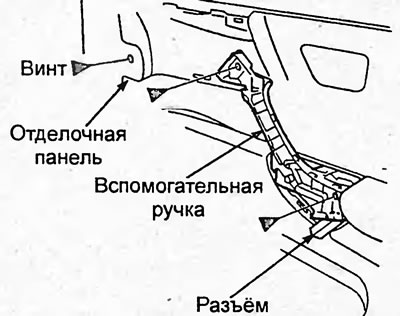
6. (Hatchback) Disconnect the connector, unscrew the screws securing the auxiliary handle and disconnect it from the front door trim panel.
7. Remove the inner trim of the side rearview mirror (see section "Side rear view mirror").
8. Disconnect the trim panel fastening clips using a special tool and remove it.
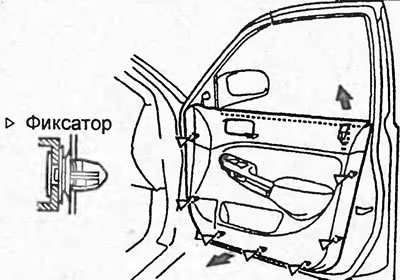
Sedan.
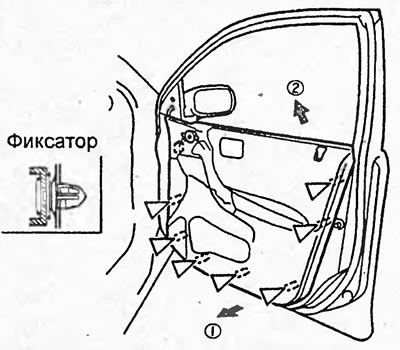
Hatchback.
Front door outer handle
Sedan
1. Raise the glass fully.
2. Remove the front door trim panel and the access hole cover.
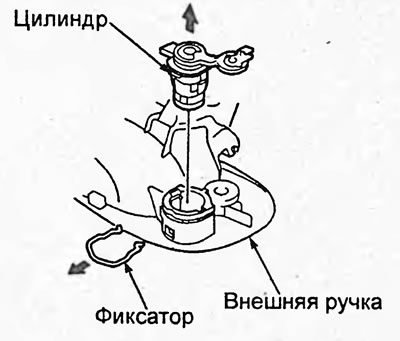
3. Disconnect the retainer, then remove the lock cylinder. Disconnect the lock cylinder rod.
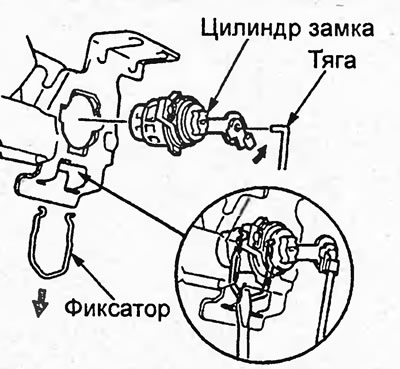
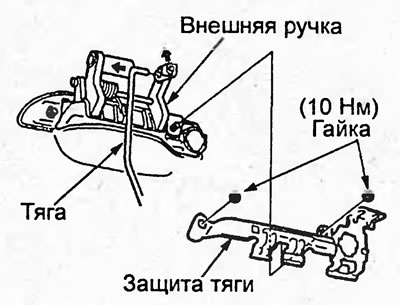
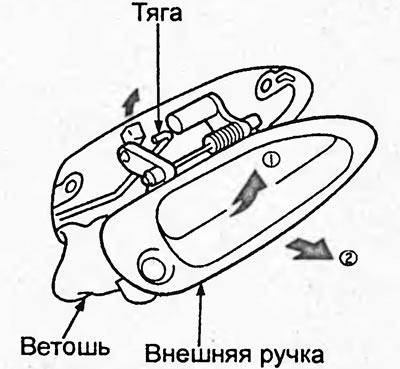
4. Disconnect the rod from the outer handle, unscrew the nuts and disconnect the protection from the outer handle.
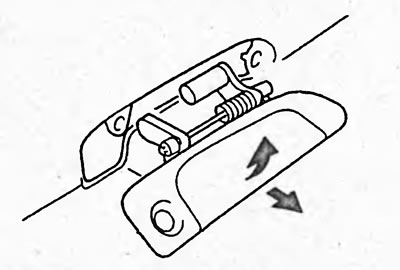
4. Pull the outer handle (A) forward and remove it.
Hatchback
1. Raise the glass fully.
2. Remove the front door trim panel and the access hole cover.
3. Loosen the bolts and disconnect the rod.
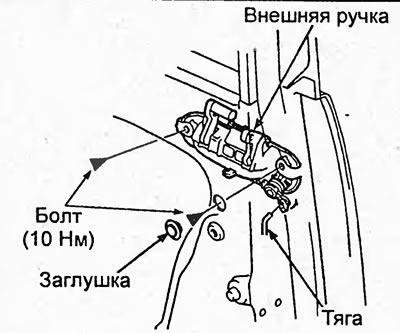
4. Remove the outer handle.
3. Disconnect the retainer and remove the lock cylinder.
Door lock
1. Raise the glass fully.
2. Remove the front door trim panel and the access hole cover.
3. Remove the traction protection.
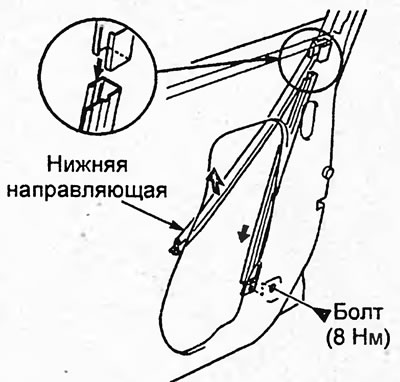
4. Bend back the guide and unscrew the bolt, then remove the lower door glass guide as shown in the figure.
Tightening torque - 8 Nm
5. Disconnect the rod from the lock cylinder.
6. Disconnect the rod from the outer handle.
7. Disconnect the connectors, then disconnect the retainer and the inner handle rod from the door.
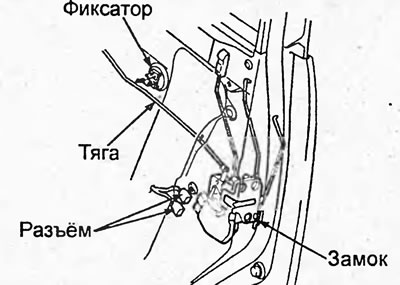
8. Loosen the screws and carefully pull the door lock out through the access hole.
Tightening torque: 6 Nm
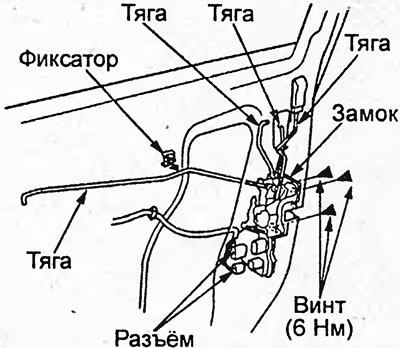
Sedan.
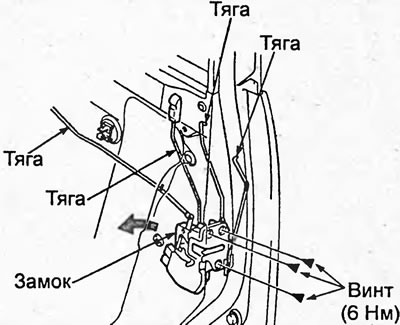
Hatchback.
Door glass and window lift mechanism
1. Remove the front door trim panel and access hole cover.
2. Lift the door glass so that the glass mounting bolts are visible. Unscrew the bolts. Carefully pull out the glass.
Tightening torque - 10 Nm
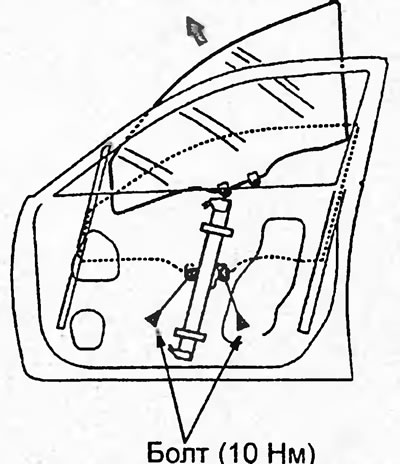
Sedan.
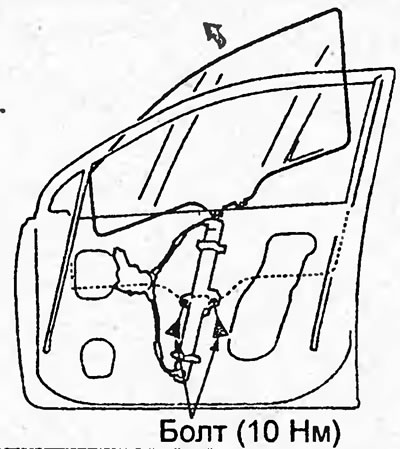
Hatchback.
3. Disconnect the connector and the retainer.
4. Unscrew the bolts. Then pull out the window lift mechanism through the technological hole.
Tightening torque - 10 Nm
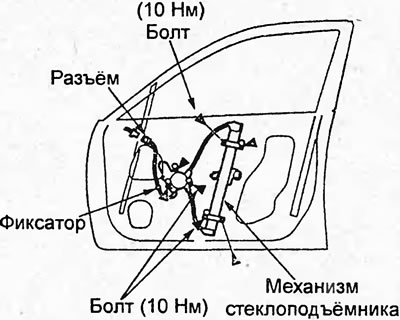
Sedan.
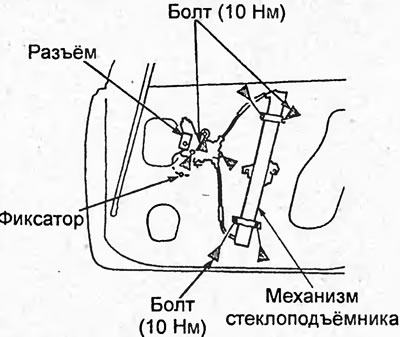
Hatchback.
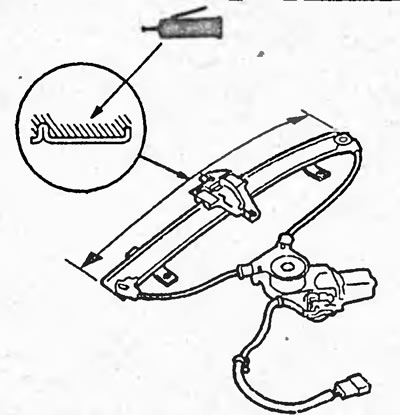
5. Before installation, apply grease to the window lift mechanism as shown in the figure.
Front door glass trim panel
1. Remove the outer seal of the front door glass.
2. Bend back the edge of the front door seal and remove the screw.
3. Lift the trim panel, release the clips and remove it.
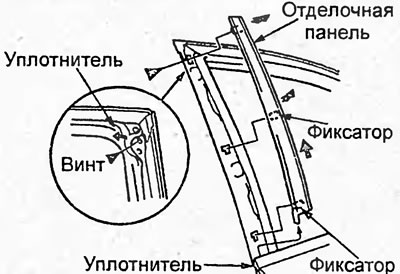
External seal of the front door glass
1. Remove the side rearview mirror (see section "Side rear view mirror").
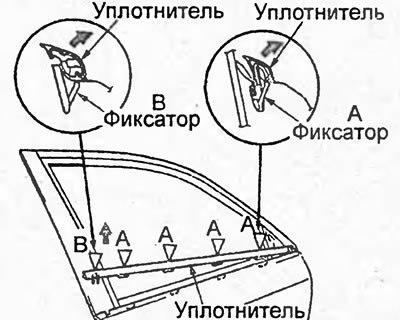
2. Starting from the rear edge, release the clips and remove the seal as shown in the figure.
Front door seal
1. Unscrew bolt "A".
Tightening torque: 29 Nm
2. Disconnect the clips, then remove the front door seal.
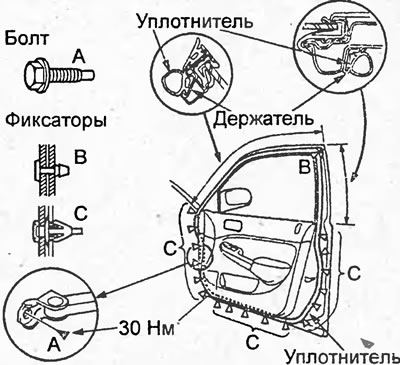
Sedan.
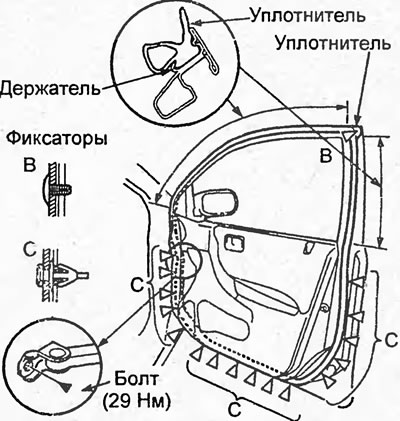
Hatchback.
Upper inner seal front door (sedan)
1. Remove the window lift control panel and the front door glass trim panel.
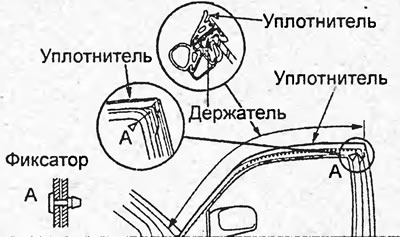
2. Disconnect the retainer, then remove the seal as shown in the figure.
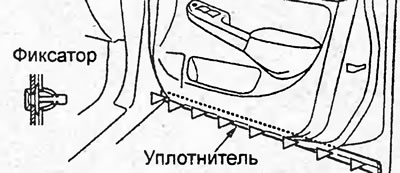
Front door lower inner seal
Disconnect the clips and remove the lower inner seal.
Disassembly and assembly
1. Disconnect the cable from the negative terminal of the battery.
2. Remove the front door trim panel.
3. When disassembling the front door, follow the assembly drawing "Disassembling and assembling the front door". Disassemble in the sequence shown in the drawing.
4. Assembly is carried out in the reverse order of disassembly.
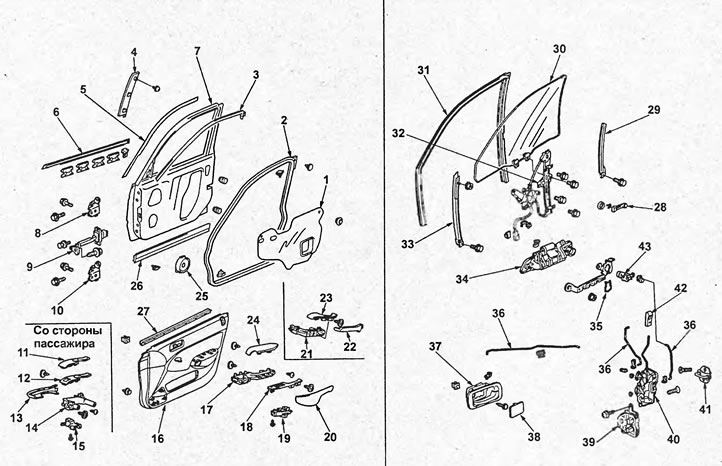
Disassembly and assembly of the front door (sedan). 1 - service hole cover, 2 - door seal, 3 - upper inner seal of the front door, 4 - trim panel of the front door glass, 5 - decorative tape, 6 - outer seal of the front door glass, 7 - front door, 8 - door hinge, 9 - travel limiter, 10 - door hinge, 11 - trim (models without electric window lift), 12 - window lift control panel, 13 - auxiliary handle trim, 14 - auxiliary handle, 15 - switch, 16 - front door trim panel, 17 - auxiliary handle, 18 - window lift control panel, 19 - switch, 20, 22 - auxiliary handle trim, 21 - auxiliary handle, 23 - trim, 24 - armrest, 25 - speaker, 26 - lower inner front door seal, 27 - inner front door glass seal, 28 - window lift handle, 29 - guide, 30 - front door glass, 31 - glass seal, 32 - window lift mechanism, 33 - lower guide, 34 - outer handle, 35 - latch, 36 - rod, 37 - inner handle, 38 - cover, 39 - electric lock drive, 40 - lock, 41 - lock bracket, 42 - button, 43 - lock cylinder.
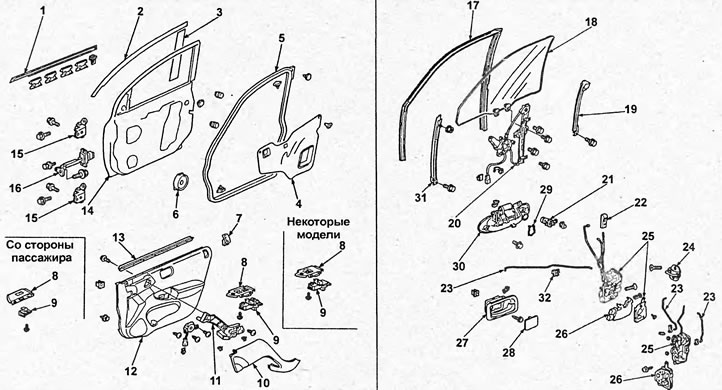
Disassembly and assembly of the front door (hatchback). 1 - front door glass outer seal, 2, 3 - decorative strip, 4 - service hole cover, 5 - door seal, 6 - speaker, 7 - button, 8 - window lifter control panel, 9 - switch, 10 - auxiliary handle trim, 11 - auxiliary handle, 12 - trim panel, 13 - front door glass inner seal, 14 - front door, 15 - front door hinge, 16 - front door travel limiter, 17 - glass seal, 18 - glass, 19 - guide, 20 - window lift mechanism, 21 - lock cylinder, 22 - button, 23 - rod, 24 - lock bracket, 25 - lock, 26 - lock electric drive, 27 - inner handle, 28 - cover, 29 - latch, 30 - outer handle, 31 - lower guide, 32 - retainer.
(The article is based on information from the website www.HondaBook.ru)