HondaBook.ru
Auto companies Volkswagen Auto companies Ford Auto companies Lada Auto companies Skoda Auto companies BMW Auto companies Mazda Auto companies Peugeot
English Русский
Български
Беларускі
Український
Српски
Hrvatski
Română
Polski
Slovenský
Magyar
Bookmark Contacts Sitemap   


Accord Civic Fit / Jazz CR-V HR-V Others Articles
Civic 3 and 4 (1983-1991) Civic 5 and 6 (1991-2000) Civic 6 (1995-2000) Civic 7 (2000-2005) Civic 8 (2005-2011)

Fuel tank (Honda Civic 7)

  • Main
  • Honda Civic
  • 7 (2000-2005)
  • Power unit
  • Fuel injection system
  • Fuel tank
0
Contents: Removal and installation (2WD models) ⇊ Removal and installation (4WD models) ⇊ Fuel level sensor ⇊

Removal and installation (2WD models)


Warning: Repairing a fuel tank that has not been properly steam cleaned can be dangerous. A tank explosion or fire could result in serious injury or death.


1. Disconnect the cable from the negative terminal of the battery.

2. Unscrew and screw back the fuel filler cap.

3. Loosen 4 screws and remove the service cover (1). Disconnect the fuel pump connector (2).
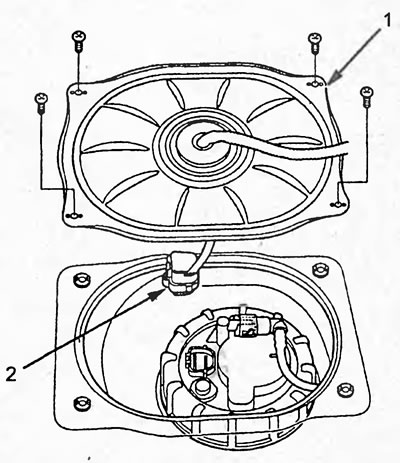
3. Loosen 4 screws and remove the service cover…


4. Disconnect the quick-release coupling of the fuel pipes.
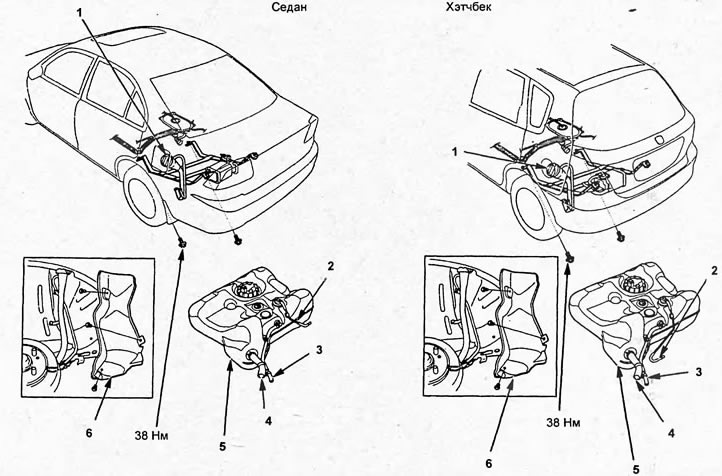
Removal and installation the fuel tank (2WD…

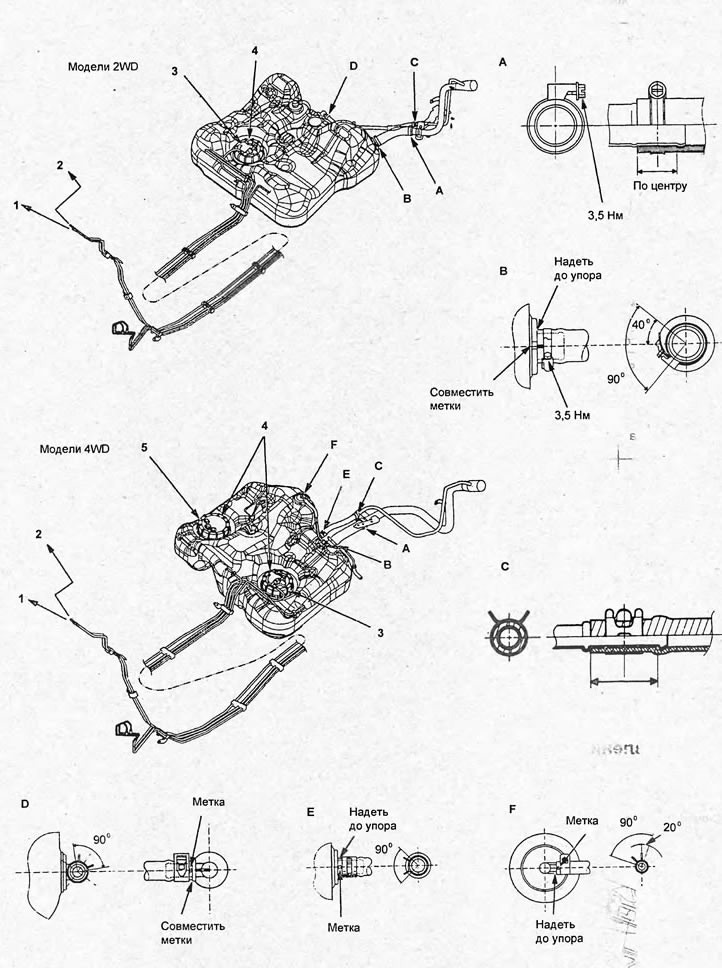
Removal and installation the fuel tank (2WD models). 1 - fuel filler cap, 2 - tube, 3 - air hose, 4 - fuel filler hose, 5 - fuel tank, 6 - fuel filler tube casing.
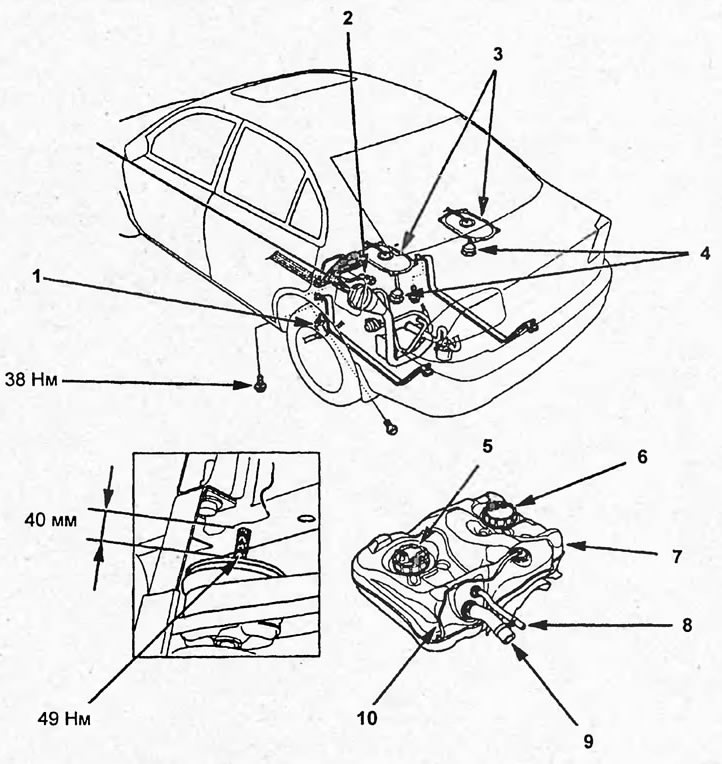


Removal and installation the fuel tank (4WD…

Removal and installation the fuel tank (4WD models). 1 - wire harness, 2 - fuel filler cap, 3 - service cap, 4 - connector, 5 - main fuel pump, 6 - auxiliary fuel pump, 7 - fuel tank, 8 - air hose, 9 - fuel filler hose, 10 - tube.


5. Using a special tool, unscrew the nut (B) of the fuel pump (A).

Tightening torque - 93 Nm
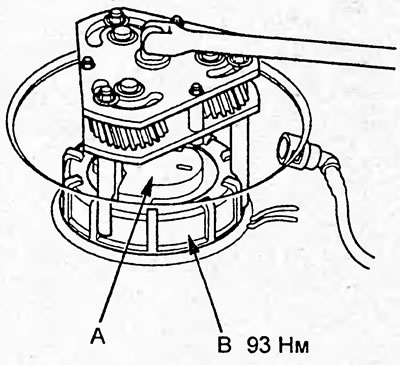
Tightening torque - 93 Nm


6. Remove the fuel pump.

7. Raise the car.

8. Remove the fuel filler tube cover.

9. Disconnect the hoses from the fuel tank.

10. Install the support device under the fuel tank.

11. Unscrew the tank mounting bolts.

Tightening torque - 38 Nm

12. Remove the fuel tank.

13. When assembling, the parts are installed in the reverse order.

Removal and installation (4WD models)


Warning: Repairing a fuel tank that has not been properly steam cleaned can be dangerous. A tank explosion or fire could result in serious injury or death.


1. Disconnect the cable from the negative terminal of the battery.

2. Unscrew the fuel filler cap.

3 Raise the vehicle.

4. Disconnect the hoses from the fuel tank.

5. Remove the rear seat.

6. Remove the service covers.

7. Disconnect the quick-release coupling.

8. Disconnect the main and auxiliary fuel pump connectors.

9. Remove the driveshaft.

10. Disconnect the wiring harness.

11. Install the rear axle support bolt (I) as shown in the figure.

12. Loosen the mounting bolts.

13. Install the support device under the fuel tank.

14. Unscrew the tank mounting bolts.

Tightening torque - 38 Nm

15. Remove the fuel tank.

16. When assembling, the parts are installed in the reverse order.

Fuel level sensor


1. Perform the procedures specified in the section "Before carrying out repair work".

2. Unscrew and screw back the fuel filler cap.

3. Loosen 4 screws and remove the service cover (1). Disconnect the fuel pump connector (2).
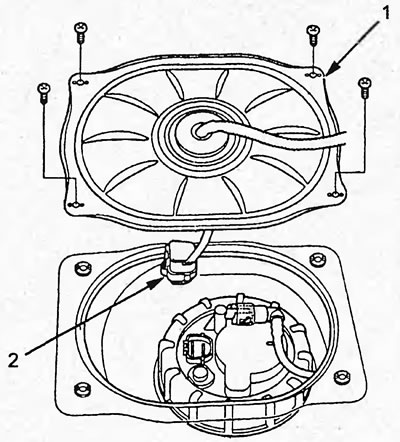
3. Loosen 4 screws and remove the service cover…


4. Check fuse #10 (7.5 A).

5. Turn the ignition switch to the "ON" position.

6. Measure the voltage between the terminals of the fuel pump harness connector.
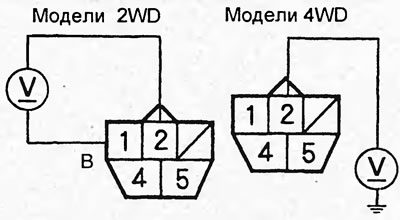
6. Measure the voltage between the terminals of…


7. Set the ignition switch to the "OFF" position.


8. Remove the fuel pump.

9. (4WD models) Remove the auxiliary fuel pump.

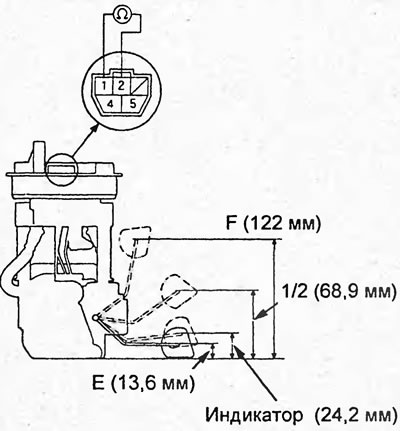
10. Measure the resistance by slowly moving the float from the "EMPTY" position to the "FULL" position.

2WD models.


Fuel levelResistance, Ohm
Full (full)11 -13
1/268,5 - 74,5
Low fuel indicator113,4-128
Empty130-132

Empty130-132


Fuel hose installation diagram. 1 - to the…

Fuel hose installation diagram. 1 - to the electro-pneumatic valve of the fuel vapor recovery system, 2 - to the fuel pressure pulsation damper, 3 - fuel pump, 4 - sealing ring, 5 - additional fuel pump.


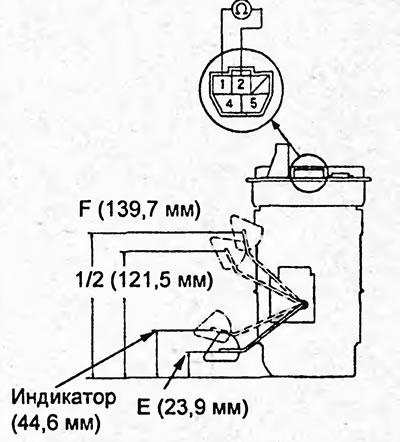
4WD models main fuel pump.


Fuel levelResistance, Ohm
Full (full)6,3-6,5
1/212-18
Low fuel indicator58 - 69,2
Empty74,5 - 76,5

Empty74,5 - 76,5


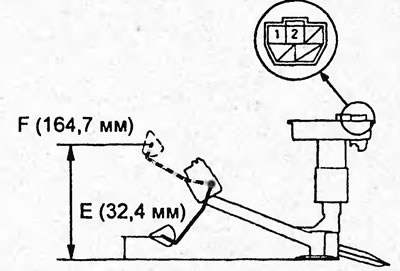
4WD models additional fuel pump.


Fuel levelResistance, Ohm
Full (full)4,5-6,5
Empty55,5 - 57,5


Empty55,5 - 57,5


If the resistance is not as described, replace the fuel level sensor or auxiliary fuel level sensor.

Original article on the website: HONDABOOK.ru
This article is available at: russian, bulgarian, belarusian, ukrainian, serbian, croatian, romanian, polish, slovak, hungarian
This information has been verified: Yaroslav Shiryaev
Share with friends:
◀ Previous
Civic 7: Fuel injection system
Next ▶

Variable Valve Timing Control (VTEC) Valve
Variable Valve Timing (VTC) Valve
Oxygen Sensor/Fuel Ratio Sensor Heater
Oxygen sensor after catalytic converter
Oxygen sensor before catalytic converter
Control unit
Diagnostic system
See also other articles from Honda manuals:
Fuel Tank — Accord 1984-89, Prelude 1984-85 Honda Accord 3 (1985-1989)
Fuel tank Honda Fit 1 (2001-2008)
Fuel tank — removal and installation Honda CR-V 1 (1995-2001, petrol)
Fuel tank — replacement Honda HR-V 1 (1998-2006, petrol)
Fuel tank filler neck Honda Avancier 1 (1999-2003, petrol)
Link in different formats to this article
Comments and feedback from visitors
No comments yet


How much will 39 + 45 ?


Civic 8 (2005-2011) 
  • General information
  • Technical data
  • Governing bodies
  • Driving and maintenance
  • Power unit
  • Gasoline engines (L13A)
  • Gasoline engines (R18A)
  • Diesel engines (N22A)
  • Cooling and lubrication (L13A)
  • Cooling and lubrication (R18A)
  • Cooling and lubrication (N22A)
  • Injection system (gasoline)
  • Injection system (diesel)
  • Toxicity reduction system
  • Troubleshooting
  • Transmission
  • Clutch and drive shafts
  • Mechanical gearbox
  • Chassis and running gear
  • Suspension and wheels
  • Steering
  • Brake system
  • Body and interior
  • Exterior (external elements)
  • Doors, locks and windows
  • Electrical equipment
  • Equipment and devices
  • Headlights and lighting
  • Power devices
  • Electrical circuits
Civic 7 (2000-2005) 
  • General information
  • User manual
  • Maintenance
  • Power unit
  • Engines D15B and D17A
  • K20A Engines
  • Overhaul engine
  • Cooling system
  • Lubrication system
  • Fuel injection system
  • Toxicity reduction system
  • Engine electrical equipment
  • Transmission
  • Clutch
  • Manual gearbox
  • Automatic gearbox
  • Variator (CVT)
  • Drive shafts
  • Chassis and running gear
  • Car suspension
  • Steering
  • Brake system
  • Body and interior
  • Exterior (external elements)
  • Interior (internal elements)
  • Doors, locks and windows
  • Heater and air conditioner
  • Manual air conditioner
  • Automatic air conditioner
  • Security system
  • Electrical equipment
  • Equipment and devices
  • Headlights and lighting
  • Windscreen wipers
  • Audio system
  • Electrical diagrams
Civic 6 (1995-2000) 
  • General information
  • Introduction to guide
  • User manual
  • Maintenance
  • Power unit
  • Engine in car (Civic)
  • Engine in car (Integra)
  • Engine overhaul
  • Cooling and heating
  • Power and exhaust systems
  • Engine electrical equipment
  • Engine management systems
  • Transmission
  • Manual gearbox
  • Automatic transmission (AT/CVT)
  • Clutch and drive shafts
  • Chassis and running gear
  • Brake system
  • Car suspension
  • Steering
  • Body and interior
  • Exterior (external elements)
  • Interior (internal elements)
  • Doors, locks and windows
  • Electrical equipment
  • Equipment and devices
  • Electrical circuits
Civic 5 and 6 (1991-2000) 
  • Power unit
  • SOHC engines
  • DOHC engines
  • Engine overhaul
  • Cooling and lubrication system
  • Intake and exhaust system
  • Fuel injection system (SOHC)
  • Fuel injection system (DOHC)
  • Carburetor
  • Transmission
  • Clutch
  • Manual gearbox S4C
  • Manual gearbox S40
  • Automatic gearbox
  • Drive shafts
  • Chassis and running gear
  • Car suspension
  • Steering
  • Brake system
  • Body and interior
  • Body elements
  • Heater and air conditioner
  • Electrical equipment
  • Power devices
  • Equipment and instruments
  • Electrical circuits
Civic 3 and 4 (1983-1991) 
  • General information
  • Maintenance
  • Power unit
  • Engine in a car
  • Engine overhaul
  • Cooling system
  • Power and exhaust system
  • Engine electrical equipment
  • Emission control system
  • Transmission
  • Mechanical gearbox
  • Automatic gearbox
  • Clutch and drive shafts
  • Four-wheel drive
  • Chassis and running gear
  • Brake system
  • Car suspension
  • Steering
  • Body and interior
  • Body elements
  • Electrical equipment
  • Equipment and devices
  • Electrical circuits
HondaBook.ru © 2018–2026 • Mobile version • Sitemap: EN BG BY UA RS HR RO PL SK HU • Feedback • Driver Information • Search system • Bookmark
Accord 3 (1985-1989) • Accord 6 (1997-2002) • Civic 3 and 4 (1983-1991) • Civic 5 and 6 (1991-2000) • Civic 6 (1995-2000) • Civic 7 (2000-2005) • Civic 8 (2005-2011) • Fit 1 (2001-2008) • CR-V 1 (1995-2001) • CR-V 2 (2002-2006) • HR-V 1 (1998-2006) • Avancier 1 (1999-2003) •
 
This website uses cookies to ensure proper functioning. By clicking "OK," you agree.