
Removal and installation
Note:
- When removing and installing the steering column, refer to the assembly drawing "Removing and installing the steering column".
- Installation is carried out in the reverse order of removal.
1. Disconnect the cable from the negative terminal of the battery.
2. Remove the driver's airbag (see chapter "Supplementary Restraint System (SRS)").
3. Remove the steering wheel (see section "Steering wheel").
4. Remove the upper and lower steering column covers.
5. Loosen the screw at the top of the combination switch and remove the combination switch.
6. Disconnect the connectors from the ignition switch.
7. Disconnect the joint from the steering shaft.
8. Loosen the bolts and remove the steering column.
Steering column tilt adjustment lever
Examination
1. Move the adjustment lever from the "Locked" position to the "Not Locked" position and back 3-5 times.
2. Using a dynamometer, measure the force on the adjustment lever at a distance of 10 mm from the edge of the lever.
Force 70 - 90 N
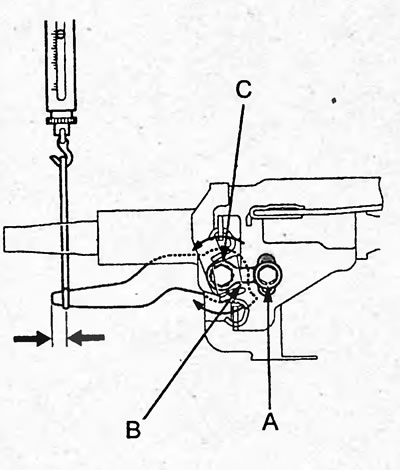
If necessary, adjust the tension on the adjustment lever.
Adjustment
1. Set the tilt steering column adjustment lever to the "Unlocked" position. Set the steering wheel to the neutral position.
2. Loosen the lock bolt (A) and remove the stopper (B).
3. Turn the bolt (C) clockwise or counterclockwise to adjust the force on the adjustment lever.
4. Set the adjustment lever to the highest position and install the stopper. Tighten the stopper bolt.
5. Check the force on the steering column tilt adjustment lever and, if necessary, repeat the adjustment.
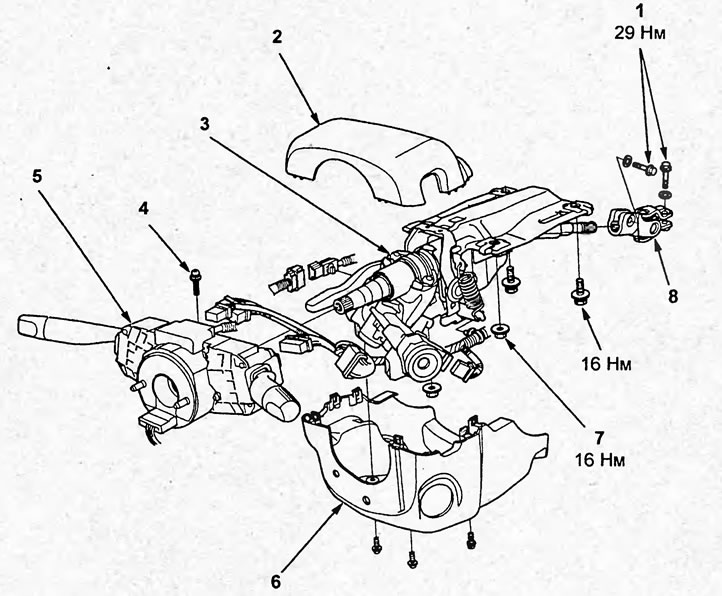
Removal and installation the steering column. 1 - bolt, 2 - upper steering column cover, 3 - steering column, 4 - screw, 5 - combination switch, 6 - lower steering column cover, 7 - nut, 8 - joint.
[Full version on the source website: HONDABOOK]