
HondaBook.ru
Auto companies Volkswagen Auto companies Ford Auto companies Lada Auto companies Skoda Auto companies BMW Auto companies Mazda Auto companies Peugeot
English Русский
Български
Беларускі
Український
Српски
Hrvatski
Română
Polski
Slovenský
Magyar
Bookmark Contacts Sitemap   


Accord Civic Fit / Jazz CR-V HR-V Others Articles
Civic 3 and 4 (1983-1991) Civic 5 and 6 (1991-2000) Civic 6 (1995-2000) Civic 7 (2000-2005) Civic 8 (2005-2011)

Removal and installation the clutch master cylinder (Honda Civic 6)

  • Main
  • Honda Civic
  • 6 (1995-2000)
  • Transmission
  • Clutch and drive shafts
  • Removal and installation the clutch master cylinder
0
Contents: Removal ⇊ Installation ⇊

Removal


1. Disconnect the negative cable from the battery.

Warning! If the car stereo system is equipped with a security code, make sure you have the correct combination to activate the audio system before disconnecting the battery!


2. Under the instrument panel, remove the pin and disconnect the split pin of the hydraulic master cylinder push rod from the clutch pedal.
2. Under the instrument panel, remove the pin and…


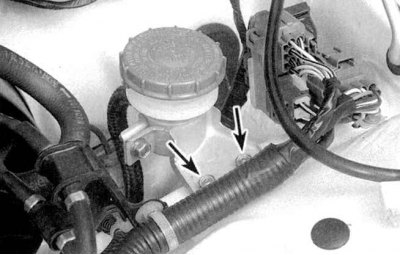
3a. Disconnect the clutch master cylinder reservoir (see accompanying illustration).
3a. Disconnect the clutch master cylinder…


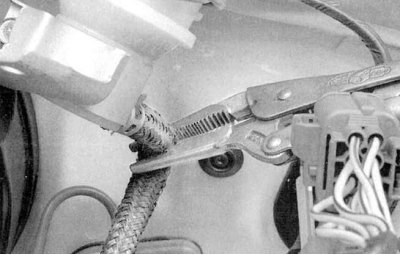
3b. Use self-locking pliers to clamp the feed hose connecting the reservoir to the master cylinder (see accompanying illustration).

Note: The hose should be pinched at a distance of about 5 cm from the cut cylinder stretched onto the nipple.


Note: The hose should be pinched at a distance of…


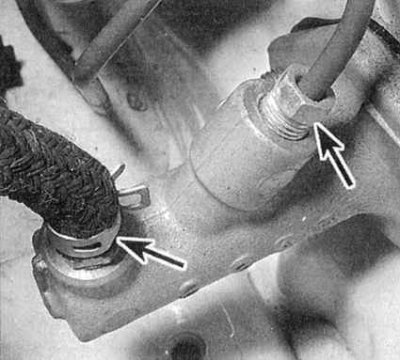
4. Disconnect the hydraulic lines from the master cylinder (see accompanying illustration). To minimize hydraulic fluid loss, wrap the fittings with rags. Immediately plug the open ends of lines and fittings to prevent dirt from entering the system.

Caution: To avoid damage to the paintwork, do not allow hydraulic fluid to come into contact with painted surfaces of body panels.

Caution: To avoid damage to the paintwork, do not…


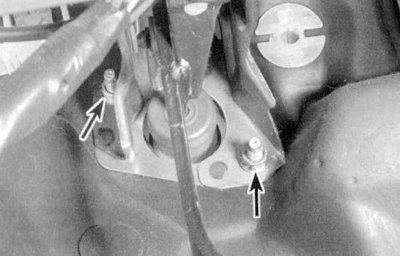
5. In the car's interior, under the instrument panel, loosen the two nuts securing the master cylinder to the engine compartment bulkhead (see accompanying illustration). Remove the cylinder from the vehicle.

Installation


1. Place the master cylinder in its regular place and secure it with bolts, hand tightening the nuts.

2. Restore the original hydraulic line connections. If necessary, slightly adjust the cylinder position to facilitate fitting the pressure line nipple. Tighten the supply hose clamp.


3. Tighten the fastener and the hydraulic line fitting securely.

4. Connect the push rod to the clutch pedal and secure the split pin with a new pin.

5. Remove the pliers that clamp the feed hose. Fill the reservoir with the required amount of DOT 3 brake fluid (see Chapter Routine maintenance), then remove air pockets from the tract (see Bleeding air from the hydraulic circuit of the clutch release drive).

[Full text available on the portal HONDABOOK]
This article is available at: russian, bulgarian, belarusian, ukrainian, serbian, croatian, romanian, polish, slovak, hungarian
This information has been verified: Timofey Goryachev
Share with friends:
◀ Previous
Civic 6: Clutch and drive shafts
Next ▶

Clutch — General information and component condition check
Clutch and Drive Shaft Specifications
Clutch and Drive Shafts — General Information
Removal and installation the clutch slave cylinder
Bleeding air from the hydraulic circuit of the clutch release drive
Removal, inspection and installation of clutch assembly components
Checking the condition and replacing the guide bearing
Removal, checking and installation the release bearing and clutch release fork
See also other articles from Honda manuals:
Clutch Master Cylinder — Removal and Installation Honda Accord 3 (1985-1989)
Clutch release master cylinder Honda Fit 1 (2001-2008)
Clutch master cylinder Honda CR-V 1 (1995-2001, petrol)
Clutch Master Cylinder — Repair and Inspection Honda HR-V 1 (1998-2006, petrol)
Master Cylinder and Brake Booster — Removal and Installation Honda Avancier 1 (1999-2003, petrol)
Link in different formats to this article
Comments and feedback from visitors
No comments yet


How much will 39 + 29 ?


Civic 8 (2005-2011) 
  • General information
  • Technical data
  • Governing bodies
  • Driving and maintenance
  • Power unit
  • Gasoline engines (L13A)
  • Gasoline engines (R18A)
  • Diesel engines (N22A)
  • Cooling and lubrication (L13A)
  • Cooling and lubrication (R18A)
  • Cooling and lubrication (N22A)
  • Injection system (gasoline)
  • Injection system (diesel)
  • Toxicity reduction system
  • Troubleshooting
  • Transmission
  • Clutch and drive shafts
  • Mechanical gearbox
  • Chassis and running gear
  • Suspension and wheels
  • Steering
  • Brake system
  • Body and interior
  • Exterior (external elements)
  • Doors, locks and windows
  • Electrical equipment
  • Equipment and devices
  • Headlights and lighting
  • Power devices
  • Electrical circuits
Civic 7 (2000-2005) 
  • General information
  • User manual
  • Maintenance
  • Power unit
  • Engines D15B and D17A
  • K20A Engines
  • Overhaul engine
  • Cooling system
  • Lubrication system
  • Fuel injection system
  • Toxicity reduction system
  • Engine electrical equipment
  • Transmission
  • Clutch
  • Manual gearbox
  • Automatic gearbox
  • Variator (CVT)
  • Drive shafts
  • Chassis and running gear
  • Car suspension
  • Steering
  • Brake system
  • Body and interior
  • Exterior (external elements)
  • Interior (internal elements)
  • Doors, locks and windows
  • Heater and air conditioner
  • Manual air conditioner
  • Automatic air conditioner
  • Security system
  • Electrical equipment
  • Equipment and devices
  • Headlights and lighting
  • Windscreen wipers
  • Audio system
  • Electrical diagrams
Civic 6 (1995-2000) 
  • General information
  • Introduction to guide
  • User manual
  • Maintenance
  • Power unit
  • Engine in car (Civic)
  • Engine in car (Integra)
  • Engine overhaul
  • Cooling and heating
  • Power and exhaust systems
  • Engine electrical equipment
  • Engine management systems
  • Transmission
  • Manual gearbox
  • Automatic transmission (AT/CVT)
  • Clutch and drive shafts
  • Chassis and running gear
  • Brake system
  • Car suspension
  • Steering
  • Body and interior
  • Exterior (external elements)
  • Interior (internal elements)
  • Doors, locks and windows
  • Electrical equipment
  • Equipment and devices
  • Electrical circuits
Civic 5 and 6 (1991-2000) 
  • Power unit
  • SOHC engines
  • DOHC engines
  • Engine overhaul
  • Cooling and lubrication system
  • Intake and exhaust system
  • Fuel injection system (SOHC)
  • Fuel injection system (DOHC)
  • Carburetor
  • Transmission
  • Clutch
  • Manual gearbox S4C
  • Manual gearbox S40
  • Automatic gearbox
  • Drive shafts
  • Chassis and running gear
  • Car suspension
  • Steering
  • Brake system
  • Body and interior
  • Body elements
  • Heater and air conditioner
  • Electrical equipment
  • Power devices
  • Equipment and instruments
  • Electrical circuits
Civic 3 and 4 (1983-1991) 
  • General information
  • Maintenance
  • Power unit
  • Engine in a car
  • Engine overhaul
  • Cooling system
  • Power and exhaust system
  • Engine electrical equipment
  • Emission control system
  • Transmission
  • Mechanical gearbox
  • Automatic gearbox
  • Clutch and drive shafts
  • Four-wheel drive
  • Chassis and running gear
  • Brake system
  • Car suspension
  • Steering
  • Body and interior
  • Body elements
  • Electrical equipment
  • Equipment and devices
  • Electrical circuits
HondaBook.ru © 2018–2026 • Mobile version • Sitemap: EN BG BY UA RS HR RO PL SK HU • Feedback • Driver Information • Search system • Bookmark
Accord 3 (1985-1989) • Accord 6 (1997-2002) • Civic 3 and 4 (1983-1991) • Civic 5 and 6 (1991-2000) • Civic 6 (1995-2000) • Civic 7 (2000-2005) • Civic 8 (2005-2011) • Fit 1 (2001-2008) • CR-V 1 (1995-2001) • CR-V 2 (2002-2006) • HR-V 1 (1998-2006) • Avancier 1 (1999-2003) •
 
This website uses cookies to ensure proper functioning. By clicking "OK," you agree.