
Examination
Lockout control solenoid valve
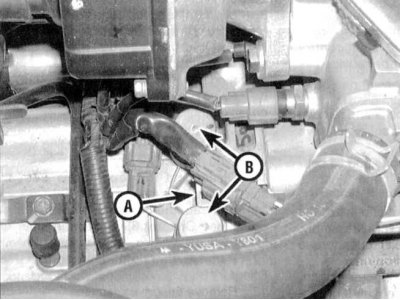
1. Disconnect the electrical connector of the lockout control solenoid valve assembly (see accompanying illustration).
2. Measure the resistance between each of the connector terminals (valve side) and mass. Compare measurement results with requirements Specifications. Replace the valve assembly if necessary.
3. Alternately connect each of the connector terminals to the positive pole of the battery - a clearly audible click should be heard, accompanying the operation of each of the valves. If a click is not heard, the vehicle should be taken to a workshop for a full diagnosis of the ECM and solenoid valve circuits.
Shift lock control solenoid valve
1. Disconnect the shift lock control solenoid valve electrical connector (see accompanying illustration).
2. Measure the resistance between each of the connector terminals (valve side) and mass. Compare measurement results with requirements Specifications. Replace the valve assembly if necessary.
3. Alternately connect each of the connector terminals to the positive pole of the battery - a clearly audible click should be heard, accompanying the operation of each of the valves. If a click is not heard, the vehicle should be taken to a workshop for a full diagnosis of the ECM and solenoid valve circuits.
4. Connect each of the connector terminals in turn to the positive pole of the battery - a distinctly audible click should be heard, accompanying the operation of each of the valves. If a click is not heard, the vehicle should be taken to a workshop for a full diagnosis of the ECM and solenoid valve circuits.
Replacement
Note. It is not possible to replace only one of the solenoid valves individually. The entire valve assembly must be replaced (lock-up control valve and shift lock control valve).
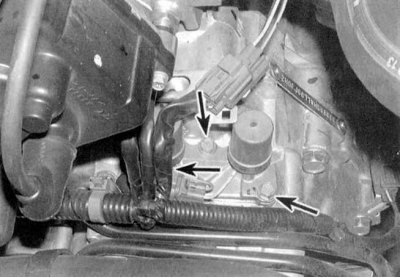
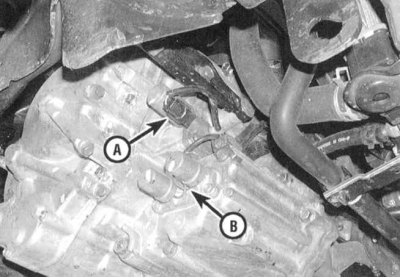
1. Give fixing bolts and remove valve assembly (see accompanying illustration).
2. Thoroughly wipe mating surfaces and clean oil passages.
3. Replace the gasket and install the new valve assembly in its original location. Tighten the fixing bolts to the required torque.
4. Check the electrical connector for signs of contamination and oxidation, clean and reconnect if necessary.
5. Check the operation of the control solenoid valves (see above).