
Clutch pedal adjustment details
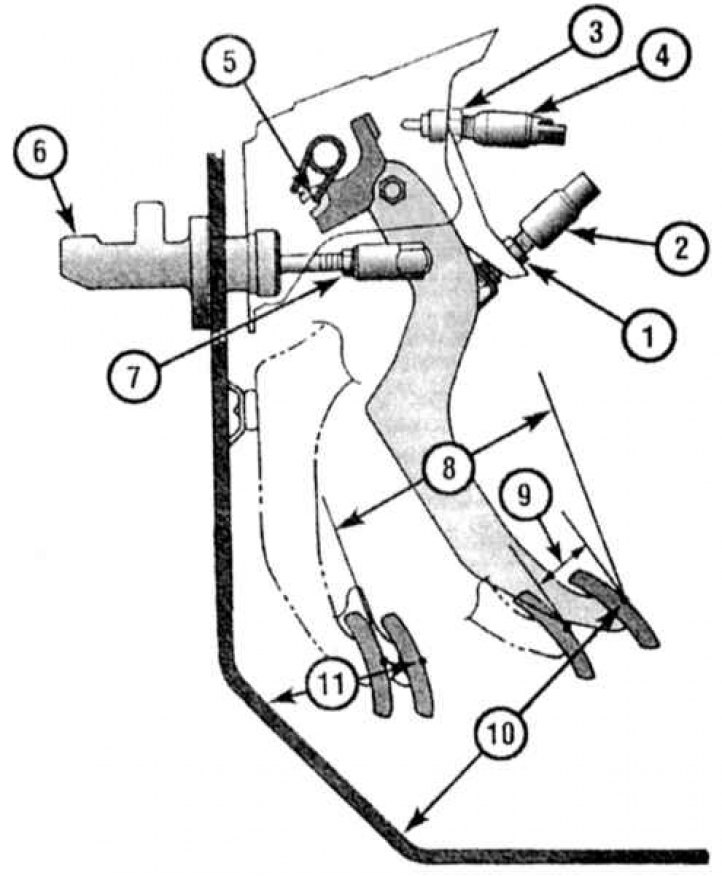
1 - Locknut of the sensor-switch A; 2 - Sensor-switch A; 3 - Locknut of sensor-switch B; 4 - Sensor-switch B for opening the starter circuit; 5 - Auxiliary spring; 6 - Clutch master cylinder; 7 - Locknut of the pusher of the main cylinder; 8 - Full stroke of the clutch pedal; 9 - Free travel of the clutch pedal; 10 - Height of the clutch pedal; 11 - The height of the depressed clutch pedal
Pedal Height
The height of the pedal position is the distance from its lining to the floor panel (see accompanying illustration). If the measurement result of this distance is outside the allowable range, it is necessary to make an appropriate adjustment.
1. To adjust the position of the pedal, loosen the locknut of the clutch switch (A) or adjusting bolt and turn the switch so that it is no longer in contact with the pedal. Now loosen the pusher locknut (see illustration above) and, turning the latter, correct the height of the pedal position as required. Tighten locknut.
2. Turn the switch/bolt clockwise to bring it into contact with the pedal lever, then tighten it another 3/4 turn/turn. Tighten locknut.
3. Adjust starter open circuit switch (see Check of a condition, replacement and adjustment of the gauge switch of opening of a chain of a starter).
Pedal free play
Free play is the distance the pedal travels without encountering resistance and without causing the clutch to engage (see illustration above). If the pedal free play is outside the allowable range, it is necessary to make an appropriate adjustment.
1. To adjust the free play, loosen the locknut on the pedal pusher, then rotate the pusher until you get the desired result. Tighten locknut.
2. Make sure that the sensor-switch of opening the starter circuit is adjusted correctly (see Check of a condition, replacement and adjustment of the gauge switch of opening of a chain of a starter)