
Contents: Removal ⇊ Installation ⇊
Removal
1. Warm up the engine to normal operating temperature, then drain the engine oil and remove the oil filter (see Chapter Routine maintenance).
2. Disconnect the negative cable from the battery.
Warning! If the car stereo system is equipped with a security code, make sure you have the correct combination to activate the audio system before disconnecting the battery!
3. Jack up the car and place it on supports. Remove the crankcase guard.
4. Remove the exhaust pipe (see Chapter Power and exhaust systems).
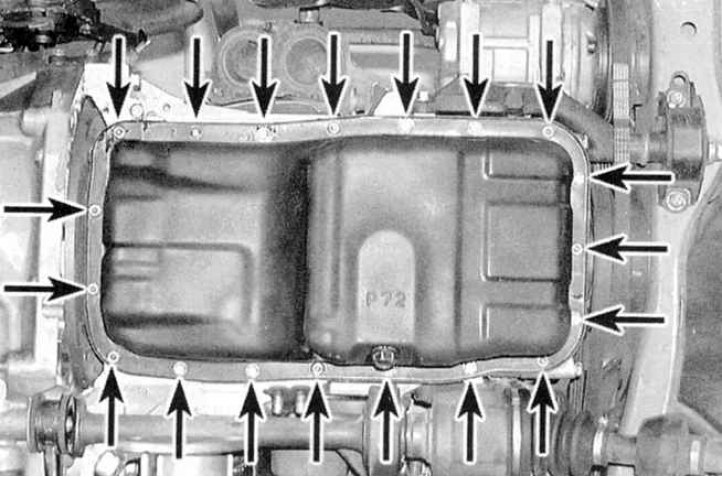
5. Remove the bolts securing the oil pan to the engine block (see accompanying illustration).
6. Tap the tray around the perimeter with a soft-faced hammer to break up the sealant layer and separate it from the block (do not attempt to pry the tray under the mating surface under any circumstances).
7. Scrape off all traces of sealant and old gasket material from the mating surfaces of the pan and block. Remove the end sealing inserts from the pan or block. Carefully wipe the mating surfaces with a rag soaked in acetone. Clean and dry the threaded holes in the block.
Installation
1. Wash the tray with solvent and dry it thoroughly. Make sure that there are no deformations of the tray mounting flange; if necessary, place the tray with the flange on a flat wooden block and straighten it.
2. Apply a 3mm thick bead of RTV sealant to the gasket surface of the pan flange. Make sure that the sealant is applied to the inside of the bolt holes.
3. Carefully press the tray onto the block.
4. Screw in the bolts in several steps (1/4 turn per set) tighten them to the required torque (see Specifications). Start tightening with the bolt closest to the center and move in a spiral outward. Remember that overtightening the fasteners can cause leaks.
5. Fill with engine oil (see Chapter Routine maintenance), start the engine and check the oil pan for leaks.
The article was copied from the website www.HondaBook.ru