
HondaBook.ru
Auto companies Volkswagen Auto companies Ford Auto companies Lada Auto companies Skoda Auto companies BMW Auto companies Mazda Auto companies Peugeot
English Русский
Български
Беларускі
Український
Српски
Hrvatski
Română
Polski
Slovenský
Magyar
Bookmark Contacts Sitemap   


Accord Civic Fit / Jazz CR-V HR-V Others Articles
Civic 3 and 4 (1983-1991) Civic 5 and 6 (1991-2000) Civic 6 (1995-2000) Civic 7 (2000-2005) Civic 8 (2005-2011)

Checking the battery status and replacing it (Honda Civic 6)

  • Main
  • Honda Civic
  • 6 (1995-2000)
  • Power unit
  • Engine electrical equipment
  • Checking the battery status and replacing it
0
Contents: Examination ⇊ Replacement ⇊

Examination


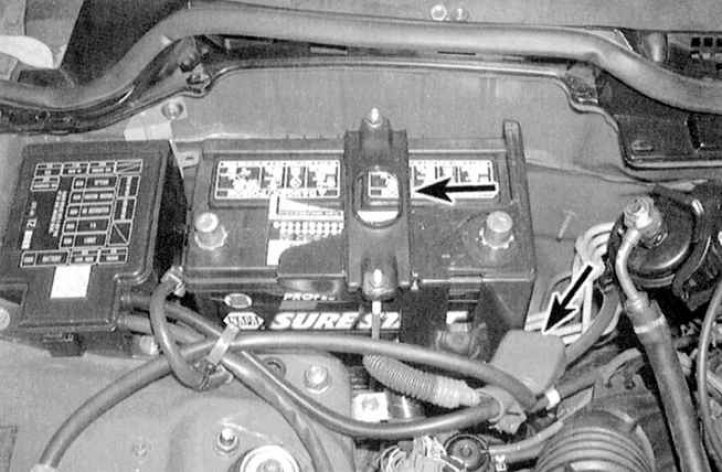
1. Disconnect both wires from the battery.

Caution! The negative cable should always be disconnected first and reconnected last. If the car stereo system is equipped with a security code, make sure you have the correct combination to activate the system before disconnecting the battery!

Caution! The negative cable should always be…


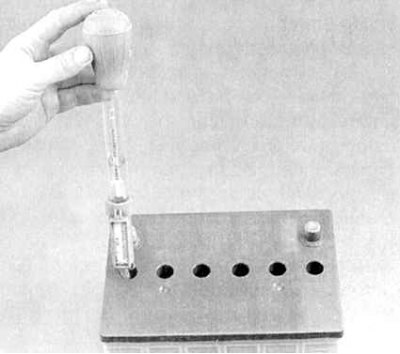
2. Check the electrolyte level in the battery (only applies to batteries that require maintenance and are equipped with removable covers) – the electrolyte should completely cover the lamellas, otherwise the appropriate amount of distilled water should be added to the jars. DO NOT OVERFILL – excess electrolyte will start to spill over the edges of the necks when the battery is overcharged! Using a hydrometer (ask in car accessories stores) measure the specific gravity of the electrolyte (see accompanying illustration). Remove the caps from the filler necks and take a sample of electrolyte from each of the battery jars in turn with a hydrometer. Following the manufacturer's instructions, determine the specific gravity of the electrolyte by the position of the measuring float of the device. At a normal charge level, the specific gravity of the electrolyte should be 1.270 units (green zone of the measuring scale). When the electrolyte density is too low (red zone of the scale) the battery should be charged (see Chapter Routine maintenance). The battery output voltage should be 12.6V or slightly higher.


Note: The nominal value of the electrolyte density is determined depending on the ambient temperature (and is directly proportional to it) – use the temperature map supplied by the manufacturer with the battery.

Note: The nominal value of the electrolyte…


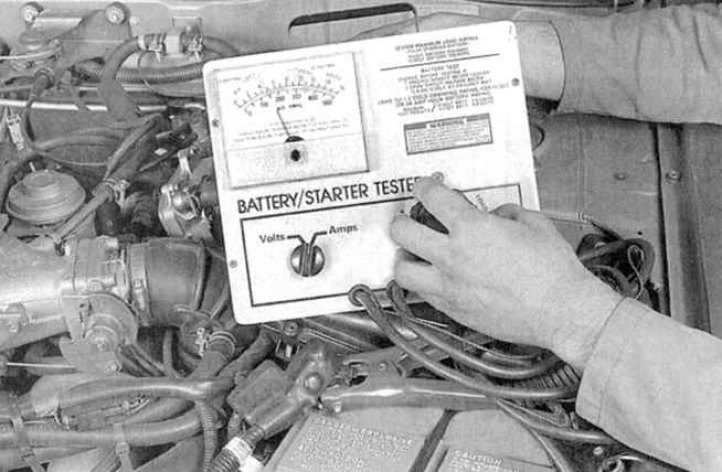
3. A more accurate check of the battery condition can be made using a universal meter (ask in car accessories stores). The device allows you to determine the battery's ability to conduct the starter and supply power to on-board consumers of electricity under increased loads on the engine. Connect the meter to the battery terminals (see accompanying illustration). Follow the device manufacturer's instructions - when the load is turned on for 15 seconds, the battery voltage should not drop below 9.6 V, otherwise the battery must be replaced.

Note: At ambient temperatures below 0°C, the minimum acceptable reading is reduced to 9.1 V.


Replacement


1. Disconnect both wires from the battery.

Caution! The negative cable should always be disconnected first and reconnected last. If the car stereo system is equipped with a security code, make sure you have the correct combination to activate the system before disconnecting the battery!


Caution! The negative cable should always be…


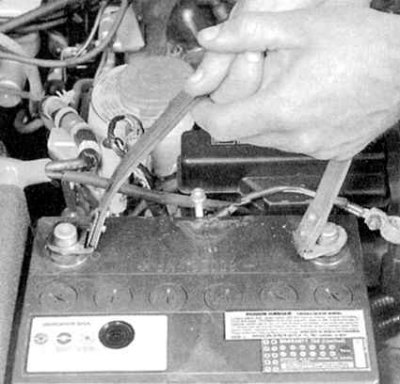
2. Release the fastener and remove the battery mounting clamp on the tray (see accompanying illustration).
2. Release the fastener and remove the battery…


3. Remove the battery from the tray (see accompanying illustration).

Note: Special brackets with a handle are available. Using such a bracket significantly simplifies the procedure for removing the battery from the engine compartment.


4. Remove the pan and carefully inspect it for signs of corrosion.

5. If necessary, remove the pallet support in order to remove corrosion products from underneath it and to apply appropriate protective treatment to the metal (use zinc based primers).

6. When replacing, make sure that the replacement battery meets the characteristics of your vehicle.

7. Installation is carried out in reverse order.
This article is available at: russian, bulgarian, belarusian, ukrainian, serbian, croatian, romanian, polish, slovak, hungarian
This information has been verified: Timofey Goryachev
Share with friends:
◀ Previous
Civic 6: Engine electrical equipment
Next ▶

Engine Electrical Specifications
Engine electrical components layout diagram
Engine Electrical Equipment — General Information and Precautions
Checking the condition and replacing battery wires
Ignition system — general information
Checking the functioning of the ignition system
Checking the condition and replacing the ignition coil
Checking and replacing the ignition control module (ICM)
See also other articles from Honda manuals:
Checking the battery status and replacing it Honda Accord 6 (1997-2002)
Checking and replacing fuses Honda Fit 1 (2001-2008)
Battery — Checking, Removing and Installing Honda CR-V 1 (1995-2001, petrol)
Piston rings — checking and replacing Honda HR-V 1 (1998-2006, petrol)
Checking and replacing fuses Honda Avancier 1 (1999-2003, petrol)
Link in different formats to this article
Comments and feedback from visitors
No comments yet


How much will 45 + 20 ?


Civic 8 (2005-2011) 
  • General information
  • Technical data
  • Governing bodies
  • Driving and maintenance
  • Power unit
  • Gasoline engines (L13A)
  • Gasoline engines (R18A)
  • Diesel engines (N22A)
  • Cooling and lubrication (L13A)
  • Cooling and lubrication (R18A)
  • Cooling and lubrication (N22A)
  • Injection system (gasoline)
  • Injection system (diesel)
  • Toxicity reduction system
  • Troubleshooting
  • Transmission
  • Clutch and drive shafts
  • Mechanical gearbox
  • Chassis and running gear
  • Suspension and wheels
  • Steering
  • Brake system
  • Body and interior
  • Exterior (external elements)
  • Doors, locks and windows
  • Electrical equipment
  • Equipment and devices
  • Headlights and lighting
  • Power devices
  • Electrical circuits
Civic 7 (2000-2005) 
  • General information
  • User manual
  • Maintenance
  • Power unit
  • Engines D15B and D17A
  • K20A Engines
  • Overhaul engine
  • Cooling system
  • Lubrication system
  • Fuel injection system
  • Toxicity reduction system
  • Engine electrical equipment
  • Transmission
  • Clutch
  • Manual gearbox
  • Automatic gearbox
  • Variator (CVT)
  • Drive shafts
  • Chassis and running gear
  • Car suspension
  • Steering
  • Brake system
  • Body and interior
  • Exterior (external elements)
  • Interior (internal elements)
  • Doors, locks and windows
  • Heater and air conditioner
  • Manual air conditioner
  • Automatic air conditioner
  • Security system
  • Electrical equipment
  • Equipment and devices
  • Headlights and lighting
  • Windscreen wipers
  • Audio system
  • Electrical diagrams
Civic 6 (1995-2000) 
  • General information
  • Introduction to guide
  • User manual
  • Maintenance
  • Power unit
  • Engine in car (Civic)
  • Engine in car (Integra)
  • Engine overhaul
  • Cooling and heating
  • Power and exhaust systems
  • Engine electrical equipment
  • Engine management systems
  • Transmission
  • Manual gearbox
  • Automatic transmission (AT/CVT)
  • Clutch and drive shafts
  • Chassis and running gear
  • Brake system
  • Car suspension
  • Steering
  • Body and interior
  • Exterior (external elements)
  • Interior (internal elements)
  • Doors, locks and windows
  • Electrical equipment
  • Equipment and devices
  • Electrical circuits
Civic 5 and 6 (1991-2000) 
  • Power unit
  • SOHC engines
  • DOHC engines
  • Engine overhaul
  • Cooling and lubrication system
  • Intake and exhaust system
  • Fuel injection system (SOHC)
  • Fuel injection system (DOHC)
  • Carburetor
  • Transmission
  • Clutch
  • Manual gearbox S4C
  • Manual gearbox S40
  • Automatic gearbox
  • Drive shafts
  • Chassis and running gear
  • Car suspension
  • Steering
  • Brake system
  • Body and interior
  • Body elements
  • Heater and air conditioner
  • Electrical equipment
  • Power devices
  • Equipment and instruments
  • Electrical circuits
Civic 3 and 4 (1983-1991) 
  • General information
  • Maintenance
  • Power unit
  • Engine in a car
  • Engine overhaul
  • Cooling system
  • Power and exhaust system
  • Engine electrical equipment
  • Emission control system
  • Transmission
  • Mechanical gearbox
  • Automatic gearbox
  • Clutch and drive shafts
  • Four-wheel drive
  • Chassis and running gear
  • Brake system
  • Car suspension
  • Steering
  • Body and interior
  • Body elements
  • Electrical equipment
  • Equipment and devices
  • Electrical circuits
HondaBook.ru © 2018–2026 • Mobile version • Sitemap: EN BG BY UA RS HR RO PL SK HU • Feedback • Driver Information • Search system • Bookmark
Accord 3 (1985-1989) • Accord 6 (1997-2002) • Civic 3 and 4 (1983-1991) • Civic 5 and 6 (1991-2000) • Civic 6 (1995-2000) • Civic 7 (2000-2005) • Civic 8 (2005-2011) • Fit 1 (2001-2008) • CR-V 1 (1995-2001) • CR-V 2 (2002-2006) • HR-V 1 (1998-2006) • Avancier 1 (1999-2003) •
 
This website uses cookies to ensure proper functioning. By clicking "OK," you agree.