
Attention! The negative cable must always be disconnected from the battery first and connected last!
Examination
1. Disconnect both wires from the battery.
Attention! The negative wire should always be disconnected first and connected last. If the stereo system installed in the car is equipped with a security code, before disconnecting the battery, make sure that you have the correct combination to activate the equipment!
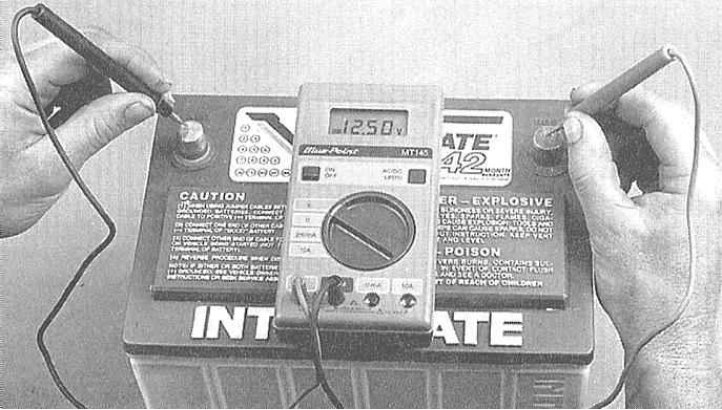
2. Check the electrolyte level in the battery (only applies to batteries equipped with removable covers that require maintenance) - the electrolyte must completely hide the lamellae, otherwise the corresponding amount of distilled water should be put into the jars. DO NOT OVERFLOW - excess electrolyte will begin to overflow over the edges of the necks when the battery is overcharged! With a hydrometer (ask at car accessories stores) measure the specific gravity of the electrolyte. Remove the caps from the filler necks and take a sample of the electrolyte with a hydrometer one by one from each of the battery cans. Following the manufacturer's instructions, determine the specific gravity of the electrolyte from the position of the instrument's measuring float. At a normal charge level, the specific gravity of the electrolyte should be 1.270 units (green area of the measuring scale). If the density of the electrolyte is too low (red zone of the scale) battery needs to be charged (see chapter Settings and ongoing maintenance). Maintenance-free batteries are usually equipped with a special color indicator. When the spot in the viewing window of the indicator turns black, the battery should be charged without delay. After checking the density of the electrolyte, you should measure the output voltage of the battery using a digital voltmeter.
Note. Before connecting the voltmeter to the battery, remove the surface charge - turn on the high beam for about 10 seconds, then turn off all on-board electrical consumers and wait about two minutes. With the engine off and consumers disconnected, connect the black voltmeter probe to the negative battery terminal. Connect the red probe to the positive terminal. The battery output voltage should be 11.5÷12.5 V or slightly higher.
The nominal value of the density of the electrolyte is determined depending on the ambient temperature (and is directly proportional to it), - use the temperature chart supplied by the manufacturers with the battery.
With positive results of the above checks, the need to test the battery under load (see below) disappears.
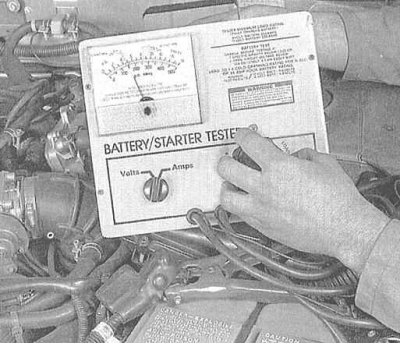
3. A more accurate check of the battery condition can be made using a universal meter (ask at car accessories stores). The device allows to determine the ability of the battery to crank the starter and supply power to on-board power consumers at increased engine loads. Connect the meter to the battery terminals (see accompanying illustration). Follow the manufacturer's instructions - when the load is turned on for 15 seconds, the battery voltage must not drop below 9.6 V, otherwise the battery must be replaced.
Note. At ambient temperatures below 0°C, the minimum allowable reading is reduced to 9.1 V.
Replacement
1. Disconnect both wires from the battery.
Attention! The negative wire should always be disconnected first and connected last. If the stereo system installed in the car is equipped with a security code, before disconnecting the battery, make sure that you have the correct combination to activate the equipment!
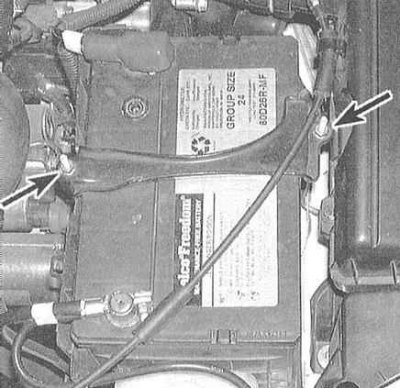
2. Loosen the fasteners and remove the battery clamp on the tray.
3. Remove the battery from the tray.
Note. Special brackets with handles are produced. The use of such brackets greatly simplifies the procedure for removing the battery from the engine compartment.
4. Carefully inspect the sump for signs of corrosion.
5. If necessary, give the fasteners and remove the pan from the engine compartment in order to remove corrosion products from it and carry out the appropriate protective treatment of the metal (use zinc based primers).
6. When replacing, ensure that the replacement battery matches the performance requirements of your vehicle.
7. Installation is carried out in the reverse order.