HondaBook.ru
Auto companies Volkswagen Auto companies Ford Auto companies Lada Auto companies Skoda Auto companies BMW Auto companies Mazda Auto companies Peugeot
English Русский
Български
Беларускі
Український
Српски
Hrvatski
Română
Polski
Slovenský
Magyar
Bookmark Contacts Sitemap   


Accord Civic Fit / Jazz CR-V HR-V Others Articles
HR-V 1 (1998-2006, petrol)

Piston rings — checking and replacing (Honda HR-V 1)

  • Main
  • Honda HR-V
  • 1 (1998-2006, petrol)
  • Power unit
  • Engine repair
  • Piston rings — checking and replacing
0
Contents: Gap in the lock ⇊ Replacement ⇊ Clearance between piston ring and…⇊ Verification ⇊

Gap in the lock


1. Push the new ring into the cylinder using a piston to a depth of 15-20 mm from the bottom.
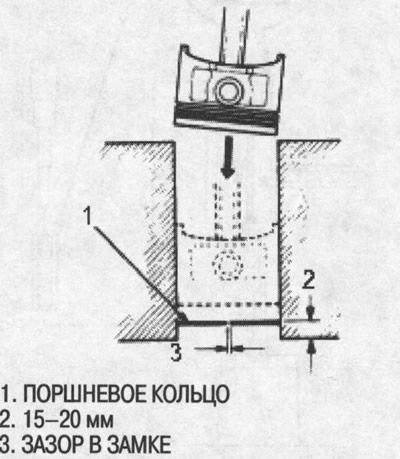
1. Push the new ring into the cylinder using a…


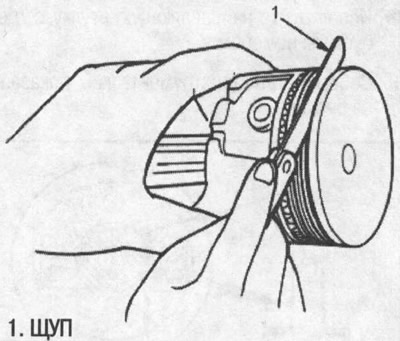
2. Measure the gap in the piston ring lock using a feeler gauge:
  • If the gap is too small, make sure these rings are correct for your engine.
  • If the clearance is too large, recheck the cylinder bore against the wear limit specified above. If the wear exceeds the allowable limit, the cylinder block must be rebored.

Piston ring gap:
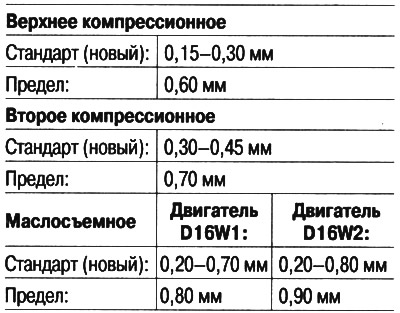
Piston ring gap:


Replacement


1. Remove the old piston rings using a tool.

2. Clean all ring grooves thoroughly.

Note:
  • Use a broken piston ring or a piston ring groove cleaner with a suitable blade.
  • The groove width for the upper compression ring is 1.0 mm (D16W1 engine) or 1.2 mm (D16W2 engine).
  • The width of the groove for the second compression ring is 1.2 mm (D16W1 engine) or 1.5 mm (D16W2 engine).
  • The width of the groove for the oil scraper ring is 2.8 mm.
  • File the blade if necessary.
  • Do not clean the piston bridges between the ring grooves with a wire brush or deepen the bridges with a cleaning tool.


3. Install the new rings in the required position (see below).


Note:
  • Do not reuse old piston rings.
  • If it is necessary to separate the piston from the connecting rod, do not install new rings yet.
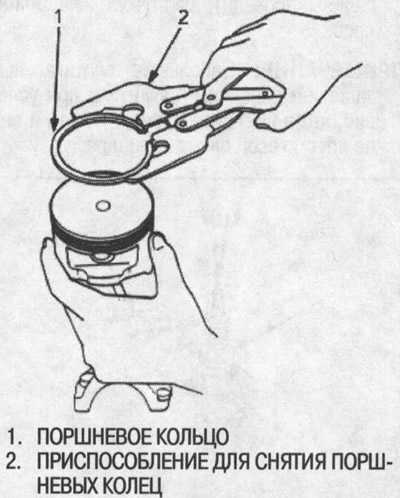

If it is necessary to separate the piston from…


Clearance between piston ring and piston groove


After installing a new set of rings, measure the gap between the ring and the piston groove:

Clearance between upper compression ring and piston groove

Engine D16W1Engine D16W2
Standard (new)0.035-0.060 mm0.030-0.060 mm
Limit0.13 mm0.13 mm

Clearance between the second compression ring and the piston groove

Standard (new)0.030-0.055 mm
Limit0.13 mm

Piston rings — checking and replacing


Verification


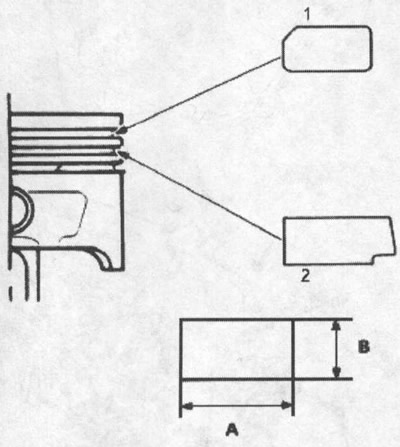
1. Install the rings as shown in the figure.

Note: Factory markings must face upwards.


Piston ring sizes:

Upper compression (standard)

AIN
Engine D16W12.6 mm1.0 mm
Engine D16W22.8 mm1.2 mm


Second compression (standard)

AIN
Engine D16W13.0 mm1.2 mm
Engine D16W23.2 mm1.5 mm

1. upper compression; 2. second compression

1. upper compression; 2. second compression


2. Rotate the rings in the grooves and make sure they do not stick.
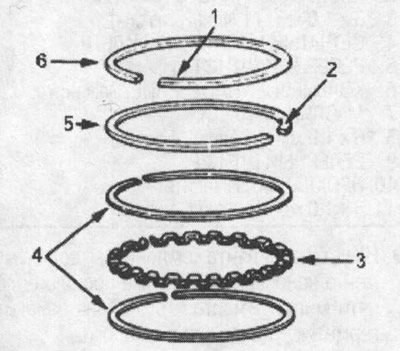
1. label; 2. label; 3. gasket; 4. oil scraper…

1. label; 2. label; 3. gasket; 4. oil scraper ring; 5. second compression ring; 6. Upper compression ring


3. Position the ring locks as shown in the picture.
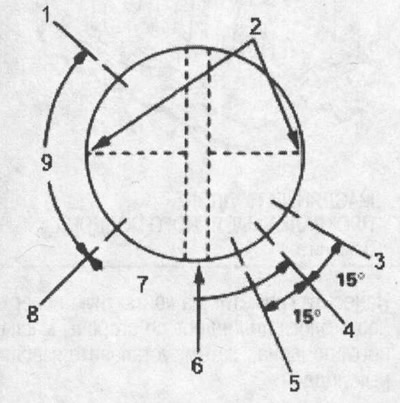
1. Second compression ring lock; 2. Do not place…

1. Second compression ring lock; 2. Do not place the lock of any ring on the piston thrust surfaces.; 3. oil scraper ring lock; 4. gasket lock; 5. oil scraper ring lock; 6. Do not place the lock of any ring opposite the piston pin hole.; 7. about 90°; 8. Upper compression ring lock; 9. about 90°


Full text available on the portal: www.hondabook.ru
This article is available at: russian, bulgarian, belarusian, ukrainian, serbian, croatian, romanian, polish, slovak, hungarian
This information has been verified: Emil Safonov
Share with friends:
◀ Previous
HR-V 1: Engine repair
Next ▶

Piston pins — installation and inspection
Connecting rods — selection
Piston pins — removal
Cylinder Block — Checking and Honing
Pistons — Check
Crankshaft oil seal — installation
Pistons — installation
Crankshaft — installation
Oil pan — installation
Cylinder Head and Valve Train Specifications
See also other articles from Honda manuals:
Checking the condition and replacing the piston position sensor (CYP) Honda Accord 6 (1997-2002)
Checking and replacing the TDC/Crankshaft Position/Piston Position… Honda Civic 6 (1995-2000)
Checking and replacing piston rings Honda Fit 1 (2001-2008)
Replacing piston rings Honda CR-V 2 (2002-2006, petrol)
Checking and replacing fuses Honda Avancier 1 (1999-2003, petrol)
Link in different formats to this article
Comments and feedback from visitors
No comments yet


How much will 46 + 17 ?


HR-V 1 (1998-2006, petrol) 
  • General information
  • User manual
  • Maintenance
  • Power unit
  • Engine repair
  • Lubrication system
  • Cooling system
  • Fuel injection and control
  • Power and exhaust system
  • Engine electrical equipment
  • Transmission
  • Clutch
  • Mechanical gearbox
  • Automatic gearbox
  • Rear differential
  • Drive shafts and cardan
  • Chassis and running gear
  • Steering
  • Car suspension
  • Brake system
  • Body and interior
  • Exterior (external elements)
  • Interior (internal elements)
  • Doors, locks and windows
  • Electrical equipment
  • Equipment and devices
  • Lighting system
  • Electrical circuits
HondaBook.ru © 2018–2026 • Mobile version • Sitemap: EN BG BY UA RS HR RO PL SK HU • Feedback • Driver Information • Search system • Bookmark
Accord 3 (1985-1989) • Accord 6 (1997-2002) • Civic 3 and 4 (1983-1991) • Civic 5 and 6 (1991-2000) • Civic 6 (1995-2000) • Civic 7 (2000-2005) • Civic 8 (2005-2011) • Fit 1 (2001-2008) • CR-V 1 (1995-2001) • CR-V 2 (2002-2006) • HR-V 1 (1998-2006) • Avancier 1 (1999-2003) •
 
This website uses cookies to ensure proper functioning. By clicking "OK," you agree.