
Contents: Examination ⇊ Replacement ⇊
Examination
1. Check the reliability of the connection to the sensor of the electrical connector. Assess the reliability of the terminals and the condition of the electrical wiring. If necessary, carry out the appropriate repair of the circuit.
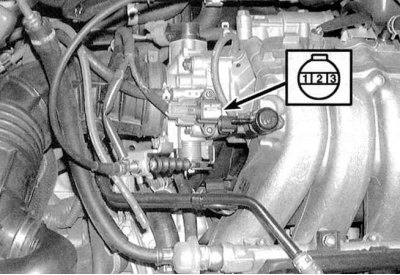
2. Identify the sensor wiring (see accompanying illustration).
Note: The color of the wire insulation may vary depending on the vehicle model (see below).
3. For Civic models, the following color scheme of the MAP sensor wiring is typical:
- a) Yellow-red: nutrition;
- b) Green-white: grounding;
- c) Red-green: signal to ECM/PCM.
4. On 1994 and 1995 Integra models, the following sensor wiring coding is used:
- a) Yellow-red: nutrition (b18B1 engines);
- b) Yellow-white: nutrition (b18C1 engines);
- c) White-yellow: ground:
- d) Green-white: signal to ECM/PCM.
5. Painting the insulation of the MAP sensor wiring for Integra models since 1996:
- a) Yellow-red: nutrition;
- b) Red-green: signal;
- c) Green-white: grounding.
6. Disconnect the sensor electrical connector without starting the engine, turn on the ignition and measure the voltage between the power and ground terminals of the wiring connector. The measurement result should be about 5 V, otherwise check the condition of the wiring, perform the necessary repairs.
7. Remove the mounting screws and remove the sensor from the throttle body (see illustration above), without disconnecting the electrical wiring from it.
8. Connect a voltmeter between the signal wire and ground wire terminals (use a straightened paper clip). With the ignition on (do not start the engine) create a vacuum at the base of the sensor removed from the throttle body. As the depth of the vacuum increases, the signal voltage should decrease (see accompanying table), otherwise replace the sensor.
| Depth of vacuum, mm Hg. | Signal voltage value, V |
| 0 | 3.0 |
| 127 | 2.5 |
| 254 | 2.0 |
| 381 | 1.5 |
| 508 | 1.0 |
| 635 | 0.5 |
Replacement
1. Disconnect the electrical wiring from the MAP sensor (see illustration above).
2. Loosen the mounting screws and remove the sensor from the throttle body.
3. Installation is carried out in reverse order.