
HondaBook.ru
Auto companies Volkswagen Auto companies Ford Auto companies Lada Auto companies Skoda Auto companies BMW Auto companies Mazda Auto companies Peugeot
English Русский
Български
Беларускі
Український
Српски
Hrvatski
Română
Polski
Slovenský
Magyar
Bookmark Contacts Sitemap   


Accord Civic Fit / Jazz CR-V HR-V Others Articles
Accord 3 (1985-1989) Accord 6 (1997-2002)

Checking the condition and replacing the absolute pressure sensor in the pipeline (MAP) (Honda Accord 6)

  • Main
  • Honda Accord
  • 6 (1997-2002)
  • Power unit
  • Engine management
  • Checking the condition and replacing the absolute pressure sensor in the pipeline (MAP)
0
Contents: Examination ⇊ Replacement ⇊

Examination


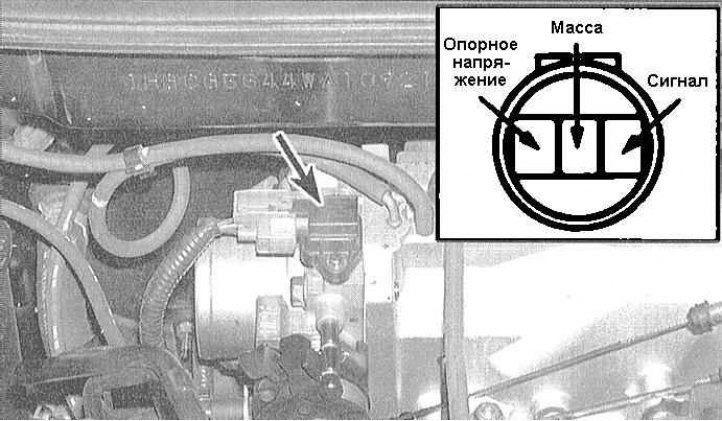
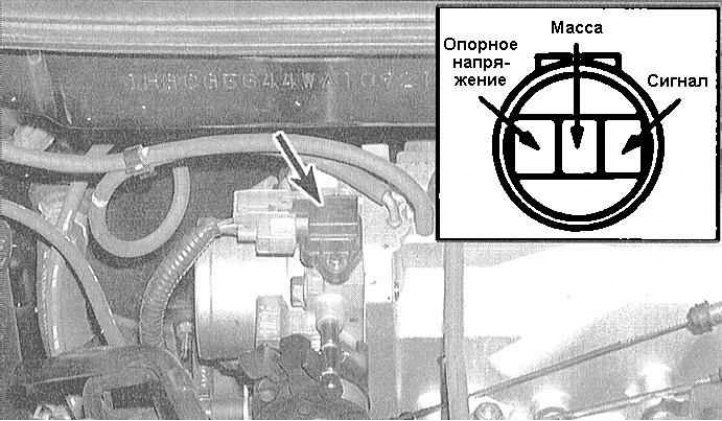
1. The MAP sensor monitors variations in the depth of vacuum in the intake manifold associated with changes in crankshaft speed and current engine load, and converts the received information into an amplitude signal. The PCM uses the information received from the MAP sensor when adjusting the ignition timing settings. The amplitude of the signal generated by the sensor can vary from 1.0÷1.5 V with the throttle valve fully closed (deep vacuum) to 4.0÷4.5 V with the throttle valve fully open (weak vacuum) and can vary slightly depending on the vehicle altitude above sea level. The MAP sensor is attached to the throttle body, its failures lead to the recording of the P0107 or P0108 fault code in the self-diagnostic system memory.
1. The MAP sensor monitors variations in the…


2. Measure the reference voltage supplied to the sensor from the PCM. Disconnect the wiring connector and connect a voltmeter between the REF (+) and GND (-) terminals of the connector. With the ignition on, the device should register a reading of about 5.0 V. The absence of a reference signal indicates an open circuit in the PCM circuit or failure of the module itself.


3. Check the signal voltage of the sensor with the engine off, connect a voltmeter between the terminals SIG (+) and GND (-) of the sensor connector. With the ignition on, the signal amplitude should be within the range of 2.5÷3.5 V.

4. Now you should check the sensor operation with the power unit running. Start the engine and observe the voltmeter readings as the engine speed increases from idle. The signal amplitude should increase as the vacuum depth decreases. At idle, the vacuum depth is maximum and the signal voltage should not rise above 0.5÷1.5 V. As the speed increases, the vacuum depth decreases, which should lead to a decrease in the amplitude of the measured signal.

Note: The change in the depth of vacuum in the intake manifold can be monitored using a vacuum gauge. With the valve fully open, the pressure in the manifold can be compared with atmospheric pressure. More detailed information on vacuum tests is given in Section General and major engine repairs Chapters Engine.


5. If the test results are negative, replace the sensor.

Replacement


1. Disconnect the negative cable from the battery.

Warning! If the car stereo system is equipped with a security code, make sure you have the correct combination to activate the audio system before disconnecting the battery!

Warning! If the car stereo system is equipped…


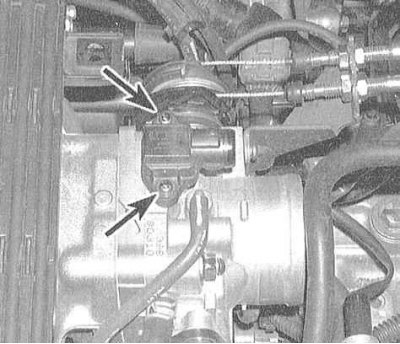
2. Disconnect the electrical wiring from the MAP sensor.


2. Disconnect the electrical wiring from the MAP…


3. Loosen the mounting screws and remove the sensor from the throttle body.

4. Installation is carried out in reverse order.
This article is available at: russian, bulgarian, belarusian, ukrainian, serbian, croatian, romanian, polish, slovak, hungarian
This information has been verified: Timofey Goryachev
Share with friends:
◀ Previous
Accord 6: Engine management
Next ▶

Checking the condition and replacing the throttle position sensor (TPS)
Removal and installation of PCM/ECM
On-Board Diagnostics (OBD) System — Operating Principle and Error Codes
Engine Management System Specifications and Description
Checking the condition and replacing the intake air temperature (IAT) sensor
Checking the condition and replacing the engine coolant temperature sensor (ECT)
Checking the condition and replacing the TDC/Crankshaft Position (TDC/CKP)…
Checking the condition and replacing the piston position sensor (CYP)
Checking the condition and replacing the electrical load detector (ELD)
See also other articles from Honda manuals:
Checking and replacing the absolute pressure sensor in the pipeline… Honda Civic 6 (1995-2000)
Checking tire pressure and condition Honda Fit 1 (2001-2008)
Manifold Absolute Pressure Sensor (MAP sensor) Honda CR-V 1 (1995-2001, petrol)
Oil Pressure Sensor — Testing Honda HR-V 1 (1998-2006, petrol)
Checking and replacing fuses Honda Avancier 1 (1999-2003, petrol)
Link in different formats to this article
Comments and feedback from visitors
No comments yet


How much will 12 + 21 ?


Accord 6 (1997-2002) 
  • General information
  • Introduction to the guide
  • User manual
  • Maintenance
  • Power unit
  • Four-cylinder engines
  • Six-cylinder engines
  • Engine overhaul
  • Cooling system
  • Heater and air conditioner
  • Power and exhaust systems
  • Engine electrical equipment
  • Engine management
  • Transmission
  • Mechanical gearbox
  • Automatic gearbox
  • Clutch and drive shafts
  • Chassis and running gear
  • Brake system
  • Car suspension
  • Steering
  • Body and interior
  • Exterior (external elements)
  • Interior (internal elements)
  • Electrical equipment
  • Equipment and devices
  • Electrical circuits
Accord 3 (1985-1989) 
  • General information
  • Maintenance
  • Power unit
  • Engine adjustment
  • Engine repair
  • Engine electrics
  • Emission management
  • Engine management (carburetor)
  • Electronic injection
  • Programmable injection
  • Schematic of emission system
  • Fuel system
  • Feedback management
  • Transmission
  • Manual gearbox
  • Automatic gearbox
  • Clutch
  • Chassis and running gear
  • Front suspension
  • Rear suspension
  • Steering
  • Brake system
  • Electrical equipment
  • Ventilation and heating
  • Air conditioner
  • Cruise control system
  • Equipment and devices
HondaBook.ru © 2018–2026 • Mobile version • Sitemap: EN BG BY UA RS HR RO PL SK HU • Feedback • Driver Information • Search system • Bookmark
Accord 3 (1985-1989) • Accord 6 (1997-2002) • Civic 3 and 4 (1983-1991) • Civic 5 and 6 (1991-2000) • Civic 6 (1995-2000) • Civic 7 (2000-2005) • Civic 8 (2005-2011) • Fit 1 (2001-2008) • CR-V 1 (1995-2001) • CR-V 2 (2002-2006) • HR-V 1 (1998-2006) • Avancier 1 (1999-2003) •
 
This website uses cookies to ensure proper functioning. By clicking "OK," you agree.