
Checking the input signal, switch (with timer)
Attention. When pulling out the switch, be careful not to damage the rear window defroster switch or the center panel.
Note: before starting the test, check if fuse No. 16 has blown (7.5A) in the under-panel fuse and relay box.
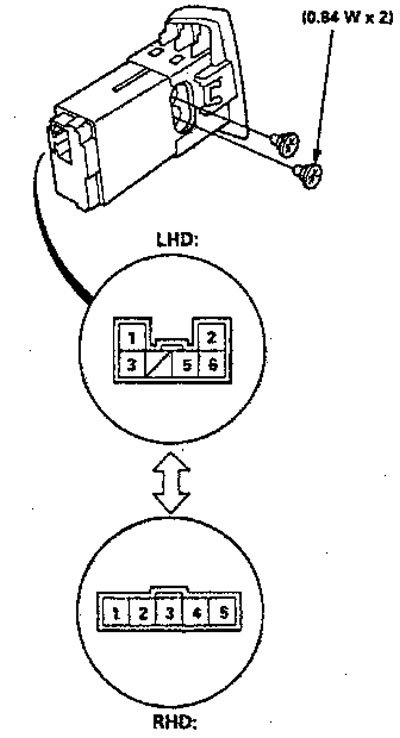
1. Pull the switch out of the center panel.
2. Disconnect the 5K connector from the switch.
3. Turn the ignition switch to ON (II) and check the voltage between contacts BLK/BLU (+) and BLK (-). There should be battery voltage.
- If there is no voltage. check for open in BLK/BLU wire.
- If there is battery voltage, go to step 4.
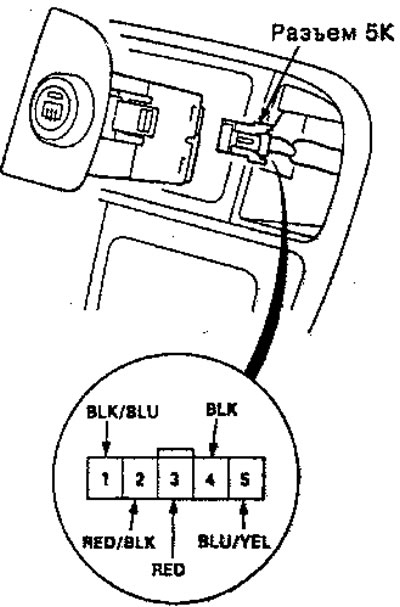
"Sockets" from the wire side
4. Connect the connecting wire between pins BLK/BLU and BLU/YEL
5. Turn the ignition switch ON (II) and check if the rear window defroster works, if it does, replace the heated switch.
Checking the switch (without timer)
Attention. When pulling out the switch, be careful not to damage the rear window defroster switch or the center panel.
1. Pull the switch out of the center panel.
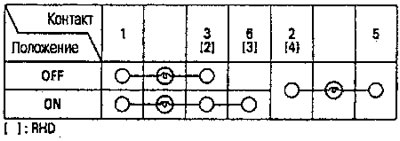
2. Check the continuity between the contacts in each switch position, in accordance with the table.
Incandescent lamp
Functional check
Attention. Be careful not to damage or scratch the heater leads with the tester probe.
1. Check the voltage between the positive terminal and the housing with the ignition switch and the heating switch ON.
There should be battery voltage.
- If there is no voltage, check:
-The heater relay is faulty.
-The heater switch is faulty.
-Break in the BLK/BLU wire.
- If there is battery voltage, go to step 2.
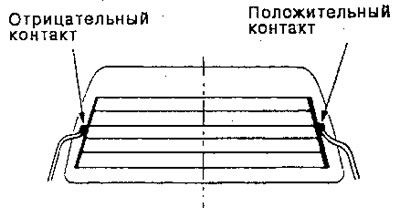
2. Check continuity between the negative terminal and the housing.
If there is no continuity, check for an open in the heater ground wire.
3. Attach the positive lead of a voltmeter to the point in the middle of each heater wire and the negative lead to the negative terminal.
There should be approximately 6V with the ignition switch and heater switch ON.
- If the voltage is within specification, the heater wire is good.
- If the voltage is not within specification, repair the heater wire.
- If more than 6V, there is an open in the negative half of the wire.
- If less than 6V, the break is in the positive half of the wire.
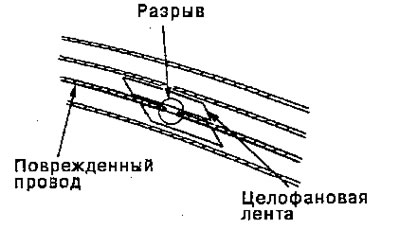
Repair of heater conductors
Note: Effective repairs are only possible if the damaged portion of the wire is less than one inch.
1. Lightly scrub the area around the damaged part with wool, then clean with alcohol.
2. Carefully cover the damaged part of the heater wire with cellophane tape at the top and bottom.
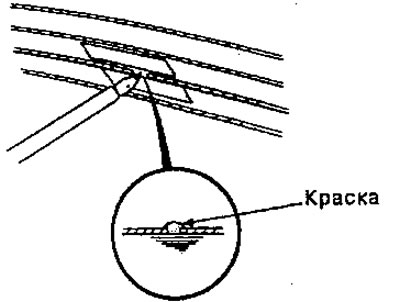
3.Using a small brush, apply a thick coat of 1/8 silver conductive paint" on both sides of the gap. Allow 30 minutes to dry.
Note: Mix the paint thoroughly before use.
4. Check continuity in the repaired conductor.
5. Apply a second coat of paint in the same way* Allow the paint to dry for 3 hours, then remove the tape.