
Removal
1. Remove the front wheels.
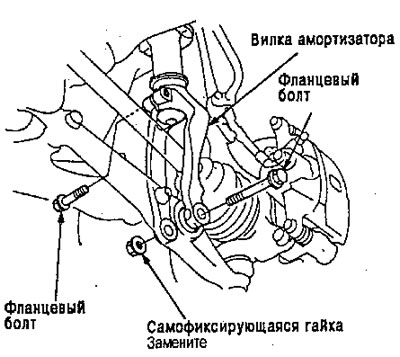
2. Remove the flange bolt.
3. Remove the flange bolt and self-locking nut, then remove the shock absorber fork.
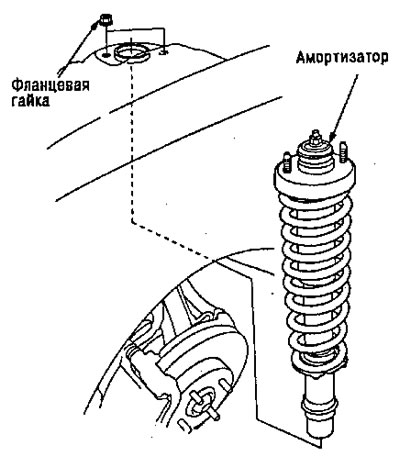
4. Remove the shock absorber by removing the two nuts.
Disassembly
1. Install the shock absorber on the spring compressor, supporting the bottom of the shock absorber and install the retainer with bolts.
2. Install the suspension mounting plate onto the spring compressor.
3. Clamp the spring compressor with the fork in a vice, then tighten the fork retainer bolts securely.
Caution: Do not tighten the bolts too much.
4. Mark the shock absorber body and spring compressor retainer with paint as indicated.
5. Mark the mounting plate and spring compressor, mounting plate and strut mounting base with paint as shown.
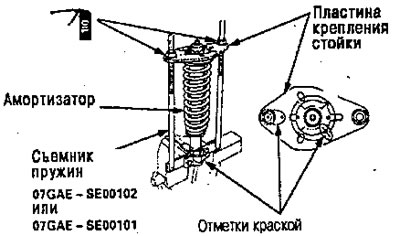
6. Compress the shock absorber by 2-3 cm, tightening the puller nuts.
Note: Tighten each puller nut gradually and equally.
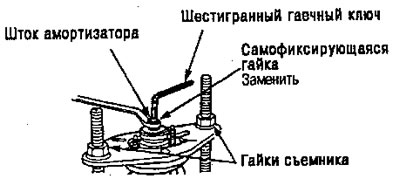
7. Hold the shock absorber shaft with a hex wrench and remove the self-locking nut.
8. Loosen the puller nuts, then remove the strut mounting plate.
9. Disassembling the shock absorber on the next page.
Assembly
1. Install the shock absorber assembly onto the spring compressor, aligning the marks on the shock absorber body and the spring compressor retainer.
Note: If a new shock absorber is to be installed, mark it in the same places as the old one.
2. Assemble the shock absorber in the reverse order of disassembly, except for the shock absorber mounting washer and self-locking nut.
Note: Align the lower part of the shock absorber spring with the lower spring plate.
3. Install the suspension mounting plate onto the shock absorber, in accordance with the marking,
4. Position the rack mount base by aligning the marks on the rack mount base and the mounting plate.
5. Apply oil to the seat surfaces of the nuts and the threaded parts of the spring compressor, then install the nuts by hand.
6. Compress the shock absorber spring by tightening the puller nuts.
Note: Tighten each nut gradually and evenly.
7. Install the shock absorber mounting washer, then loosely install the self-locking nut.
8. Hold the shock absorber rod with a hex wrench and tighten the self-locking nut.
9. Remove the shock absorber from the spring compressor.
Installation
1. Install the shock absorber lightly onto the frame, aligning with the inward facing protrusion, then lightly install the two flange nuts.
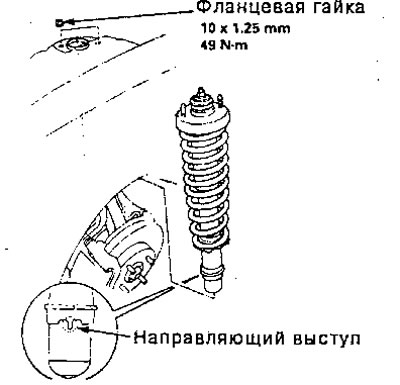
2. Install the shock absorber fork over the drive shaft on the lower arm. Then install the shock absorber into the shock absorber fork so that the guide tab aligns with the slot in the shock absorber fork.
3. Tighten the bolts and nuts by hand.
4. Raise the steering knuckle with a jack until the car begins to rise off the safe stands.
Note: Bolts and nuts should be tightened when the weight of the vehicle is on the shock absorber.
Warning: The jack must be installed securely to avoid injury to a person.
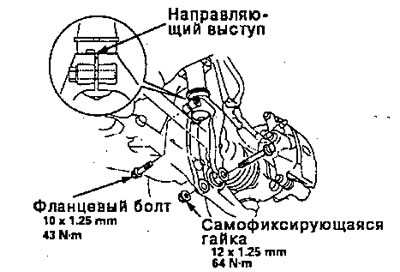
5. Tighten the flange bolt.
6. Tighten the flange bolt with a new self-locking nut.
7. Tighten the shock absorber to the frame with flange nuts.
Examination
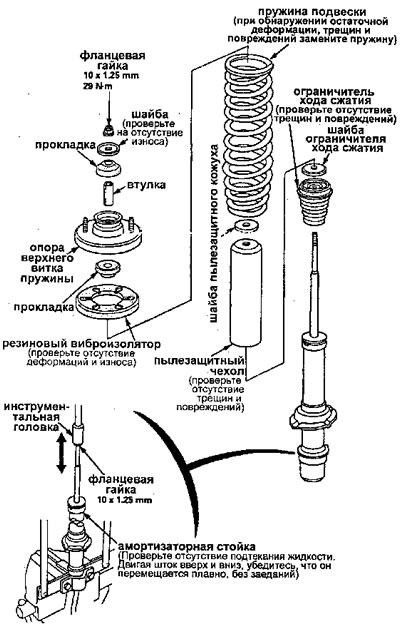
The original is located on the website HONDABOOK