
HondaBook.ru
Auto companies Volkswagen Auto companies Ford Auto companies Lada Auto companies Skoda Auto companies BMW Auto companies Mazda Auto companies Peugeot
English Русский
Български
Беларускі
Український
Српски
Hrvatski
Română
Polski
Slovenský
Magyar
Bookmark Contacts Sitemap   


Accord Civic Fit / Jazz CR-V HR-V Others Articles
Avancier 1 (1999-2003, petrol)

Front shock absorber (Honda Avancier 1)

  • Main
  • Honda
  • Avancier 1 (1999-2003, petrol)
  • Chassis and running gear
  • Car suspension
  • Front shock absorber
0
Contents: Removal ⇊ Disassembly ⇊ Assembly ⇊ Installation ⇊

Removal


1. Remove the front wheels (see above).

2. Unscrew the shock absorber bolt.

3. Loosen the self-locking nut (12 mm), remove the fork bolt and remove the shock absorber fork.
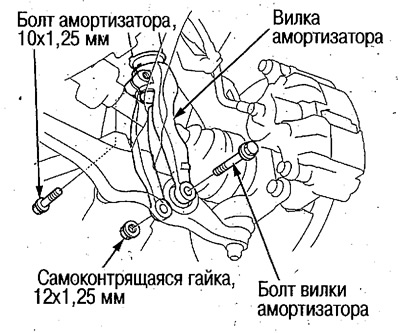
3. Loosen the self-locking nut (12 mm), remove…


4. Unscrew the upper nuts (8 mm) and (10 mm) and remove the shock absorber assembly.
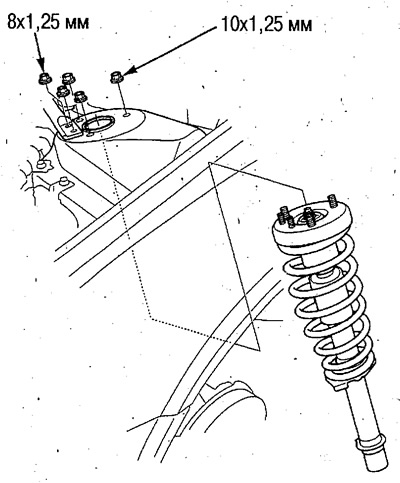
4. Unscrew the upper nuts (8 mm) and (10 mm) and…


To avoid confusing the left and right shock absorbers, mark them.

Disassembly


1. Install the shock absorber assembly on the spring compressor and compress the spring. Use a hex key and a special tool to loosen the self-locking nut.
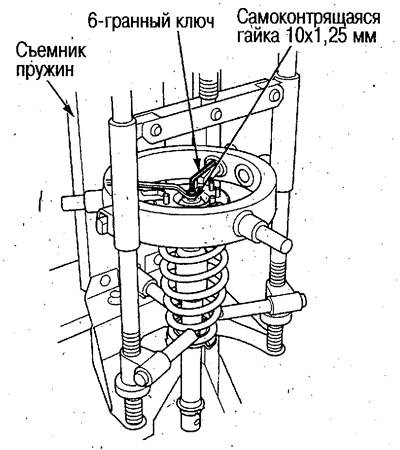
1. Install the shock absorber assembly on the…


For information on using the spring compressor, see the compressor operating instructions.


Caution: Do not compress the spring more than necessary.


2. Disassemble the shock absorber to the state shown in the figure.
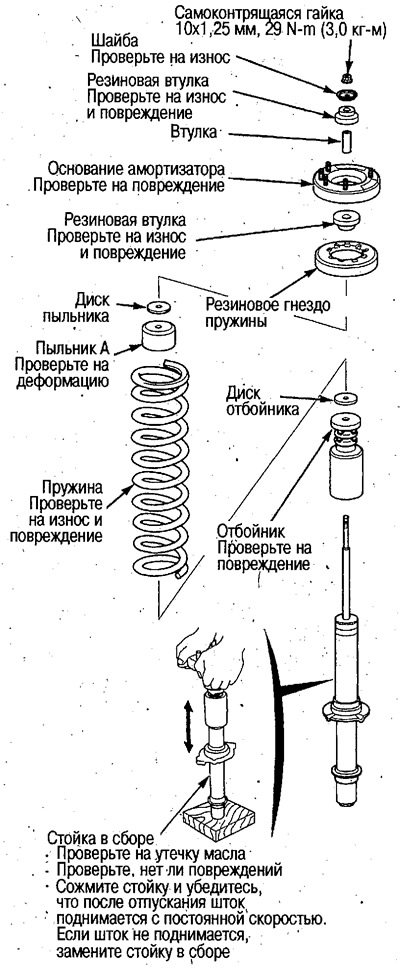
2. Disassemble the shock absorber to the state…


Assembly


1. Install the bump stop, bump stop disc, dust boot, dust boot disc, bushing, and lower rubber bushing onto the strut. Install the spring by aligning the lower end of the spring with the step in the lower seat.

2. Install the spring rubber seat, shock absorber base, upper rubber bushing, washer and install the shock absorber assembly onto the spring compressor.

Install the shock absorber base as shown in the figure.
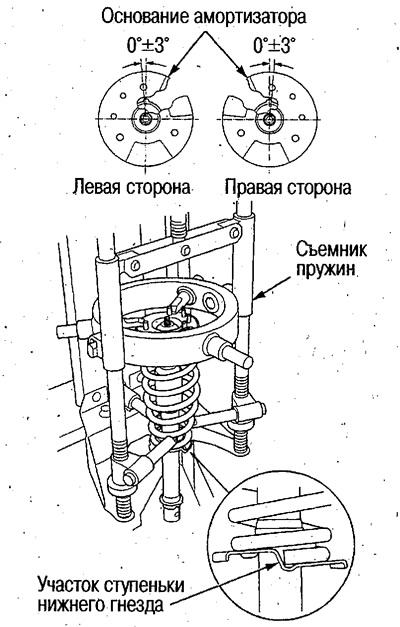
Install the shock absorber base as shown in the…


3. Compress the shock absorber until the end of the strut rod comes out of the hole in the washer installed on the base.

4. Install the new self-locking nut (12 mm) and tighten it to the required torque, securing the strut rod with an Allen key.
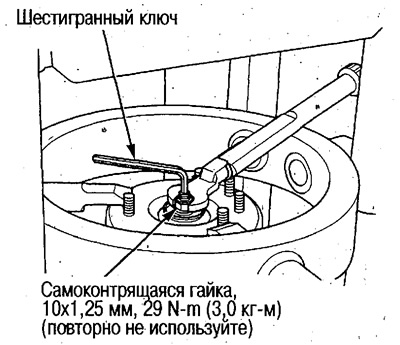


4. Install the new self-locking nut (12 mm) and…


5. Remove the shock absorber assembly from the spring compressor.

Installation


1. Direct the protrusion on the shock absorber to the inside of the frame and pre-install the shock absorber on the frame by hand-tightening the nuts (8 mm) and (10 mm).

Do not confuse the left shock absorber with the right one.
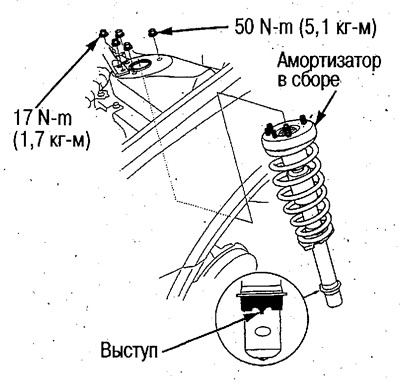
Do not confuse the left shock absorber with the…


2. Place the fork on the drive shaft, align the protrusion on the shock absorber with the groove on the fork and tighten the shock absorber bolt by hand.

3. Pre-install the shock absorber fork on the lower arm.

4. Raise the steering knuckle with a jack so that the weight of the car acts on the shock absorber.
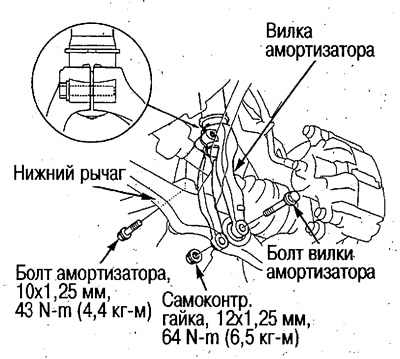
4. Raise the steering knuckle with a jack so that…


Tightening of the rubber bushings is performed when the shock absorber is compressed under the weight of the car to the working condition.


5. Tighten the shock absorber bolt to the required torque.

6. Install the fork bolt and tighten the self-locking nut (12 mm) to the required torque.

7. Tighten the nuts (8 mm) and (10 mm), tightened by hand in step 1

8. Secure the brake hose to the shock absorber.

Full version on the source website: HondaBook.ru
This article is available at: russian, bulgarian, belarusian, ukrainian, serbian, croatian, romanian, polish, slovak, hungarian
This information has been verified: Emil Safonov
Share with friends:
◀ Previous
Avancier 1: Car suspension
Next ▶

Removal and installation the front suspension stabilizer
Replacing the front suspension ball joint boot
Front Suspension Steering Knuckle and Hub — Wheel Bearing Replacement
Front Suspension Steering Knuckle and Hub — Removal and Installation
Front suspension — device
Rear Suspension — Hub & Bearing Assembly (2WD Models)
Rear Suspension Knuckle and Hub (4WD Models) — Inspection, Removal and…
Rear Suspension Knuckle and Hub (4WD Models) — Wheel Bearing Replacement
Replacing the rear suspension knuckle bushing (4WD models)
Replacing the rear suspension ball joint boot (4WD models)
See also other articles from Honda manuals:
Removal and installation the front shock absorber assembly with a… Honda Accord 6 (1997-2002)
Removal and installation the front shock absorber assembly with a… Honda Civic 6 (1995-2000)
Checking the rear shock absorber Honda Fit 1 (2001-2008)
To understand why you need a shock absorber, try riding without it Honda CR-V 1 (1995-2001, petrol)
Front shock absorber — removal Honda HR-V 1 (1998-2006, petrol)
Link in different formats to this article
Comments and feedback from visitors
No comments yet


How much will 17 + 14 ?


Avancier 1 (1999-2003, petrol) 
  • General information
  • Controls and instruments
  • User manual
  • Power unit
  • Engine maintenance
  • Engine repair
  • Cooling system
  • Engine management
  • Power and exhaust system
  • Transmission
  • Automatic gearbox
  • Drive shafts and differential
  • Chassis and running gear
  • Steering
  • Car suspension
  • Brake system
  • Body and interior
  • Doors, locks and windows
  • Interior (internal elements)
  • Exterior (external elements)
  • Air conditioner
  • Electrical equipment
  • Power devices
  • Equipment and devices
  • Headlights and lighting
  • Electrical circuits
HondaBook.ru © 2018–2026 • Mobile version • Sitemap: EN BG BY UA RS HR RO PL SK HU • Feedback • Driver Information • Search system • Bookmark
Accord 3 (1985-1989) • Accord 6 (1997-2002) • Civic 3 and 4 (1983-1991) • Civic 5 and 6 (1991-2000) • Civic 6 (1995-2000) • Civic 7 (2000-2005) • Civic 8 (2005-2011) • Fit 1 (2001-2008) • CR-V 1 (1995-2001) • CR-V 2 (2002-2006) • HR-V 1 (1998-2006) • Avancier 1 (1999-2003) •
 
This website uses cookies to ensure proper functioning. By clicking "OK," you agree.