
Contents: Removal and installation ⇊ Removal and installation the rear…⇊ Removal and installation luggage…⇊ Removal and installation rear door…⇊
Removal and installation
1. When removing the interior trim, refer to the assembly drawing "Interior trim".
2. Installation is carried out in the reverse order of removal.
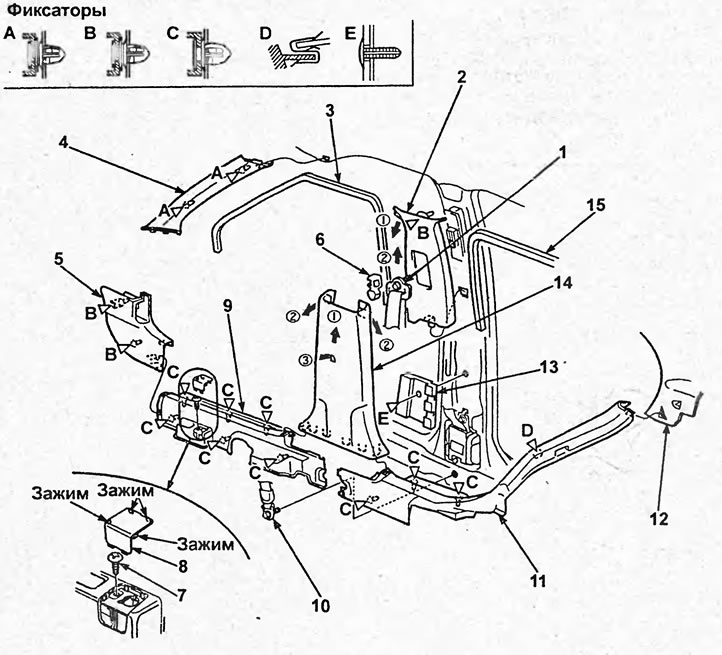
Interior trim (sedan). 1 - upper seat belt attachment for the front seat, 2-upper center pillar trim, 3-front door seal, 4-front pillar trim, 5-front side trim, 6-upper seat belt attachment cover for the front seat, 7-screw, 8-cover, 9-front door sill trim, 10 - lower seat belt attachment for the front seat, 11-rear side door sill trim, 12-upper rear pillar trim, 13-protection, 14-lower center pillar trim, 15-rear side door seal.
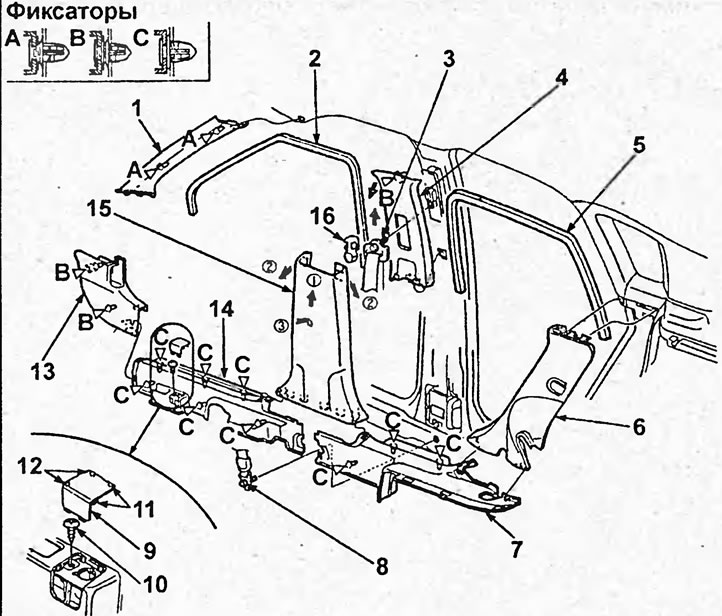
Interior trim (hatchback). 1 - front pillar trim, 2 - front door seal, 3 - front seat upper belt fastening bolt, 4 - center pillar upper trim, 5 - rear side door seal, 6 - rear pillar lower trim, 7 - rear side door sill trim, 8 - front seat lower belt fastening bolt, 9 - cover, 10 - screw, 11,12 - clamp, 13 - front side interior trim, 14 - front door sill trim, 15 - center pillar lower trim, 16 - cover.
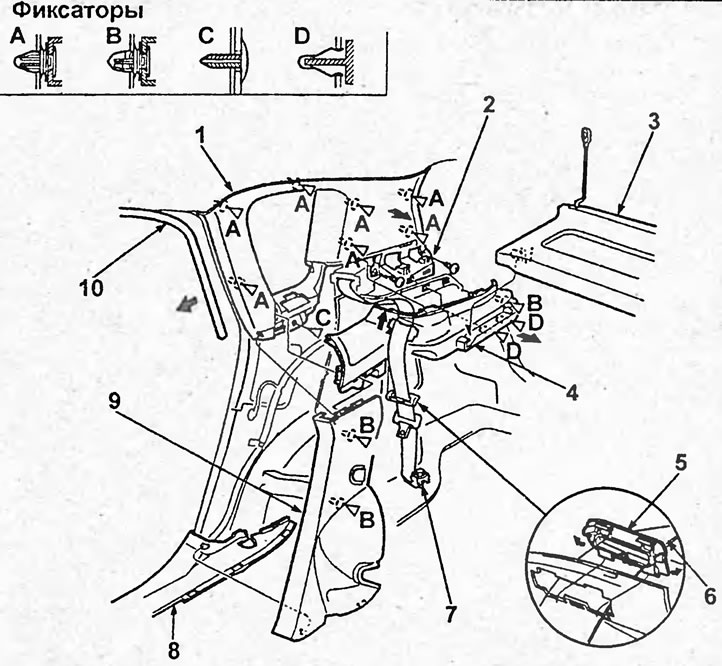
Interior trim (hatchback, continuation). 1 - Upper trim of the rear pillar, 2 - Side trim of the luggage compartment, 3 - Rear shelf, 4 - Upper trim of the side trim of the luggage compartment, 5 - Cover, 6 - Rear seat belt, 7 - Lower bolt of the rear seat belt, 8 - Trim of the sill of the rear side door, 9 - Lower trim of the rear pillar, 10 - Seal of the rear side door.
Removal and installation the rear shelf
1. When removing the rear shelf, refer to the assembly drawing "Rear shelf".
2. Installation is carried out in the reverse order of removal.
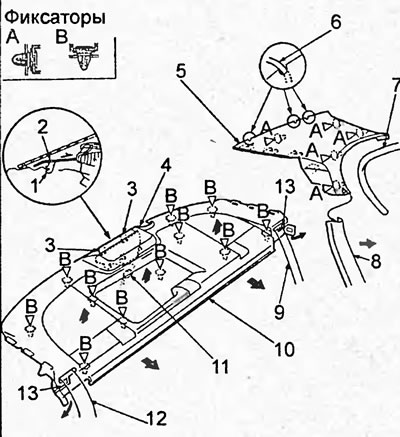
Rear shelf. 1 - clamp, 2 - rear shelf, 3 - clamp, 4 - slot, 5 - rear pillar upper trim, 6 - rear window heating connector, 7 - rear side door seal, 8 - rear side door sill trim, 9 - rear seat belt, 10 - rear shelf, 11 - additional brake light connector, 12 - rear seat belt, 13 - clamp, slot.
Removal and installation luggage compartment trim panels (sedan)
1. When removing the luggage compartment trim panels, refer to the assembly drawing "Luggage compartment trim panels".
2. Installation is carried out in the reverse order of removal.
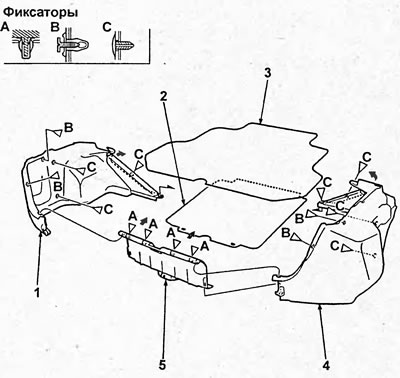
Trunk trim panels (sedan). 1 - left side trim of the luggage compartment, 2 - spare wheel tray cover, 3 - luggage compartment mat, 4 - right side trim of the luggage compartment, 5 - rear trim of the luggage compartment.
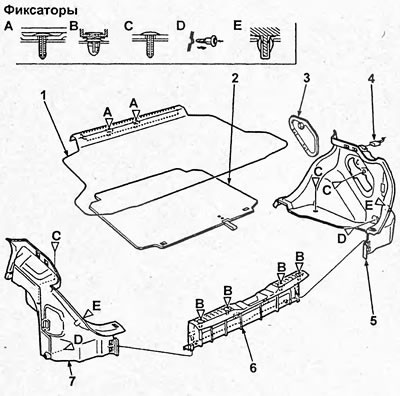
Trunk trim panels (hatchback). 1 - luggage compartment mat, 2 - luggage compartment lid, 3 - lid, 4 - connector, 5, 7 - luggage compartment side trim, 6 - luggage compartment rear trim.
Removal and installation rear door trim (hatchback)
1. When removing the rear door trim, refer to the assembly drawing "Rear Door". Carry out removal in the sequence shown in the drawing.
2. Installation is carried out in the reverse order of removal.
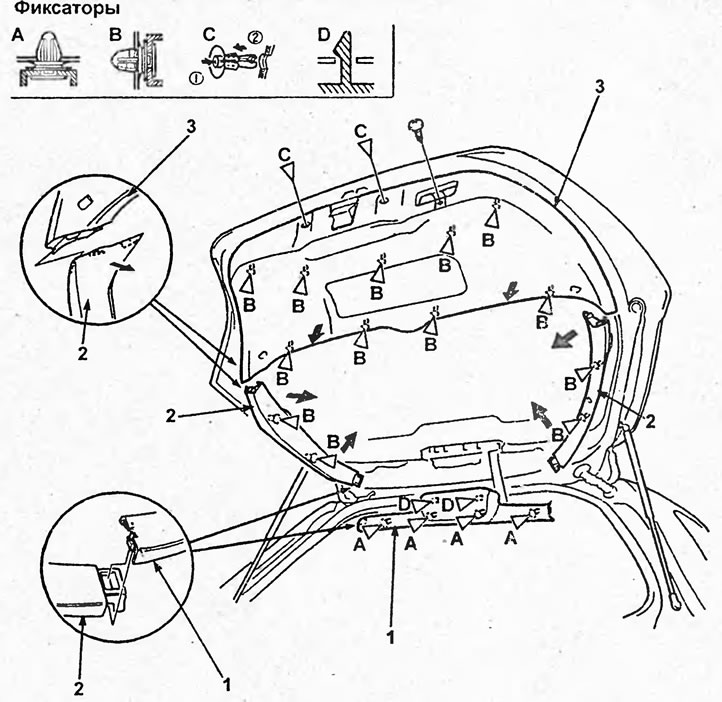
Back door. 1 - upper trim of the rear door, 2 - side trim of the rear door, 3 i inner trim of the rear door.
[The article was copied from the website: www.hondabook.ru]