Replacement
Note: LHD type shown, RHD type is similar.
1. Remove the battery.
2. Release the refrigerant.
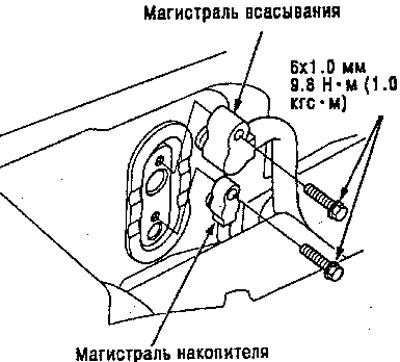
3. Remove the bolts and disconnect the lines from the evaporator.
Note: Close the line openings immediately after disconnecting to prevent dirt and moisture from entering.
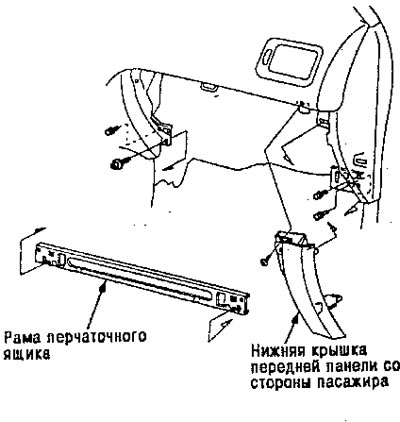
4. Remove the glove box.
5. Remove the self-tapping bolts and the passenger side lower dash cover, then remove the 4 bolts and the glove box frame.
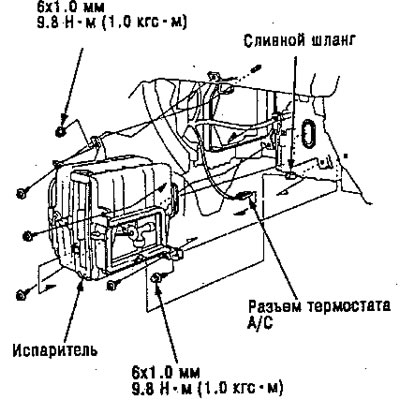
6. Disconnect the connector from the A/C thermostat and remove the wires from the evaporator. Remove the self-tapping screws, mounting bolts and nuts. Disconnect the condensate drain hose and remove the evaporator
7. Install in the reverse order of removal. Please note the following points.
- If you are installing a new evaporator, add oil to the system (Nippondenso: ND-OIL8, P/N 38899-PR-003 [or P/N-38899-PR7-A01], or Sanden &Hadsys: SP-10, P/N 38899-P13-003 [or P/N 38899- P13-A01].
- Replace the O-rings on all connections, and lubricate them with refrigerant oil before connecting.
Note: Be sure to use HFC 134a refrigerant rings (R-134a), to prevent leaks.
- Apply sealant to the gaskets.
- Make sure there are no leaks. Charge the system and check its performance.
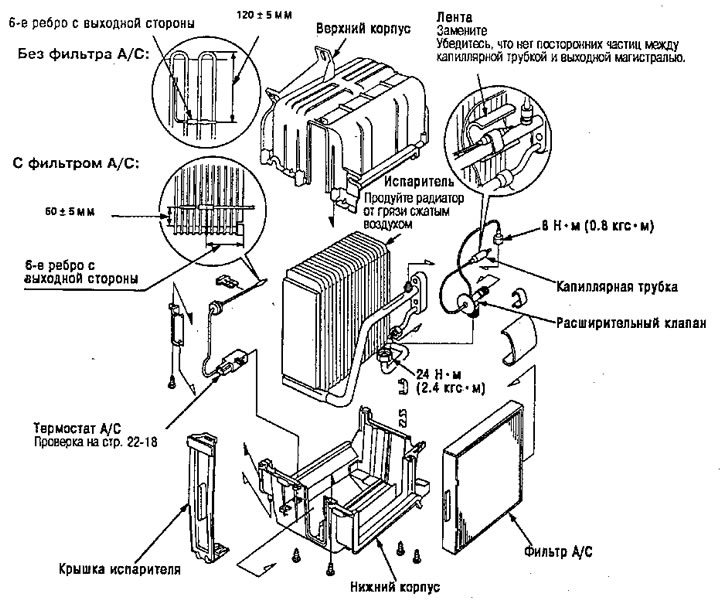
Major renovation
Note: LHD type is shown, RHD type is similar.
1. Remove the evaporator cover and take out the A/C filter.
2. Remove the thermostat sensor from the evaporator core.
3. Remove the self-tapping screws and clips from the evaporator body.
4. Carefully separate the housing, then remove the evaporator.
5. If necessary, remove the expansion valve.
Note: When loosening the expansion valve nuts, hold the valve or evaporator tube with a wrench, otherwise it may be damaged.
6. Reassemble in the reverse order of disassembly. Please note the following points.
- Replace O-rings at each connection. Lubricate them with refrigerant oil (Nippondenso: ND-OIL8, P/N 38899-PR-003 [or P/N-38899-PR7-A01] or Sanden&Hadsys: SP-10, P/N 38899-Р13-003 [or P/N 38899-Р13- A01] before connection.
Note: Be sure to use HFC-134a refrigerant rings (R-134a), to prevent leaks.
- Install the capillary tube of the expansion valve directly onto the suction line and wrap it with tape.
- Reinstall the thermostat sensor in its original location.