
HondaBook.ru
Auto companies Volkswagen Auto companies Ford Auto companies Lada Auto companies Skoda Auto companies BMW Auto companies Mazda Auto companies Peugeot
English Русский
Български
Беларускі
Український
Српски
Hrvatski
Română
Polski
Slovenský
Magyar
Bookmark Contacts Sitemap   


Accord Civic Fit / Jazz CR-V HR-V Others Articles
Civic 3 and 4 (1983-1991) Civic 5 and 6 (1991-2000) Civic 6 (1995-2000) Civic 7 (2000-2005) Civic 8 (2005-2011)

Replacing valve springs with plates and oil deflector caps (Honda Civic 6)

  • Main
  • Honda Civic
  • 6 (1995-2000)
  • Power unit
  • Engine in car (Civic)
  • Replacing valve springs with plates and oil deflector caps
0
Note: Broken valve springs and worn valve stem seals can be replaced without removing the cylinder head. All you need is two special tools and a source of compressed air.


1. Remove the cylinder head cover (see Removal and installation the cylinder head cover).

2. Remove the spark plugs from the cylinders whose components need to be checked. If the valve stem seals need to be replaced, remove all the spark plugs.

3. Turn the crankshaft and bring the corresponding piston to the TDC position at the end of the compression stroke (see Bringing the piston of the first cylinder to the top dead center (TDC) position). When replacing valve stem seals, start with the first cylinder, then move from one to the next in the firing order (see Specifications).

4. Remove the rocker arm assembly with axles (see Removal, condition check and installation of rocker arm assembly).
4. Remove the rocker arm assembly with axles (see…


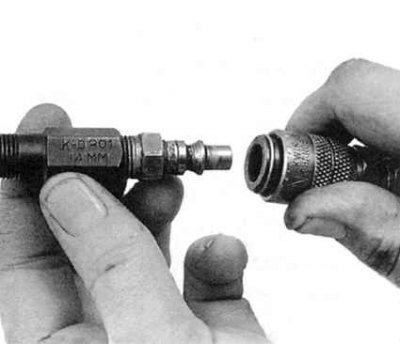
5. Screw the adapter into the spark plug hole of the corresponding cylinder and connect a hose from a compressed air source to it.

Note: Special threaded nozzles with quick-connect fittings are available (see accompanying illustration) – ask in car service shops.


6. Supply air to the cylinder.

Caution! Under air pressure, the piston may move downwards, which will lead to sudden crankshaft rotation - do not leave the socket wrench used to bring the piston to the TDC position on the bolt screwed into the shaft journal.


7. The valves will be held in place by air pressure.
7. The valves will be held in place by air…


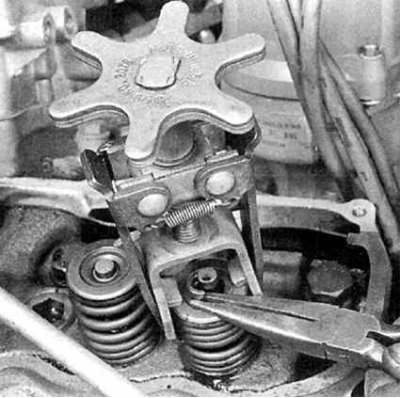
8. To prevent debris and other foreign objects from getting into the engine, plug all the holes in the block around the valves to be serviced with rags. Now, using a special tool, compress the spring of the valve to be serviced (see accompanying illustration). 9. Using needle-nose pliers or a magnet, remove the split lock crackers from the grooves on the valve stem (see illustration for paragraph 8).

10. Remove the spring plate, protective screen, and spring from the valve stem, then remove the oil deflector cap from the guide sleeve.

Note. If it is not possible to fix the valve in the closed position with compressed air, then there is a leak due to mechanical defects in the working chamfer of the plate or its seat. In this case, the cylinder head must be removed from the engine in order to perform the appropriate restoration repair.


11. Attach a rubber band to the upper end of the valve stem, or wrap it with tape to prevent the valve from falling into the combustion chamber, then shut off the air supply to the cylinder.

12. Check the valve stem for signs of wear or mechanical damage. Rotate the valve inside the guide bushing and estimate the amount of radial clearance of its end, which determines the degree of straightness of the stem (the bent valve needs to be replaced).

13. Move the valve up and down in the guide bushing, trying to identify jamming points, the presence of which indicates either deformation of the valve stem or damage to the bushing - in either case, the head must be removed in order to perform the necessary repairs.

14. Re-inject air into the cylinder to secure the valve. Remove the rubber band/tape from the rod.

15. Lubricate the valve stem with clean engine oil and install a new valve stem seal.

Note: The valve stem seal springs are color coded: white means the seal is designed for installation on the intake valve, black means the seal is designed for installation on the exhaust valve.


16. Place the valve spring on the valve stem (end with reduced pitch of threads to the head) with a plate.
16. Place the valve spring on the valve stem (end…


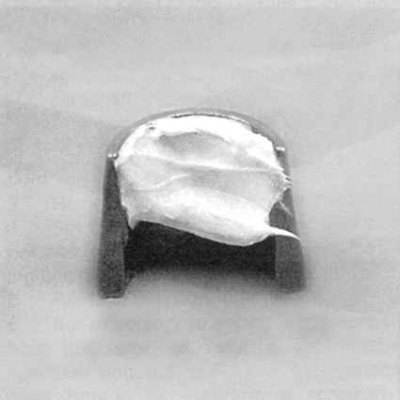
17. Compress the spring using a special tool and carefully insert the split lock crackers into the mounting groove. To temporarily fix the crackers until the tool is released, lubricate them from the inside with thick grease (see accompanying illustration). 18. While observing the correct seating of the crackers in the groove, release the spring compression device.


19. Shut off the air supply to the cylinder and unscrew the adapter from the spark plug hole.

20. Install the rocker arm assembly (see Removal, condition check and installation of rocker arm assembly).

21. Install the cylinder head cover (see Removal and installation the cylinder head cover).

22. Screw the spark plugs back into place and connect them to them (in the required order) High voltage wires.

23. Start the engine and check it for signs of oil leaks and unusual noises from the valve train.
This article is available at: russian, bulgarian, belarusian, ukrainian, serbian, croatian, romanian, polish, slovak, hungarian
This information has been verified: Timofey Goryachev
Share with friends:
◀ Previous
Civic 6: Engine in car (Civic)
Next ▶

Removal, condition check and installation of rocker arm assembly
VTEC Systems — General Information and Component Health Checks
Removal and installation the exhaust manifold
Removal and installation the intake manifold
Removal and installation the cylinder head cover
Removal, condition check and installation of the timing belt and timing drive…
Replacing the front crankshaft oil seal
Removal, condition check and installation of the camshaft
Removal and installation the cylinder head
Removal and installation the engine oil pan
See also other articles from Honda manuals:
Replacing oil deflector caps and valve springs with plates Honda Accord 6 (1997-2002)
Engine number and identification plates Honda Fit 1 (2001-2008)
Replacing valve guide bushings Honda CR-V 2 (2002-2006, petrol)
Replacing light bulbs Honda HR-V 1 (1998-2006, petrol)
Checking and replacing fuses Honda Avancier 1 (1999-2003, petrol)
Link in different formats to this article
Comments and feedback from visitors
No comments yet


How much will 34 + 15 ?


Civic 8 (2005-2011) 
  • General information
  • Technical data
  • Governing bodies
  • Driving and maintenance
  • Power unit
  • Gasoline engines (L13A)
  • Gasoline engines (R18A)
  • Diesel engines (N22A)
  • Cooling and lubrication (L13A)
  • Cooling and lubrication (R18A)
  • Cooling and lubrication (N22A)
  • Injection system (gasoline)
  • Injection system (diesel)
  • Toxicity reduction system
  • Troubleshooting
  • Transmission
  • Clutch and drive shafts
  • Mechanical gearbox
  • Chassis and running gear
  • Suspension and wheels
  • Steering
  • Brake system
  • Body and interior
  • Exterior (external elements)
  • Doors, locks and windows
  • Electrical equipment
  • Equipment and devices
  • Headlights and lighting
  • Power devices
  • Electrical circuits
Civic 7 (2000-2005) 
  • General information
  • User manual
  • Maintenance
  • Power unit
  • Engines D15B and D17A
  • K20A Engines
  • Overhaul engine
  • Cooling system
  • Lubrication system
  • Fuel injection system
  • Toxicity reduction system
  • Engine electrical equipment
  • Transmission
  • Clutch
  • Manual gearbox
  • Automatic gearbox
  • Variator (CVT)
  • Drive shafts
  • Chassis and running gear
  • Car suspension
  • Steering
  • Brake system
  • Body and interior
  • Exterior (external elements)
  • Interior (internal elements)
  • Doors, locks and windows
  • Heater and air conditioner
  • Manual air conditioner
  • Automatic air conditioner
  • Security system
  • Electrical equipment
  • Equipment and devices
  • Headlights and lighting
  • Windscreen wipers
  • Audio system
  • Electrical diagrams
Civic 6 (1995-2000) 
  • General information
  • Introduction to guide
  • User manual
  • Maintenance
  • Power unit
  • Engine in car (Civic)
  • Engine in car (Integra)
  • Engine overhaul
  • Cooling and heating
  • Power and exhaust systems
  • Engine electrical equipment
  • Engine management systems
  • Transmission
  • Manual gearbox
  • Automatic transmission (AT/CVT)
  • Clutch and drive shafts
  • Chassis and running gear
  • Brake system
  • Car suspension
  • Steering
  • Body and interior
  • Exterior (external elements)
  • Interior (internal elements)
  • Doors, locks and windows
  • Electrical equipment
  • Equipment and devices
  • Electrical circuits
Civic 5 and 6 (1991-2000) 
  • Power unit
  • SOHC engines
  • DOHC engines
  • Engine overhaul
  • Cooling and lubrication system
  • Intake and exhaust system
  • Fuel injection system (SOHC)
  • Fuel injection system (DOHC)
  • Carburetor
  • Transmission
  • Clutch
  • Manual gearbox S4C
  • Manual gearbox S40
  • Automatic gearbox
  • Drive shafts
  • Chassis and running gear
  • Car suspension
  • Steering
  • Brake system
  • Body and interior
  • Body elements
  • Heater and air conditioner
  • Electrical equipment
  • Power devices
  • Equipment and instruments
  • Electrical circuits
Civic 3 and 4 (1983-1991) 
  • General information
  • Maintenance
  • Power unit
  • Engine in a car
  • Engine overhaul
  • Cooling system
  • Power and exhaust system
  • Engine electrical equipment
  • Emission control system
  • Transmission
  • Mechanical gearbox
  • Automatic gearbox
  • Clutch and drive shafts
  • Four-wheel drive
  • Chassis and running gear
  • Brake system
  • Car suspension
  • Steering
  • Body and interior
  • Body elements
  • Electrical equipment
  • Equipment and devices
  • Electrical circuits
HondaBook.ru © 2018–2026 • Mobile version • Sitemap: EN BG BY UA RS HR RO PL SK HU • Feedback • Driver Information • Search system • Bookmark
Accord 3 (1985-1989) • Accord 6 (1997-2002) • Civic 3 and 4 (1983-1991) • Civic 5 and 6 (1991-2000) • Civic 6 (1995-2000) • Civic 7 (2000-2005) • Civic 8 (2005-2011) • Fit 1 (2001-2008) • CR-V 1 (1995-2001) • CR-V 2 (2002-2006) • HR-V 1 (1998-2006) • Avancier 1 (1999-2003) •
 
This website uses cookies to ensure proper functioning. By clicking "OK," you agree.