
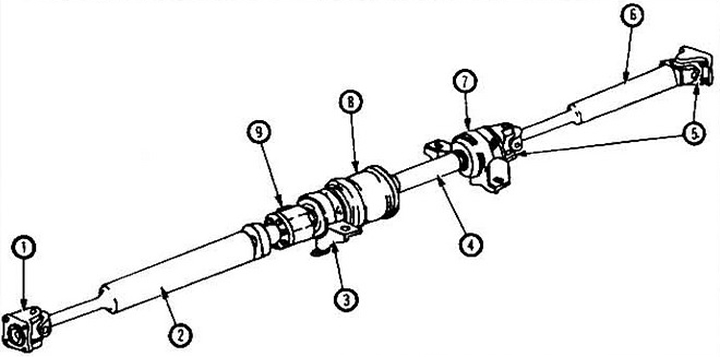
Pic. 3.1 1987 model driveshaft (no viscous coupling on pre-1987 models, mid-pipe on models from 1988): 1 - universal joint; 2 - front pipe; 3 - front support; 4 - middle pipe; 5 - universal joint; 6 - rear pipe; 7 - rear support; 8 - viscous coupling; 9 - CV joint.
2. On models of release 1985-1987. the differential is a common part of the continuous rear axle beam. On production models since 1988, an independent suspension of the rear wheels has been introduced and the middle tube of the cardan shaft has been eliminated.
3. The cardan shaft assembly fails extremely rarely. Periodic inspection and lubrication require only cardan joints, CV joints and its anther. If the viscous coupling fails, it is simply replaced.
Check on the road
4. Problems with the propeller shaft usually manifest themselves in the form of noise and vibrations when the car is moving.
- A) select a section of the road, if possible without heavy traffic, and note the engine speed at which vibration occurs;
- b) accelerate the car in 1st, 2nd, 3rd, etc. gears up to the same engine speed at which the malfunction was noted;
- V) if noise or vibration occurs at the same engine speed, the cardan shaft is not to blame for the troubles that have arisen.
- G) if the noise increases or disappears, visually determine the location of the damage to the driveshaft, loss of balance weights, or damage to the universal joints.
However, noise and vibration can be caused by poor tire balance.
5. Checking the wear of the cardan joint:
- A) on a road with little traffic, drive slowly in top gear. Release the gas pedal and press it hard. A clicking sound will indicate wear on the universal joints.
View from the bottom
6. For control, the rear wheels must be hung out. When monitoring the operation of the viscous coupling, it is required to hang out all the wheels.
7. Inspect the propeller shaft. Make sure that the balance of the shaft is not disturbed by the loss of balancing weights or adhering dirt. If you decide to remove the shaft, mark its relative position to avoid imbalance during assembly and disassembly.
8. Check for oil leaks from the front and rear ends of the shaft. Oil leaks in the front indicate a defect in the transfer case seal, leaks in the rear indicate a defect in the final drive gear seal. The replacement of these seals is described in Sections 9 and 10.
9. Engage neutral gear. Rotate the shaft by the rear wheel while holding the second. For this you need an assistant.
- A) Listen to the universal joints - they should work silently. Check the tightness of the hinge bolts. Check the wear of the cardan cross by relative twisting of its two parts. Any gap indicates wear on the hinge. If the universal joint is damaged or worn, the entire shaft will have to be replaced, since only the joints cannot be replaced.
- b) Listen to the CV joint in action: the noise combined with boot damage indicates that the joint needs to be repaired or replaced, see Section 6.
- G) Using an indicator head located approximately in the middle of each pipe, check the runout of the shaft components. It should not exceed 1.5 mm. If the runout exceeds the specified value, then there is either curvature, or wear of the cardan joint, or wear of the CV joint.
- d) To control the viscous coupling, hang all the wheels on stands, start the engine. At idle, shift into a low gear and slowly release the clutch pedal. Then apply the parking brake fully. If the engine stalls, the viscous clutch is OK Otherwise, the clutch needs to be replaced (see Section 8).
10. Turn off the engine. Inspect all CV joints and check their fastening. Check for oil leaks at the ends of the drives. If there are leaks, the seals are damaged. The presence of grease on the outer surfaces indicates that the anthers of the drives are torn.