
Contents: Removal ⇊ Installation ⇊
Removal
1. Disconnect the battery from ground.
2. Remove the cylinder head cover.
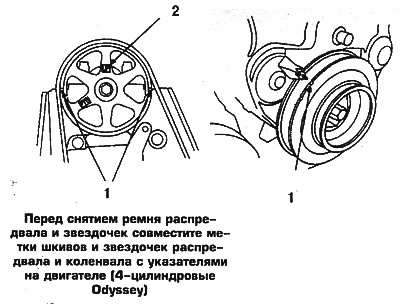
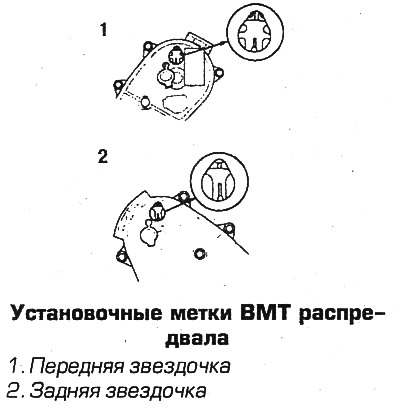
3. Set the piston of the 1st cylinder to TDC of the compression stroke, aligning the marks. In this position, the white mark on the crankshaft pulley should be aligned with the protrusion on the lower cover of the camshaft timing belt, the UP marks on the camshaft sprockets should be facing upward, and the TDC marks on the camshaft should coincide with the split plane of the cylinder head under the cover.
4. Remove the lower engine shield.
5. Remove the power steering pump drive belt and the alternator belt. Remove the power steering pump.
6. Jack up the engine using a board. Remove the side engine mount.
7. Remove the oil level indicator pipe.
8. Remove the crankshaft pulley.
9. Remove the lower camshaft belt cover.
Attention! If only the balance shaft belt is removed, the camshaft belt tension should be maintained by screwing a 6.0x1.0x25 bolt into the tensioner plate.
10. Loosen the balance shaft belt tensioner adjusting nut by 2/3 - 1 turn, move the tensioner away and tighten the nut.
11. Remove the balance shaft belt and drive sprocket.
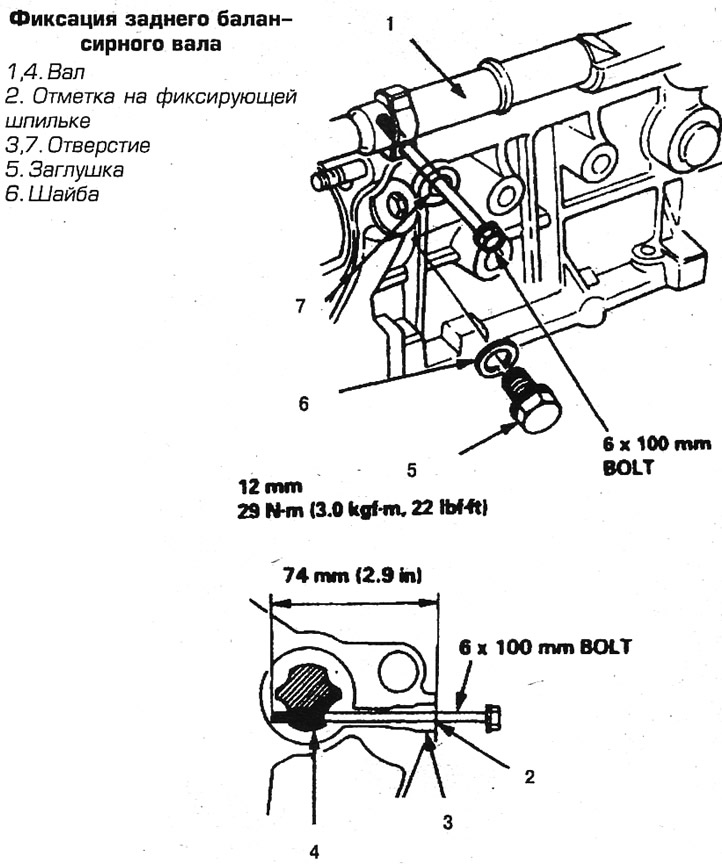
12. Remove the rear balance shaft sprocket (shaft from the side of the engine compartment wall). To do this, unscrew the stud at the rear of the cylinder block and insert a 6.0x100 mm bolt into the hole to a depth of 74 mm, making a corresponding mark on the stud. First make sure that the pointer on the shaft sprocket is opposite the mark on the oil pump housing, unscrew the bolts and remove the gear housing.
13. Remove the front balance shaft sprocket (shaft from the radiator side). To do this, secure the shaft by inserting a pin or screwdriver into the hole behind the sprocket, unscrew the nut and remove the sprocket.
14. Loosen the tensioner bolt, move the tensioner away and remove the camshaft belt.
15. Remove the crankshaft sprocket by removing the key and washers. On some vehicles, you will need to remove the TDC sensor, which is secured with a bolt.
16. Loosen the bolt and remove the camshaft sprocket.
Installation
17. Install the camshaft sprocket so that the UP mark faces upward. Tighten the bolt to 37 Nm.
18. Install the crankshaft sprocket so that the mark on the sprocket is opposite the pointer on the oil pump housing.
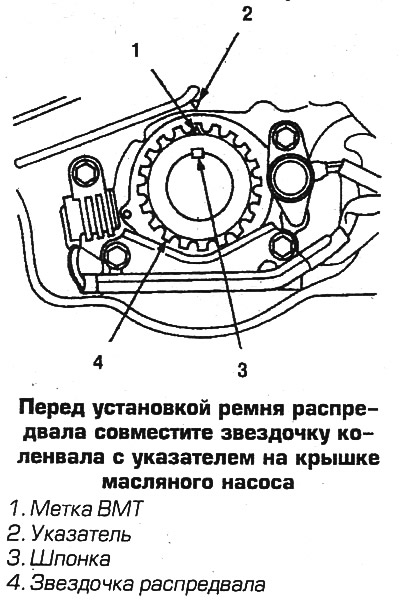
19. Place the washers with the concave surface facing inward and install the key. On some vehicles, install a TDC sensor.
20. Install and tension the camshaft belt by tightening the 6x1.25mm tensioner auxiliary bolt.
21. Install the crankshaft pulley, turn the crankshaft 5-6 turns counterclockwise.
22. Set the piston of the 1st cylinder to TDC of the compression stroke.
23. Turn the crankshaft counterclockwise so that the belt on the camshaft sprocket moves 3 teeth from the TDC mark.
24. Loosen and retighten the auxiliary bolt.
25. If the balance shaft gear housing was removed, do the following:
- a. If the rear balance shaft has been removed, turn it so that a 6x100 mm bolt enters the hole up to the previously made mark.
- b. Align the notch on the shaft sprocket with the pointer on the gear housing. Install the gear housing with the sprocket. The sprocket must be oriented to the position corresponding to TDC. The pointer on the gear must be aligned with the pointer on the oil pump housing.
- c. Tighten the gear housing bolts to 25 Nm.
26. Install the rear balance shaft sprocket (if it was filmed). To do this, secure the shaft with a screwdriver inserted into the hole behind the sprocket, put the sprocket on and tighten the nut to a torque of 29 Nm.
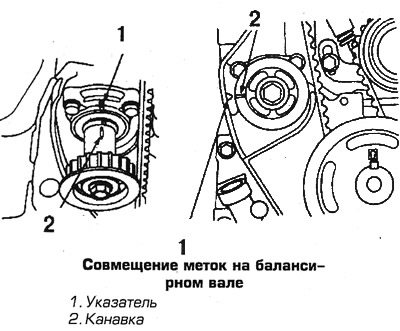
27. Make sure that the balance shafts and crankshaft are in the TDC position.
28. Remove the crankshaft pulley and install the balance shaft belt drive sprocket.
29. Install the balance shaft belt without disturbing the shaft installation.
30. Install the belt tensioner and tighten the belt.
31. Loosen and re-tighten the tensioner nut to 45 Nm.
32. Remove the stud that secures the balance shaft.
33. Install the crankshaft pulley and turn the crankshaft 2 turns counterclockwise and set it back to the TDC position.
34. Check the alignment of the marks on all shafts, loosen and tighten the tensioner nut again to a torque of 45 Nm.
35. Remove the pin that secures the camshaft belt tensioner.
36. Remove the crankshaft pulley and install the lower belt cover. Finally install the crankshaft pulley by tightening the bolt to a torque of 245 Nm.
37. Install the upper camshaft belt cover and engine side support. Tighten the bolt nut to 55 Nm, tighten the through bolt to 55 Nm.
38. Install all removed parts.
(Full text available on the portal: Hondabook.ru)