
When reassembling, replace all bolts and nuts of the power unit mounts/brackets.
Withdrawal
1. Mark the position of the hinges and remove the hood.
2. Remove the battery from the tray.
3. Remove the air filter and air ducts.
4. Decompress the fuel system (Ch. 5), drain the oil and fluid from the engine and transmission, drain the coolant and disconnect the hoses from the radiator.
5. Designate (including trails) and disconnect all hoses, cables and wires from the engine, including cruise control and throttle cables, brake booster hose, fuel lines, 3 vacuum hoses on the intake manifold, etc. Disconnect the battery cable from the fuse box in the engine compartment.
6. Remove the accessory drive belts.
7. Remove the power steering pump, set aside and secure without disconnecting the hoses.
8. Remove the generator together with an arm.
9. Remove the heat sink assembly with 2 fans.
10. Disconnect the heater hoses from the cooling pipe under the intake manifold.
11. Remove the A/C compressor and secure with wire to the radiator strut without disconnecting the hoses.
12. Disconnect the hoses on the automatic transmission housing.
13. Hook the hoist to the hooks on the cylinder block and hang the engine slightly.
14. Raise the car.
15. Disconnect the oxygen sensor connector
16. Disconnect the exhaust pipe from the manifold.
17. Mark the position of the central beam of the subframe relative to the rear, unscrew the 2 bolts, but do not remove the beam.
18. Remove the gearbox cable cover and disconnect the cable from the rod.
19. Remove the protective panel of the engine, remove forward wheels.
20. Disconnect the shock absorber fork from the lower suspension arm, unscrew the bolts and remove the fork from the suspension strut.
21. Disconnect the lower arms from the suspension knuckles by pressing out the ball bearings.
22. Disconnect the axle shafts and carefully knock out the spline axles from the wheel hubs. Take the half shafts to the side and tie. Place plastic bags over splined axles and boots to keep dirt out.
23. Remove an arm of a forward support of the engine.
24. Install a jack under the front subframe beam and support the beam through the board.
25. Turn away bolts and remove a forward support, bars of a suspension bracket and lower levers, remove a forward beam.
26. Remove the side support of the engine.
27. Remove the gearbox side support.
28. Make sure that all hoses and wires are disconnected and slowly lower the engine and remove it from under the car.
29. Place stands under the front of the car and block the rear wheels. If the car needs to be rolled after removing the engine, then install the front beam and suspension arms
Installation
30. Install the power unit on the car by lifting it from the bottom of the car. Install the side support, center with a wrench (core) bolt holes. Tighten the bolt with a torque of 64 Nm, on the engine side, tighten the nut and bolt by hand.
31. Install the gearbox side support, center with a wrench (core) bolt holes. Tighten the bolt with a torque of 64 Nm, on the engine side, tighten the nut and bolt by hand.
32. Install the engine mount rear bracket and tighten the bolt to 47 Nm.
33. Establish a forward beam of a subframe, wrap new bolts with color marking, tighten by hand.
34. Align the marks on the central and front beams, tighten the 2 fastening bolts by hand.
35. Tighten the front beam bolts to 64 Nm.
36. Attach the lower suspension arms and stabilizer bar links. Tighten bolts and nuts by hand.
37. Install the front support bracket, hand-tighten the three bolts. Tighten the support through bolt to 47 Nm.
38. Tighten the bolt and nut of the side support with a torque of 64 Nm.
39. Tighten the transmission side support nuts to 38 Nm.
40. Tighten the three front support bracket mounting bolts to 38 Nm.
41. Install the spline axles of the hubs and axle shafts by replacing the spring rings on the inside of the axle shafts.
42. Attach cables, an exhaust pipe and transmission hoses and other details which were removed after a raising of the car. Install wheels and lower vehicle.
43. Next, the assembly is performed in the reverse order. When installing removed units, follow the descriptions in the relevant sections.
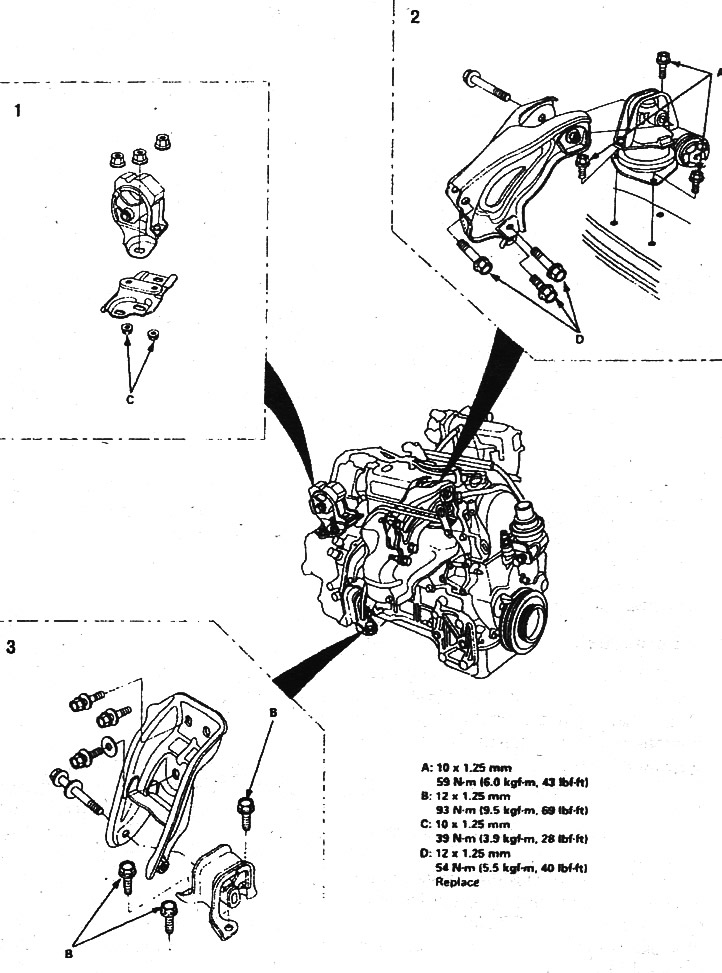
Supports of the power unit and the order of tightening the fastenings of the supports (4-cylinder Odyssey): 1. Transmission support; 2. Rear support; 3. Front support