
Contents: Removal ⇊ Installation ⇊
On these models, the engine is lowered and removed from under the car along with the transmission.
To raise the engine high enough to remove the subframe, you will need a hydraulic lift or a strong hoist and equipment to secure the raised engine.
Removal
1. Mark the position of the hinges and remove the hood.
2. Remove the air filter and air ducts.
3. Remove the battery, tray and relay stand.
4. Decompress the fuel system (Chapter 5).
5. Identify and disconnect cables, hoses, and wires from the engine, including cruise control and throttle cables, brake booster hose, fuel lines, intake manifold hoses, etc. except for cooling system hoses. First, disconnect the clamps and brackets securing the wiring routes and cable sheaths.
6. Disconnect the wiring connectors from the engine processor unit. The unit is mounted in the footwell on the passenger side.
7. Remove the wiring harnesses with seals through the engine compartment wall by unscrewing the seal flange bolts and turning the seals counterclockwise.
8. Disconnect the battery cable from the relay and fuse box.
9. Disconnect the engine ground bus.
10. Remove the drive belts. Remove the power steering pump, set it aside and secure it without disconnecting the hoses.
11. Disconnect the battery cable from the starter.
12. Raise the vehicle, remove the front wheels and lower engine shield.
13. Drain oil and fluid from the engine and transmission, drain the coolant.
14. Disconnect the oxygen sensor connector
15. Disconnect the exhaust pipe from the manifold and neutralizer.
16. Disconnect the shock absorber fork from the lower suspension arm, unscrew the bolts and remove the fork from the suspension strut.
17. Disconnect the stabilizer rods from the suspension arms.
18. Press the ball joints out of the suspension knuckles.
19. Disconnect the axle shafts and knock the splined axles out of the wheel hubs. Move the axle shafts to the side and tie them up. Place plastic bags over the splined axles and covers to protect them from dirt.
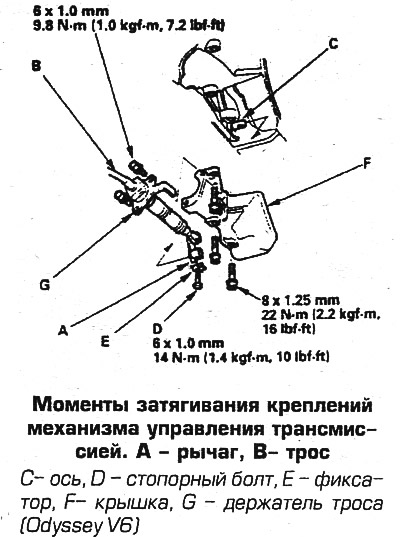
20. Disconnect the cable from the gearbox by removing the cover and unscrewing the bolt on the drive lever.
21. Remove the clamps and remove the power steering hose from the front cross member of the subframe.
22. Loosen the transmission support nuts
23. Remove the subframe reinforcement brackets by unscrewing the bolts.
24. Remove the remaining hose and wiring clamps on the subframe.
25. Remove the steering gear from the crossmember.
26. Remove the rear engine/transmission mount mounting bolts.
27. Lower the car, disconnect the hoses from the radiator.
28. Disconnect the heater hoses from the engine.
29. Disconnect and plug the cooling hoses from the transmission.
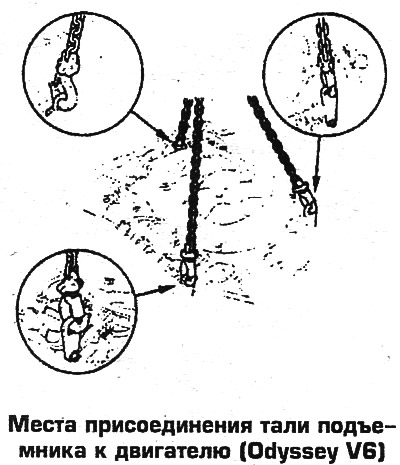
30. Attach the hoist to the engine (photo).
31. Remove the side engine mount bracket.
32. Unscrew the front support bracket nut.
33. Raise the car.
34. Take up the slack in the tackle.
35. Mark the location of the subframe relative to the body and the mounting locations.
36. Loosen the bolts and carefully lower the subframe.
37. Securely fasten the steering gear to the bottom of the body using a strong rope.
38. Loosen the bolts and remove the air conditioning compressor without disconnecting the hoses, move the compressor to the side and secure it.
39. Make sure all hoses, wires and cables are disconnected from the power unit.
40. Lower the power unit and remove it from under the vehicle.
41. Place stands under the front of the vehicle and block the rear wheels. If the car needs to be rolled after removing the engine, install the subframe and the removed suspension parts
42. Remove the intermediate shaft of the gearbox.
43. Remove the cover in the transmission housing and, while rotating the crankshaft, unscrew the 8 torque converter mounting bolts one by one.
44. Remove the reinforcement plate, starter and unscrew the transmission mounting bolts.
45. Remove the transmission from the engine, making sure the torque converter remains on the transmission. If the drive disk is stuck, move the torque converter through the starter window towards the transmission.
Installation
46. Install the transmission and tighten the bolts to 64 Nm.
47. Tighten the 8 torque converter mounting bolts to the drive disk one by one, tighten the bolts in a diagonal order to a torque of 12 Nm.
48. Check the freedom of rotation of the crankshaft.
49. Check the crankshaft pulley bolt tightening torque by holding the pulley with tool 07JAB-001020A, or equivalent. The torque should be 245 Nm.
50. Install the intermediate shaft, replacing the spring ring.
51. Raise the car.
52. Install the power unit on the vehicle by lifting it from underneath the vehicle.
53. Install the air conditioning compressor, tighten the bolts to 22 Nm.
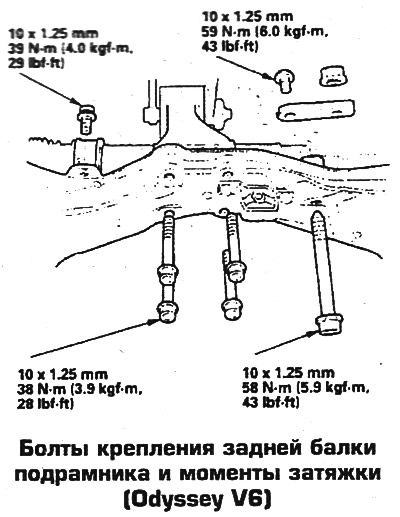
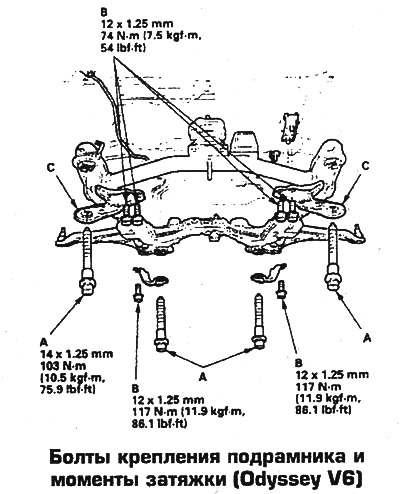
54. Install the subframe, aligning the marks made during disassembly, tighten the bolts to the torque specified on the subframe.
55. Install the transmission support brackets on the subframe, tighten the nuts to 38 Nm.
56. Install the rear support of the power unit, tighten the bolts to a torque of 38 Nm.
57. Tighten the front support nut to a torque of 54 Nm.
58. Install the side engine mounts, tighten the mount bracket bolts to 44 Nm, then tighten the mount through bolt to 54 Nm.
59. Remove the hoist.
60. Install the steering gear, tighten the bolts to 38 Nm.
61. Lay the power steering hose and wiring in place, secure them along the route with clamps.
62. Install the subframe stiffeners, tighten the bolts to 58 Nm.
63. Install the axle shafts and the removed and disconnected suspension components.
64. Install the exhaust pipe, replacing the gaskets. Connect the oxygen sensor connector, install the lower shield.
65. Lower the car.
66. Install all removed parts and units, connect wires, cables and hoses according to the marks made during disassembly. Adjust the belts and cables. If a new power steering pump belt is installed, adjust it so that the deflection is 8.5-11 mm. After the engine has been running for 5 minutes, adjust the belt to normal tension (Ch. 1). Fill the engine and transmission with oil and fluids.
67. Before starting the engine, turn the ignition key to the RUN position, but do not start the engine. After waiting 2 seconds, turn off the ignition 2-3 times and turn it on again (this is necessary to fill the line with gasoline. Make sure there are no fuel leaks from the fittings.
 |
 |
 |
 |
Original article on the website: www.hondabook.ru