
Contents: Removal ⇊ Installation ⇊
Removal
1. Disconnect the battery from ground.
2. Drain the coolant.
3. Disconnect the ventilation hoses from the throttle body.
4. Remove the air duct by disconnecting the hoses.
5. Remove the cover from the ignition coils and from the intake manifold.
6. Disconnect the throttle and cruise control cables.
7. Decompress the fuel system (Chapter 5).
8. Disconnect the fuel lines.
9. Disconnect the crankcase ventilation hose, disconnect both vacuum hoses from the brake booster.
10. Disconnect the breather hose from the cylinder head cover, and disconnect the 3 cooling system hoses from the throttle body.
11. Remove the alternator belt.
12. Jack up the engine and remove the side engine support.
13. Remove the power steering pump from its mountings, move it to the side and secure it without disassembling the lines.
14. Disconnect the wires and remove the generator.
15. Identify and disconnect connectors that prevent cylinder head removal, including engine sensor, ignition coil, and fan switch connectors.
16. Remove all 6 ignition coils.
17. Remove the intake manifold.
18. Disconnect the connectors from the injectors and remove the fuel distributor.
19. Disconnect the vacuum hoses from the air bypass valve.
20. Remove the camshaft belt.
21. Disconnect both hoses from the radiator, disconnect the heater hoses.
22. Disconnect the exhaust pipe from the manifold, remove both exhaust manifolds.
23. Remove the thermostat housing with the pipe.
24. Remove the camshaft sprockets and rear belt covers.
25. Remove the cylinder head covers.
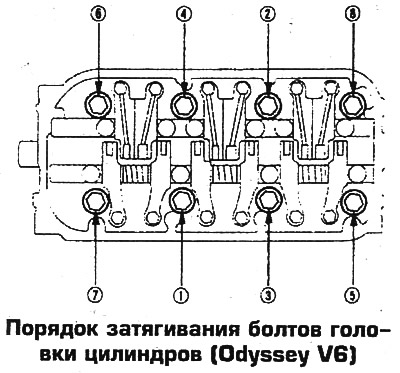
26. Loosen the bolts of each cylinder head in the reverse order shown in the photo, making 1/3 of a turn at a time. Remove the cylinder heads.
 |
 |
Installation
27. Clean the head and the parting surface of the cylinder block. Check the deformation of the planes, which should not exceed 0.15 mm. If the deformation exceeds 0.15 mm, grind the head. When grinding, it is permissible to reduce the head height by no more than 0.20 mm (base head height 121 mm).
28. Install the new head gasket.
29. Clean the oil nozzle and install, replacing the seal. Install new control pins.
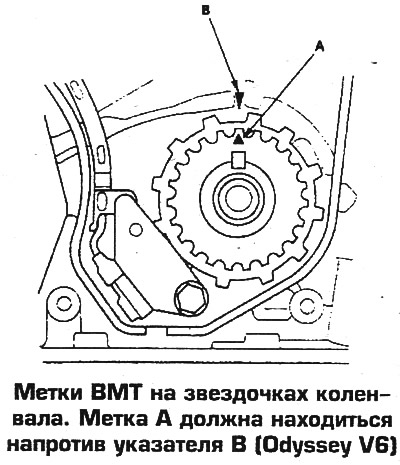
30. Align the camshaft belt drive sprocket so that the mark on the pulley aligns with the pointer on the oil pump cover.
31. Make sure that the piston of the 1st cylinder is set to TDC.
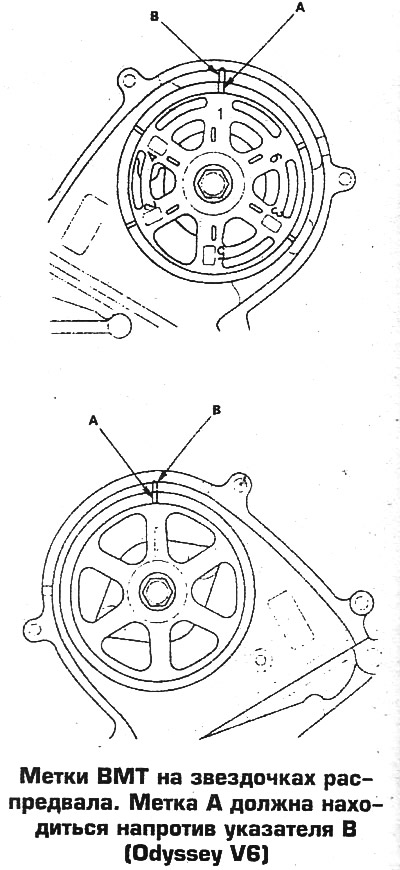
32. Align the TDC marks on the camshaft sprockets with the pointers.
 |
 |
33. Install both cylinder heads.
34. Tighten the bolts in the following order (perform each tightening step simultaneously on both heads).
- Step 1 - Tighten the bolts to 39 Nm,
- Step 2 - Tighten the bolts to 69 Nm,
- Step 2 - Tighten the bolts to 98.1 Nm.
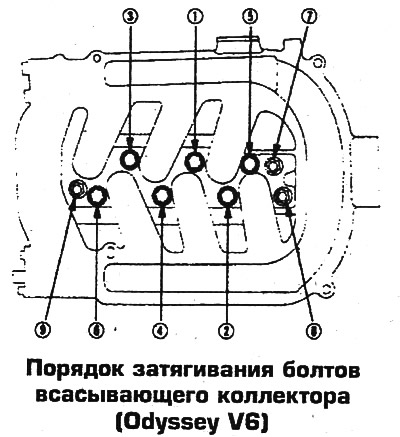
35. Install the intake manifolds, replacing the gaskets. Tighten the bolts to 31 Nm in a diagonal order, starting from the center and moving towards the periphery.
36. Install the exhaust pipe onto the manifolds. Tighten the mounting nuts to a torque of 33 Nm.
37. Install heat shields.
38 Install the camshaft belt.
39. Adjust the valve clearances.
40. Install the cylinder head covers. Tighten the bolts in a diagonal order to a torque of 12 Nm.
41. Install the thermostat housing with the pipe.
42. Install the intake manifold, replacing the gasket.
43. Install the ignition coils.
44. Install the generator and power steering pump, adjust the pump belt tension.
45. Raise the engine and install the engine side support and alternator belt tensioner bracket.
46. Install the cylinder head cover.
47. Connect the wires, hoses and cables in place. Install the remaining removed parts.
48. Change the engine oil and filter. Fill with coolant.
49. Warm up the engine, check the adjustment of the cables, adjust if necessary.
The cruise control cable should have 3.25-4.25 mm of slack. The throttle cable should have 10-12 mm of slack where it attaches to the throttle.
(The article was copied from the website: «HondaBook»)