
CR-V
1. Disconnect the battery from ground.
2. Raise the car.
3. Drain the oil from the engine.
4. Unscrew the nuts and bolts securing the pan diagonally and remove the pan. If necessary, trim the seal or move the tray by hitting it in the corners with a soft hammer.
5. Clean the tray.
6. Check the condition of the oil receiver and oil deflector. If significant resin deposits or other contaminants are found, replace these parts.
7. When assembling, lubricate with sealant the places where the rear oil seal housing and the oil pump housing are adjacent to the cylinder block.
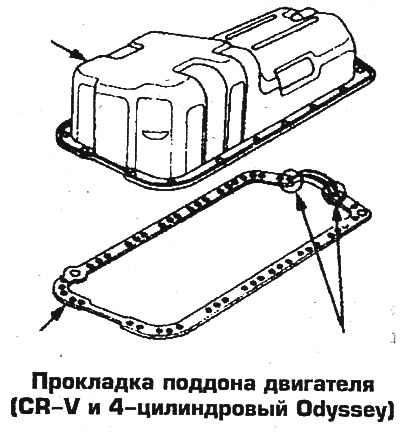
8. Install the pan with a new gasket, tighten the bolts and nuts in the 6 places shown in the photo.
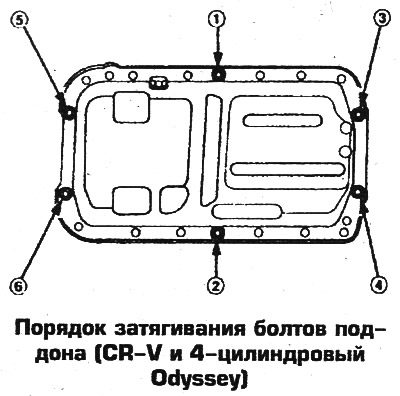
9. Tighten the nuts and bolts in three stages in a diagonal sequence to a torque of 14 Nm. Do not overtighten the nuts to avoid deformation of the gasket and the development of oil leaks.
Odyssey
1. Disconnect the battery from ground.
2. Raise the car.
3. Drain the oil from the engine.
4. Remove the lower engine shield.
5. On a 4-cylinder Odyssey, remove the front wheels and center subframe beam.
6. Disconnect the wires from the oxygen sensor, unscrew the nuts and remove the front exhaust pipe, disconnecting it from the middle pipe and manifold.
7. On 4-cylinder engines, remove the lower torque converter cover.
8. Loosen the pan nuts and bolts in a diagonal order and remove the pan. If necessary, trim the seal or move the tray by hitting it in the corners with a soft hammer. It is not allowed to detach the tray by prying it with a sharp tool.
9. Check the condition of the oil receiver and oil deflector. If significant resin deposits or other contaminants are found, replace these parts.
10. Clean the tray.
11. Apply sealant to the threads in the bolt holes, as well as to the areas where the rear oil seal housing and the oil pump housing meet the cylinder block.
12. On 4-cylinder engines, lubricate the corner areas of the gasket with sealant, install the pan with the gasket in place.
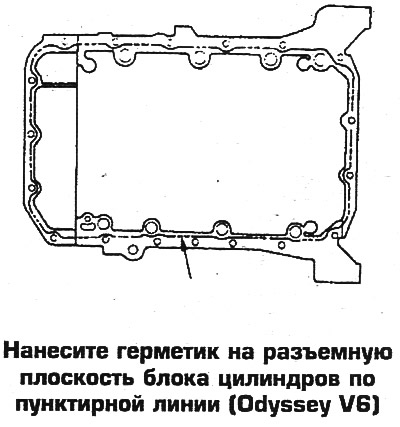
13. On 6-cylinder engines, apply a bead of sealant to the split plane of the cylinder block, circling the bolt holes on the inside, and lubricate the threads in the bolt holes in the cylinder block with sealant. Place the pan in place and tighten the bolts and nuts by hand.
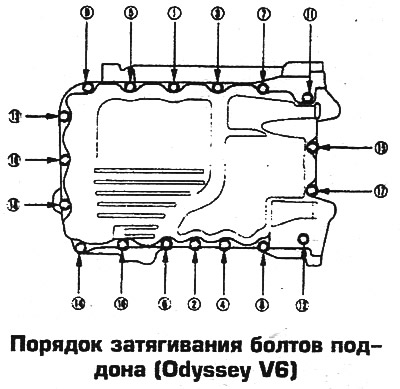
14. Tighten the nuts and bolts in three stages in a diagonal sequence to the specified torque. On 4-cylinder engines, tighten the fasteners to 14 Nm and install the torque converter cover. On 6-cylinder engines, tighten the fasteners to 12 Nm.
15. Install all removed parts. Pour in oil.
[Refer to the original source on the website: HondaBook]