
Contents: Sedan ⇊ Hatchback ⇊
Sedan
1. Remove the additional storage box.
2. Squeeze the latches, remove the sunroof control switch (A) and disconnect the connector (B).
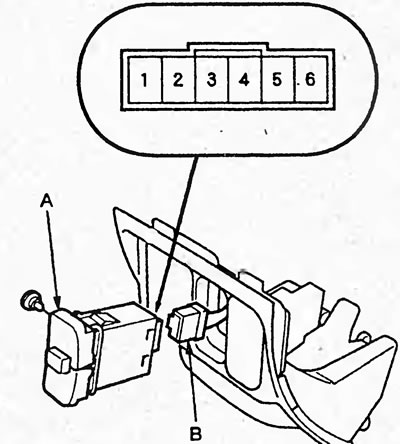
Table. Checking the sunroof electric drive control unit.
| Conclusion | Wire color | Verification conditions | In good condition | Possible cause/location of malfunction |
| 5 | IN | Constantly | Conductivity between terminal "5" and ground | - Poor ground contact (G501) - Broken wire |
| 1 | Y/G | Ignition switch in the "ON" position (II) | At terminal "1" the battery voltage | -Fuse No.6 (7.5 A) (mounting block in the cabin) -Broken wire |
| 4 | Lg | The hatch is completely closed | Conductivity between terminal "4" and ground | -Bad ground connection (G501) -Hatch position sensor -Broken wire |
| 3 | R/Y | Ignition switch in the "ON" position (II) | At terminal "3" the battery voltage | -Fuse No.6 (7.5 A) (mounting block in the cabin) -Hatch opening relay -Wire break |
| Install a jumper between terminals "3" and "5" and turn the ignition switch to the "ON" (II) position | The hatch opens | -Bad ground contact (G501) -Fuse No.6 (7.5 A) (mounting block in the cabin) -Fuse No.7 (20 A) (mounting block in the cabin) -Hatch opening relay -Hatch closing relay -Hatch drive electric motor -Wire break | ||
| 2 | G/W | Ignition switch in the "ON" position (II) | At terminal "2" the battery voltage | -Fuse No.6 (7.5 A) (mounting block in the cabin) -Hatch closing relay -Wire break |
| Install a jumper between terminals "2" and "5" and turn the ignition switch to the "ON" (II) position | The hatch closes | -Bad ground contact (G501) -Fuse No.6 (7.5 A) (mounting block in the cabin) -Fuse No.7 (20 A) (mounting block in the cabin) -Hatch opening relay -Hatch closing relay -Hatch drive electric motor -Wire break |
3. Check for conductivity between the switch terminals according to the table.
| Switch position | Conclusions |
| CLOSE | 2-5 (lamp), 1-3 |
| TILT | 2-5 (lamp), 3-4 |
| OPEN | 2-5 (lamp), 3-6 |
If continuity is not as described, replace the sunroof control switch.
Hatchback
1. Remove the local lighting lamp.
2. Squeeze the latches, remove the sunroof control switch (A) and disconnect the connector (B).
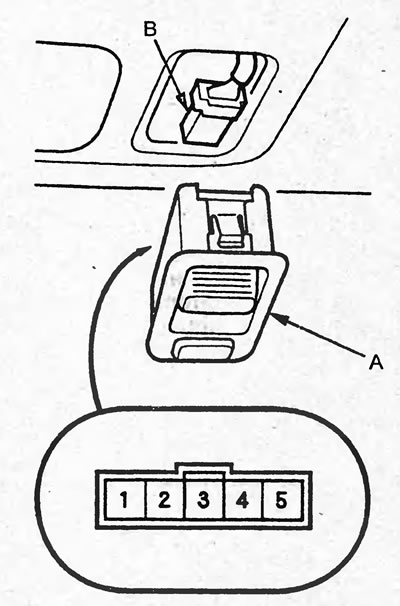
3. Check for conductivity between the switch terminals according to the table.
| Switch position | Conclusions |
| CLOSE | 4-5 |
| TILT | 2-4 |
| OPEN | 1-4 |
If continuity is not as described, replace the sunroof control switch.
Original material on the website hondabook.ru