
HondaBook.ru
Auto companies Volkswagen Auto companies Ford Auto companies Lada Auto companies Skoda Auto companies BMW Auto companies Mazda Auto companies Peugeot
English Русский
Български
Беларускі
Український
Српски
Hrvatski
Română
Polski
Slovenský
Magyar
Bookmark Contacts Sitemap   


Accord Civic Fit / Jazz CR-V HR-V Others Articles
Civic 3 and 4 (1983-1991) Civic 5 and 6 (1991-2000) Civic 6 (1995-2000) Civic 7 (2000-2005) Civic 8 (2005-2011)

Checking the status of the charging system (Honda Civic 6)

  • Main
  • Honda Civic
  • 6 (1995-2000)
  • Power unit
  • Engine electrical equipment
  • Checking the status of the charging system
0
1. Remember that charging system malfunctions are not necessarily related to generator failures. Always perform the following simple checks first:
  • a) Check the condition of the battery wires where they are connected to the terminals of the latter. Check the reliability of the fastening of the terminal clamps;
  • b) Check the battery condition (see Checking the battery status and replacing it). If necessary, recharge the latter or replace it with a new one;
  • c) Check the condition of the wiring and electrical connections of the generator and voltage regulator;
  • d) Check the condition and tension of the alternator drive belt (see Chapter Routine maintenance). Replace if necessary;
  • e) Check the generator mounting bolts for tightness;
  • f) Start the engine and evaluate the intensity of the background noise emitted by the generator;
  • g) If equipped, check the condition of the fuse links in the fuse box in the engine compartment of the vehicle (see Chapter On-board electrical equipment).If any of the inserts fail, investigate and eliminate the causes of the overload;
  • h) Check the proper functioning of the charge indicator lamp in the engine instrument panel. With the ignition on and the engine not running, the lamp should light. Otherwise, disconnect the 4-pin connector from the back of the alternator and ground the terminal of its white and blue wire. If the lamp still does not turn on, check the condition of fuse #15 at 7.5 A and the filament of the lamp itself. Also check for battery voltage at terminal #1. If voltage is present, replace the alternator;
  • i) Check the contents of the on-board processor memory unit for the presence of electrical load monitoring (ELD) system fault codes stored in it (see Chapter Engine management systems).

2. Using a voltmeter, measure the voltage produced by the battery with the engine off and all electrical consumers disconnected (heater fan, radio, cigarette lighter, cooling system fan, etc., etc.). The measurement result should be around 12.5 V, or slightly higher if the engine has been running for the last hour.
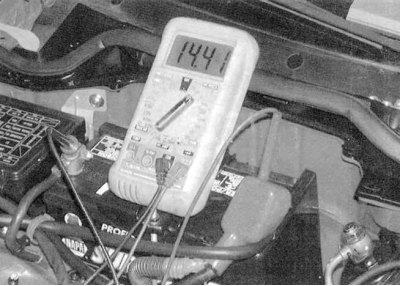


2. Using a voltmeter, measure the voltage…


3. Start the engine and repeat the measurement. At a crankshaft speed of 1500 rpm, the voltage should be 13.8÷14.8 V (see accompanying illustration).

4. Turn on the high beam headlights, run the K/V voltmeter at maximum speed, turn on the rear window heating and radio. If the charging system is functioning normally, the voltage should drop briefly, then return to the normal operating level of about 13.5 V. If the voltage drops below 13 V, then the system is not functioning properly.

5. Reduce engine speed to idle – the charging voltage should not fall below 13 V.

6. Turn off all electrical consumers, increase engine speed to 1600 rpm and read the voltmeter again. Now the voltage should not rise above 15 V (minor deviations are permissible, inversely related to the ambient temperature).

7. The dependence of the charging voltage on the engine speed and the number of switched-on electrical consumers indicates a malfunction of the voltage regulator.

8. If the deviation from the nominal value is unacceptable, the generator should be repaired accordingly or replaced. If the charging voltage is too low and the drive belts and battery are in good condition, replace the generator assembly with the regulator (see Removal and installation the generator).

(Information obtained from this source: «hondabook.ru»)
This article is available at: russian, bulgarian, belarusian, ukrainian, serbian, croatian, romanian, polish, slovak, hungarian
This information has been verified: Timofey Goryachev
Share with friends:
◀ Previous
Civic 6: Engine electrical equipment
Next ▶

Charging system — general information and precautions
Checking the installation and adjusting the ignition timing angle
Removal and installation the ignition distributor
Checking and replacing the ignition control module (ICM)
Checking the condition and replacing the ignition coil
Removal and installation the generator
Replacing the voltage regulator and generator brushes
Starting System — General Information and Precautions
Checking the proper functioning of the starter on the vehicle (in situ)
Removal and installation the starter
See also other articles from Honda manuals:
Checking the status of the charging system Honda Accord 6 (1997-2002)
Checking the charging system Honda Fit 1 (2001-2008)
Cooling system — checking and replacing fluid Honda CR-V 1 (1995-2001, petrol)
Checking the charging system with a test lamp Honda HR-V 1 (1998-2006, petrol)
Checking the crankcase ventilation system Honda Avancier 1 (1999-2003, petrol)
Link in different formats to this article
Comments and feedback from visitors
No comments yet


How much will 42 + 29 ?


Civic 8 (2005-2011) 
  • General information
  • Technical data
  • Governing bodies
  • Driving and maintenance
  • Power unit
  • Gasoline engines (L13A)
  • Gasoline engines (R18A)
  • Diesel engines (N22A)
  • Cooling and lubrication (L13A)
  • Cooling and lubrication (R18A)
  • Cooling and lubrication (N22A)
  • Injection system (gasoline)
  • Injection system (diesel)
  • Toxicity reduction system
  • Troubleshooting
  • Transmission
  • Clutch and drive shafts
  • Mechanical gearbox
  • Chassis and running gear
  • Suspension and wheels
  • Steering
  • Brake system
  • Body and interior
  • Exterior (external elements)
  • Doors, locks and windows
  • Electrical equipment
  • Equipment and devices
  • Headlights and lighting
  • Power devices
  • Electrical circuits
Civic 7 (2000-2005) 
  • General information
  • User manual
  • Maintenance
  • Power unit
  • Engines D15B and D17A
  • K20A Engines
  • Overhaul engine
  • Cooling system
  • Lubrication system
  • Fuel injection system
  • Toxicity reduction system
  • Engine electrical equipment
  • Transmission
  • Clutch
  • Manual gearbox
  • Automatic gearbox
  • Variator (CVT)
  • Drive shafts
  • Chassis and running gear
  • Car suspension
  • Steering
  • Brake system
  • Body and interior
  • Exterior (external elements)
  • Interior (internal elements)
  • Doors, locks and windows
  • Heater and air conditioner
  • Manual air conditioner
  • Automatic air conditioner
  • Security system
  • Electrical equipment
  • Equipment and devices
  • Headlights and lighting
  • Windscreen wipers
  • Audio system
  • Electrical diagrams
Civic 6 (1995-2000) 
  • General information
  • Introduction to guide
  • User manual
  • Maintenance
  • Power unit
  • Engine in car (Civic)
  • Engine in car (Integra)
  • Engine overhaul
  • Cooling and heating
  • Power and exhaust systems
  • Engine electrical equipment
  • Engine management systems
  • Transmission
  • Manual gearbox
  • Automatic transmission (AT/CVT)
  • Clutch and drive shafts
  • Chassis and running gear
  • Brake system
  • Car suspension
  • Steering
  • Body and interior
  • Exterior (external elements)
  • Interior (internal elements)
  • Doors, locks and windows
  • Electrical equipment
  • Equipment and devices
  • Electrical circuits
Civic 5 and 6 (1991-2000) 
  • Power unit
  • SOHC engines
  • DOHC engines
  • Engine overhaul
  • Cooling and lubrication system
  • Intake and exhaust system
  • Fuel injection system (SOHC)
  • Fuel injection system (DOHC)
  • Carburetor
  • Transmission
  • Clutch
  • Manual gearbox S4C
  • Manual gearbox S40
  • Automatic gearbox
  • Drive shafts
  • Chassis and running gear
  • Car suspension
  • Steering
  • Brake system
  • Body and interior
  • Body elements
  • Heater and air conditioner
  • Electrical equipment
  • Power devices
  • Equipment and instruments
  • Electrical circuits
Civic 3 and 4 (1983-1991) 
  • General information
  • Maintenance
  • Power unit
  • Engine in a car
  • Engine overhaul
  • Cooling system
  • Power and exhaust system
  • Engine electrical equipment
  • Emission control system
  • Transmission
  • Mechanical gearbox
  • Automatic gearbox
  • Clutch and drive shafts
  • Four-wheel drive
  • Chassis and running gear
  • Brake system
  • Car suspension
  • Steering
  • Body and interior
  • Body elements
  • Electrical equipment
  • Equipment and devices
  • Electrical circuits
HondaBook.ru © 2018–2026 • Mobile version • Sitemap: EN BG BY UA RS HR RO PL SK HU • Feedback • Driver Information • Search system • Bookmark
Accord 3 (1985-1989) • Accord 6 (1997-2002) • Civic 3 and 4 (1983-1991) • Civic 5 and 6 (1991-2000) • Civic 6 (1995-2000) • Civic 7 (2000-2005) • Civic 8 (2005-2011) • Fit 1 (2001-2008) • CR-V 1 (1995-2001) • CR-V 2 (2002-2006) • HR-V 1 (1998-2006) • Avancier 1 (1999-2003) •
 
This website uses cookies to ensure proper functioning. By clicking "OK," you agree.