


Vehicle fuel system Honda Accord 3

Electric fuel pumps
All Accord and Prelude models covered in this book use an electric fuel pump located near or inside the fuel tank. Accords through 1985 and Preludes through 1987 use an external fuel pump mounted underneath the vehicle...
All Accord and Prelude models covered in this book use an electric fuel pump located near or inside the fuel tank. Accords through 1985 and Preludes through 1987 use an external fuel pump mounted underneath the vehicle...

External Fuel Pumps — Removal and Installation
1. Remove the cap to relieve excess pressure in the system. 2. Clamp the fuel line going to the pump. 3. Disconnect the cable from the negative battery terminal. 4. Raise the rear of the vehicle. Remove the left rear...
1. Remove the cap to relieve excess pressure in the system. 2. Clamp the fuel line going to the pump. 3. Disconnect the cable from the negative battery terminal. 4. Raise the rear of the vehicle. Remove the left rear...

Internal Fuel Pumps — Removal and Installation
The fuel pump is a direct drive type. Fuel enters the pump through a filter, flows past the anchor through a one-way valve and then is supplied to the engine compartment. It is equipped with a deflector, which prevents...
The fuel pump is a direct drive type. Fuel enters the pump through a filter, flows past the anchor through a one-way valve and then is supplied to the engine compartment. It is equipped with a deflector, which prevents...

External Fuel Pumps — Checking
Before testing the fuel pump, always check the fuel filter for clogs and/or the fuel lines for kinks or blockages. This will require a pressure gauge and a graduated drain container. 1. Turn the ignition off. Remove the...
Before testing the fuel pump, always check the fuel filter for clogs and/or the fuel lines for kinks or blockages. This will require a pressure gauge and a graduated drain container. 1. Turn the ignition off. Remove the...

Internal Fuel Pumps — Checking
Accord 1. Turn the ignition off. Remove the screws securing the under-dash fuse box to the bracket. Remove the fuel cut-off relay from the rear of the fuse box and rotate the box so that the relay mount can be seen. 2....
Accord 1. Turn the ignition off. Remove the screws securing the under-dash fuse box to the bracket. Remove the fuel cut-off relay from the rear of the fuse box and rotate the box so that the relay mount can be seen. 2....

Throttle Cable — 1984-85 Accord
1. The throttle cable should operate smoothly and without sticking. 2. Check the free play of the cable when connected (the cable should freely move 4.7-9.5 mm between the lock nut and the lever. 3. If the deviation is...
1. The throttle cable should operate smoothly and without sticking. 2. Check the free play of the cable when connected (the cable should freely move 4.7-9.5 mm between the lock nut and the lever. 3. If the deviation is...
Damper and Linkage — 1984-85 Accord
1. When performing these tests, the engine must be cold. 2. Remove the air cleaner. 3. To set the throttle valve, press the accelerator all the way down and release it smoothly. The valve should close completely. If the...
1. When performing these tests, the engine must be cold. 2. Remove the air cleaner. 3. To set the throttle valve, press the accelerator all the way down and release it smoothly. The valve should close completely. If the...

Fast Idle Reset — 1984-85 Accord
1. The engine coolant temperature must be below 30°C. 2. Disconnect the two hoses from the ejector. 3. To set the throttle valve, press the accelerator pedal to the floor and release it smoothly. 4. Start the engine; it...
1. The engine coolant temperature must be below 30°C. 2. Disconnect the two hoses from the ejector. 3. To set the throttle valve, press the accelerator pedal to the floor and release it smoothly. 4. Start the engine; it...

Choke Opener — Accord 1984-85
1. This test must be performed on a cold engine. 2. Disconnect the damper heater wires. 3. To set the throttle valve, press the accelerator pedal to the floor and release it smoothly. 4. Start the engine. The throttle...
1. This test must be performed on a cold engine. 2. Disconnect the damper heater wires. 3. To set the throttle valve, press the accelerator pedal to the floor and release it smoothly. 4. Start the engine. The throttle...

Fast Idle — 1984-85 Accord
This test can be performed on a warm engine. 1. With the engine off, connect the tachometer. 2. Disconnect and plug the internal fast idle release vacuum hose. 3. Engage the fast idle cam by fully opening and closing...
This test can be performed on a warm engine. 1. With the engine off, connect the tachometer. 2. Disconnect and plug the internal fast idle release vacuum hose. 3. Engage the fast idle cam by fully opening and closing...

Replacement of the throttle body cover — Accord 1984-85
1. Remove the air cleaner assembly. 2. Cover the carburetor with a clean rag to prevent metal particles from getting inside. Using a 4mm drill, drill out the rivets holding the cover in place. Remove the retaining ring....
1. Remove the air cleaner assembly. 2. Cover the carburetor with a clean rag to prevent metal particles from getting inside. Using a 4mm drill, drill out the rivets holding the cover in place. Remove the retaining ring....

Air Fuel Ratio Control — 1984-85 Accord
This procedure is used to adjust the basic idle on carbureted engines after the carburetor has been disassembled or repaired. Generally, the mixture is adjusted at the factory and should not be adjusted without a...
This procedure is used to adjust the basic idle on carbureted engines after the carburetor has been disassembled or repaired. Generally, the mixture is adjusted at the factory and should not be adjusted without a...

Adjusting the Float Level — 1984-85 Accord
With the car leveled and the engine warmed up to normal temperature, check the primary and secondary fuel levels through the inspection windows on the carburetor side. Quickly rev the engine up to 3000 rpm several...
With the car leveled and the engine warmed up to normal temperature, check the primary and secondary fuel levels through the inspection windows on the carburetor side. Quickly rev the engine up to 3000 rpm several...
Throttle Cable — Prelude 1984-87
Look figure 13 . 1. The throttle cable should operate smoothly and without sticking. 2. Check the free play of the cable when connected (the cable should move freely by 4.7-9.5 mm between the lock nut and the lever). 3....
Look figure 13 . 1. The throttle cable should operate smoothly and without sticking. 2. Check the free play of the cable when connected (the cable should move freely by 4.7-9.5 mm between the lock nut and the lever). 3....
Choke and Linkage — Prelude 1984-87
1. When performing these tests, the engine must be cold. 2. Remove the air cleaner. 3. To set the throttle valve, press the accelerator all the way down and release it smoothly. The valve should close completely. If the...
1. When performing these tests, the engine must be cold. 2. Remove the air cleaner. 3. To set the throttle valve, press the accelerator all the way down and release it smoothly. The valve should close completely. If the...

Choke Opener — Prelude 1984-87
1. When the engine is cold, disconnect the upper hose from the throttle opener. 2. Connect the vacuum pump and pressure gauge to the line through the tee. 3. Start the engine and check the vacuum in the line. 4. If the...
1. When the engine is cold, disconnect the upper hose from the throttle opener. 2. Connect the vacuum pump and pressure gauge to the line through the tee. 3. Start the engine and check the vacuum in the line. 4. If the...
Startup Leak Solenoid — 1984-87 Prelude
1. Disconnect vacuum hose #20 from the vacuum manifold tubes near the emission control unit. 2. Without turning on the ignition, create a vacuum in the hose. If a vacuum is not achieved, replace the electromagnetic...
1. Disconnect vacuum hose #20 from the vacuum manifold tubes near the emission control unit. 2. Without turning on the ignition, create a vacuum in the hose. If a vacuum is not achieved, replace the electromagnetic...
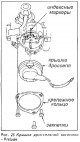
Throttle Body Cover Replacement — Prelude 1984-87
1. Remove the air cleaner assembly. 2. Cover the carburetor with a clean rag to prevent metal particles from getting inside. Using a 4mm drill, drill out the rivets holding the cover in place. Remove the retaining ring....
1. Remove the air cleaner assembly. 2. Cover the carburetor with a clean rag to prevent metal particles from getting inside. Using a 4mm drill, drill out the rivets holding the cover in place. Remove the retaining ring....
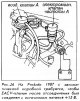
Air Fuel Ratio Control — Prelude 1984-87
Make sure the carbs are synchronized before checking the idle speed and mixture. You will also need to remove the ECU fuse from the fuse box for 10 seconds to reset the control unit after this procedure is completed. 1....
Make sure the carbs are synchronized before checking the idle speed and mixture. You will also need to remove the ECU fuse from the fuse box for 10 seconds to reset the control unit after this procedure is completed. 1....

Float Level — Prelude 1984-87
With the carburetor and float chambers removed, hold the assembly so that the surface of the float chamber is approximately 30° from vertical. Use a float level gauge (Tool 07401-0010000 or equivalent) to measure the...
With the carburetor and float chambers removed, hold the assembly so that the surface of the float chamber is approximately 30° from vertical. Use a float level gauge (Tool 07401-0010000 or equivalent) to measure the...
Damper and Linkage — 1986-89 Accord
1. When performing these tests, the engine must be cold. 2. Remove the air cleaner. 3. To set the throttle valve, press the accelerator all the way down and release it smoothly. The valve should close completely. If the...
1. When performing these tests, the engine must be cold. 2. Remove the air cleaner. 3. To set the throttle valve, press the accelerator all the way down and release it smoothly. The valve should close completely. If the...

Fast Idle Reset — 1986-89 Accord
Cold engine 1. Disconnect the two hoses from the ejector. 2. Press the accelerator pedal to the floor and release it smoothly to engage the fast idle cam. 3. Start the engine; it should run at fast idle. If it does not,...
Cold engine 1. Disconnect the two hoses from the ejector. 2. Press the accelerator pedal to the floor and release it smoothly to engage the fast idle cam. 3. Start the engine; it should run at fast idle. If it does not,...
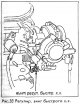
Fast Idle — 1986-89 Accord
1. Start the engine and warm it up to normal operating temperature. 2. Turn off the engine and connect the tachometer. 3. Disconnect and plug the internal fast idle release vacuum hose. 4. Engage the fast idle cam by...
1. Start the engine and warm it up to normal operating temperature. 2. Turn off the engine and connect the tachometer. 3. Disconnect and plug the internal fast idle release vacuum hose. 4. Engage the fast idle cam by...

Air Fuel Ratio Control — 1986-89 Accord
Cars with manual transmission These procedures are identical to those described in this Chapter is for the 1984-85 Accord . Cars with automatic transmission 1. Place the vehicle in Park or Neutral, apply the parking...
Cars with manual transmission These procedures are identical to those described in this Chapter is for the 1984-85 Accord . Cars with automatic transmission 1. Place the vehicle in Park or Neutral, apply the parking...
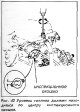
Adjusting the Float Level — 1986-89 Accord
With the vehicle level on the ground and the engine at normal operating temperature, check the primary and secondary fuel level sight glasses on the side of the carburetor. Quickly rev the engine from idle to 3,000 rpm...
With the vehicle level on the ground and the engine at normal operating temperature, check the primary and secondary fuel level sight glasses on the side of the carburetor. Quickly rev the engine from idle to 3,000 rpm...
Removal and installation the carburetor — Accord
Removal 1. Disconnect the wire from the negative battery terminal. 2. Remove the air cleaner cover. 3. Disconnect the intake and hot air hoses from the air cleaner. 4. Disconnect the vacuum lines from the air cleaner...
Removal 1. Disconnect the wire from the negative battery terminal. 2. Remove the air cleaner cover. 3. Disconnect the intake and hot air hoses from the air cleaner. 4. Disconnect the vacuum lines from the air cleaner...
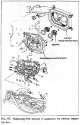
Removal Carburetors — Prelude
1. Disconnect the air intake duct and hot air hose from the air cleaner. 2. Disconnect the vacuum hose from the hot air intake control diaphragm. 3. Remove the air cleaner cover and filter element. 4. Disconnect the...
1. Disconnect the air intake duct and hot air hose from the air cleaner. 2. Disconnect the vacuum hose from the hot air intake control diaphragm. 3. Remove the air cleaner cover and filter element. 4. Disconnect the...

Carburetor Separation — Prelude
1. Remove four screws and disconnect vacuum lines from carburetors; remove the upper manifold. 2. Disconnect the fuel shutoff solenoid valve and the air shutoff solenoid valve connectors. Remove the vacuum hose from the...
1. Remove four screws and disconnect vacuum lines from carburetors; remove the upper manifold. 2. Disconnect the fuel shutoff solenoid valve and the air shutoff solenoid valve connectors. Remove the vacuum hose from the...

Carburetor Assembly — Prelude
1. The right carburetor flap shaft has a fork at the end; insert it between the washers at the end of the left carburetor damper shaft. 2. Install new sealing rings on the evaporator tube and install it. 3. Install the...
1. The right carburetor flap shaft has a fork at the end; insert it between the washers at the end of the left carburetor damper shaft. 2. Install new sealing rings on the evaporator tube and install it. 3. Install the...
Carburetor Installation — Prelude
1. Place the carburetors in place. Make sure they are fully seated and tightened in the insulators. Install the insulator fasteners. 2. Install the main fuel supply hose to the right side of the vacuum manifold. 3....
1. Place the carburetors in place. Make sure they are fully seated and tightened in the insulators. Install the insulator fasteners. 2. Install the main fuel supply hose to the right side of the vacuum manifold. 3....

Major repairs of carburetors
Warning: Carburetor cleaner is a highly corrosive liquid; protect your eyes when working with aerosols and liquids, and when using compressed air. If the cleaner gets on painted surfaces, remove it immediately!...
Warning: Carburetor cleaner is a highly corrosive liquid; protect your eyes when working with aerosols and liquids, and when using compressed air. If the cleaner gets on painted surfaces, remove it immediately!...

Synchronization of carburetors
The Prelude's dual carburetors are designed to operate in sync, meaning that the same amount of air is drawn into each carburetor. The carburetors are synchronized as an assembly and generally do not require adjustment...
The Prelude's dual carburetors are designed to operate in sync, meaning that the same amount of air is drawn into each carburetor. The carburetors are synchronized as an assembly and generally do not require adjustment...
Internal Fuel Pumps — 1990-91 Accord
Gasoline vapors are explosive. Handle components slowly, preventing falls. Do not smoke or work near open flames. Have a dry powder fire extinguisher handy. 1. Relieve fuel pressure. 2. After disconnecting all fuel...
Gasoline vapors are explosive. Handle components slowly, preventing falls. Do not smoke or work near open flames. Have a dry powder fire extinguisher handy. 1. Relieve fuel pressure. 2. After disconnecting all fuel...

Fuel Injectors — 1985 Accord
1. Disconnect the negative cable from the battery. 2. Carefully relieve fuel pressure. 3. Remove the air cleaner housing. 4. Disconnect the electrical connector from each injector. 5. Disconnect the vacuum hose and fuel...
1. Disconnect the negative cable from the battery. 2. Carefully relieve fuel pressure. 3. Remove the air cleaner housing. 4. Disconnect the electrical connector from each injector. 5. Disconnect the vacuum hose and fuel...
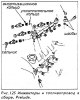
Fuel Injectors — Accord 1986-89, Prelude 1986-88
1. Disconnect the negative cable from the battery. 2. Carefully relieve fuel pressure. 3. Disconnect the electrical connector from each injector. 4. Disconnect the vacuum hose and fuel return hose from the pressure...
1. Disconnect the negative cable from the battery. 2. Carefully relieve fuel pressure. 3. Disconnect the electrical connector from each injector. 4. Disconnect the vacuum hose and fuel return hose from the pressure...
Fuel Injectors — Accord 1990-91, Prelude 1989-91
1. Relieve fuel pressure. 2. Mark the wiring harnesses from the injectors. 3. Place a rag under the pressure regulator. Disconnect the fuel hose and fuel line. Plug the fuel line. 4. On Prelude, disconnect the fuel hose...
1. Relieve fuel pressure. 2. Mark the wiring harnesses from the injectors. 3. Place a rag under the pressure regulator. Disconnect the fuel hose and fuel line. Plug the fuel line. 4. On Prelude, disconnect the fuel hose...
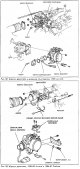
Throttle body — removal and installation
Removal 1. Disconnect the air intake pipe from the throttle body. 2. Drain the coolant to at least the level below the throttle body. 3. Disconnect the cooling hoses leading to the throttle body. 4. Label and disconnect...
Removal 1. Disconnect the air intake pipe from the throttle body. 2. Drain the coolant to at least the level below the throttle body. 3. Disconnect the cooling hoses leading to the throttle body. 4. Label and disconnect...
Throttle angle sensor
The sensor is located on the side of the throttle body and is connected to the throttle shaft. After removing the throttle, the sensor can be removed by removing the mounting bolts. When reinstalling, make sure the...
The sensor is located on the side of the throttle body and is connected to the throttle shaft. After removing the throttle, the sensor can be removed by removing the mounting bolts. When reinstalling, make sure the...

Fuel pressure regulator
Removal 1. Place a rag under the regulator. Be prepared to catch any leaking fuel. 2. Relieve fuel system pressure. 3. Disconnect the vacuum hose from the regulator. 4. Disconnect the fuel line from the regulator; plug...
Removal 1. Place a rag under the regulator. Be prepared to catch any leaking fuel. 2. Relieve fuel system pressure. 3. Disconnect the vacuum hose from the regulator. 4. Disconnect the fuel line from the regulator; plug...
Injector resistor — removal and installation
1. Turn off the ignition. 2. The resistor is located in the engine compartment on the left wing visor (inner surface) or on the shock absorber strut. Disconnect the electrical connector going to the resistor. 3. Remove...
1. Turn off the ignition. 2. The resistor is located in the engine compartment on the left wing visor (inner surface) or on the shock absorber strut. Disconnect the electrical connector going to the resistor. 3. Remove...
MAP sensor — removal and installation
The MAP sensor is located inside the emission control box on the partition. Remove the control box from its mountings and open it. Disconnect the harness connector from the sensor, then disconnect the vacuum hose(s)....
The MAP sensor is located inside the emission control box on the partition. Remove the control box from its mountings and open it. Disconnect the harness connector from the sensor, then disconnect the vacuum hose(s)....
Intake air temperature sensor
The sensor is located on the intake manifold or air chamber. It is easy to remove and install; disconnect the wiring connector and remove the mounting screws. Remove the sensor.
The sensor is located on the intake manifold or air chamber. It is easy to remove and install; disconnect the wiring connector and remove the mounting screws. Remove the sensor.
Oxygen sensor — removal and installation
1. Allow the exhaust system to cool before starting work; during engine operation, the pipe and sensor may heat up to over 100°C. 2. Disconnect the sensor(s) electrical wiring connector. Release the wire from any...
1. Allow the exhaust system to cool before starting work; during engine operation, the pipe and sensor may heat up to over 100°C. 2. Disconnect the sensor(s) electrical wiring connector. Release the wire from any...
EGR system control and cleaning control
The controls associated with the EGR (exhaust gas recirculation) and the purification control system are housed inside the control box on the bulkhead. These components include the EGR control solenoid valve, the CVC...
The controls associated with the EGR (exhaust gas recirculation) and the purification control system are housed inside the control box on the bulkhead. These components include the EGR control solenoid valve, the CVC...
Electronic Air Control Valve (EACV), Fast Idle Valve
1. Typically these air control valves are located on the side of the intake chamber. 2. Disconnect the electrical wiring connector from the valve. 3. Mark and disconnect the vacuum hoses from the assembly. 4. Remove the...
1. Typically these air control valves are located on the side of the intake chamber. 2. Disconnect the electrical wiring connector from the valve. 3. Mark and disconnect the vacuum hoses from the assembly. 4. Remove the...
Electrical Load Detector
This sensor is only used on 1990-91 Accord models and is located in the underhood fuse/relay box. The detector assembly is "hardwired" into the box it is mounted in, and if the detector fails, the entire box and...
This sensor is only used on 1990-91 Accord models and is located in the underhood fuse/relay box. The detector assembly is "hardwired" into the box it is mounted in, and if the detector fails, the entire box and...

Fuel Tank — Accord 1984-89, Prelude 1984-85
Since draining the fuel tank is part of every procedure, it is difficult to imagine that it will be possible to safely store large quantities of fuel during repairs. Therefore, before starting work, the tank should be...
Since draining the fuel tank is part of every procedure, it is difficult to imagine that it will be possible to safely store large quantities of fuel during repairs. Therefore, before starting work, the tank should be...
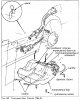
Fuel Tank — Prelude 1986-91
1. Block the front wheels. Raise the rear of the vehicle and secure it. 2. Remove the drain bolt from the tank and drain the remaining fuel. 3. On 1986-87 models, disconnect the sensor connector. On 1988-91 models,...
1. Block the front wheels. Raise the rear of the vehicle and secure it. 2. Remove the drain bolt from the tank and drain the remaining fuel. 3. On 1986-87 models, disconnect the sensor connector. On 1988-91 models,...

Fuel Tank — Accord 1990-91
1. Block the front wheels. Raise the rear of the vehicle and secure it. 2. Remove the drain bolt from the tank and drain the remaining fuel. 3. Disconnect the 3-pin connector in the trunk. 4. Remove the protector from...
1. Block the front wheels. Raise the rear of the vehicle and secure it. 2. Remove the drain bolt from the tank and drain the remaining fuel. 3. Disconnect the 3-pin connector in the trunk. 4. Remove the protector from...
This section is available on: russian, bulgarian, belarusian, ukrainian, serbian, croatian, romanian, polish, slovak, hungarian
Link in different formats to this section
TEXTHTMLBB Code
- General information
- Introduction to the guide
- User manual
- Maintenance
- Power unit
- Four-cylinder engines
- Six-cylinder engines
- Engine overhaul
- Cooling system
- Heater and air conditioner
- Power and exhaust systems
- Engine electrical equipment
- Engine management
- Transmission
- Mechanical gearbox
- Automatic gearbox
- Clutch and drive shafts
- Chassis and running gear
- Brake system
- Car suspension
- Steering
- Body and interior
- Exterior (external elements)
- Interior (internal elements)
- Electrical equipment
- Equipment and devices
- Electrical circuits
- General information
- Maintenance
- Power unit
- Engine adjustment
- Engine repair
- Engine electrics
- Emission management
- Engine management (carburetor)
- Electronic injection
- Programmable injection
- Schematic of emission system
- Fuel system
- Feedback management
- Transmission
- Manual gearbox
- Automatic gearbox
- Clutch
- Chassis and running gear
- Front suspension
- Rear suspension
- Steering
- Brake system
- Electrical equipment
- Ventilation and heating
- Air conditioner
- Cruise control system
- Equipment and devices