
Warning: Carburetor cleaner is a highly corrosive liquid; Protect your eyes when handling aerosols and liquids, as well as when handling compressed air. If the cleaner comes into contact with painted surfaces, remove it immediately!
The efficient operation of a carburetor is greatly dependent on careful cleaning and inspection during an overhaul, as dirt, glue, water, or varnish in or on parts of a carburetor will often result in poor performance.
Carefully disassemble the carburetor, referring often to the instructions and illustrations provided in the repair kit. Keep all similar parts separate during disassembly and cleaning to avoid accidental replacement during reassembly.
When the carburetor is disassembled, wash all parts (excluding diaphragms, electrical damper assemblies, pump plunger and any other plastic, fibrous or rubber parts) carburetor thinner or aerosol. Do not leave parts in the solvent longer than necessary. Excessive cleaning can remove the special layer from the float and choke, making them unusable. Let the parts air dry or spray them with compressed air.
Blow out all channels and jets with compressed air and make sure there are no blockages. Never use wires or similar tools to clean jets or fuel or air passages. Clean all jets and valves individually to avoid accidental replacement.
Check all parts for wear or damage. Especially check the following:
1. Check the stopper needle of the float regulator and the seat. If there is wear, replace the entire assembly.
2. Check the float pivot pin for wear, and the float itself (floats) - for dents or distortions. Replace the float if fuel has leaked into it.
3. Check the walls of the damper axles for wear or out-of-cylindrical. Damage or wear to the throttle lever, axles, or walls often requires replacement of the throttle. These parts require full compliance with each other; wear can cause air leakage which will affect starting and idling.
Throttle axles and bushings are not included in the repair kit. If they are worn out, the entire carburetor needs to be replaced.
4. Inspect the idle mixture adjusting needles for scores or grooves. If they are, then the needle must be replaced, since it will not be possible to obtain a satisfactory idle mode.
5. Check the control valves of the accelerator pump. Replace valve if necessary.
6. Inspect the tank for surface warping.
7. Carefully inspect valves and seats for wear and damage, replacing as needed.
8. After the carburetor is assembled, check the throttle valve for freedom of action.
After cleaning and inspecting all components, assemble the carburetor using new parts and constantly referring to the directions in the repair kit. When assembling, make sure that all screws and jets are tightened (but not overstretched). Tighten all screws gradually, alternately. Do not overtighten the needle valves in their seats; this will result in an unequal overlap. Make sure the float level is correct.
Accord
For each specific Accord carburetor, there are separate float and gasket kits containing detailed instructions for their application. These procedures can be performed with the carburetor mounted on the engine, which saves a lot of time and eliminates many problems.
Prelude
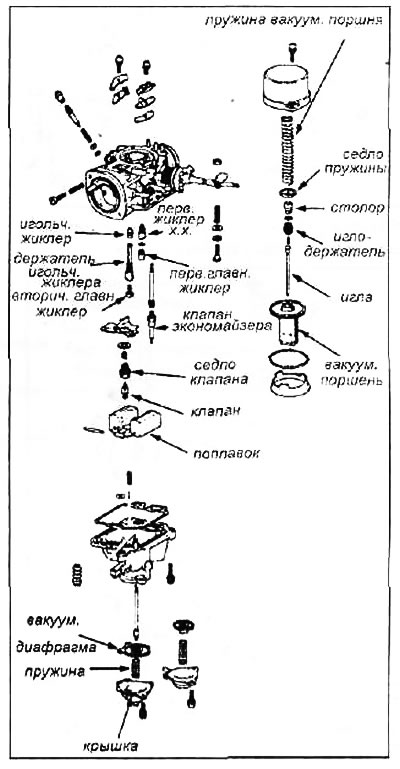
The following procedure is used to disassemble each carburetor. When repairing, inspect each component for wear. Thoroughly clean each channel and replace worn parts as needed.
1. Remove and separate carburettors.
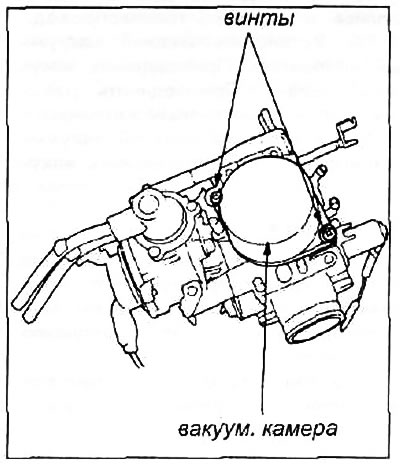
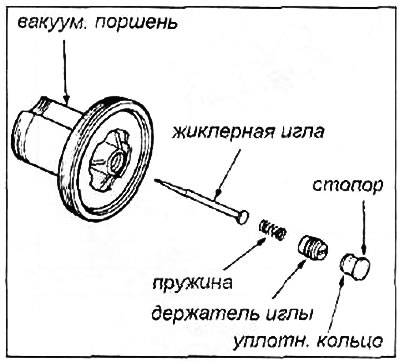
2. Remove the vacuum chamber; remove the vacuum piston and spring.
3. Inspect piston and needle for wear or damage, replacing parts as needed.
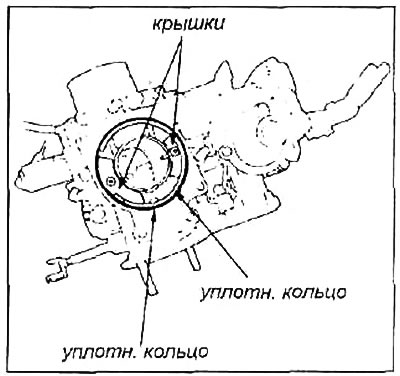
4. Remove the O-rings.
5. Remove the two screws, plate, jet caps and gasket from the carburetor. This will open the air channels.
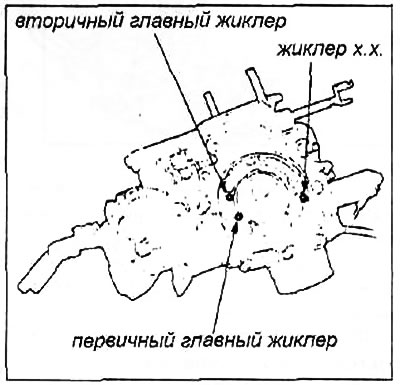
6. Remove the primary and secondary main air jets and the cold air jet. Do not confuse the jets; mark and isolate each when removed.
7. Remove the accelerator pump cover, spring, and diaphragm from the left carburetor.
8. Inspect diaphragm and spring for cracks or damage, replacing parts as needed.

9. Remove 3 screws, economizer valve cover, spring and diaphragm. Inspect diaphragm and spring for damage.

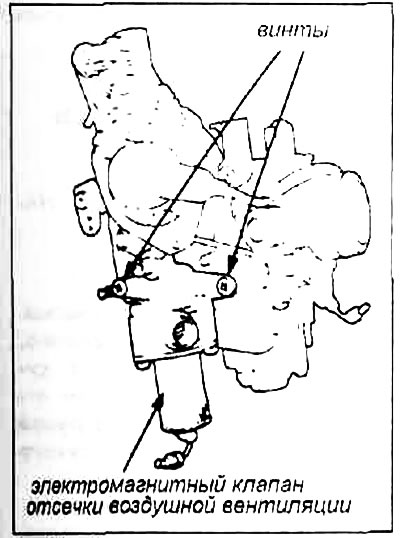
10. Remove the air vent cutoff solenoid valve in the right carburetor.
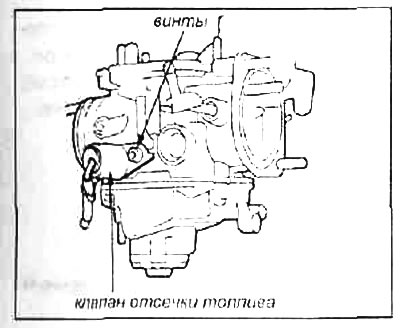
11. Remove the fuel cut-off valve.
12. 11 Remove the float chamber.
13. Remove the float arm pin, float and float valve.
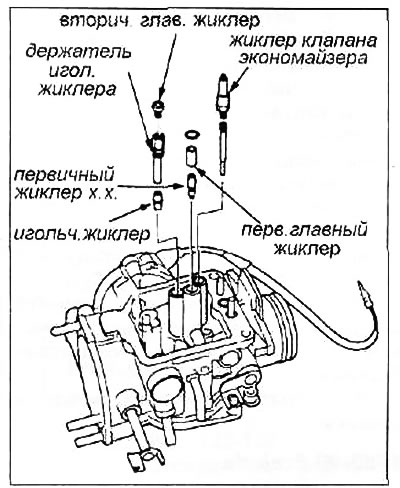
14. Remove secondary main jet and needle jet holder.
15. Remove the primary main jet; it is a press fit with an o-ring.
16. Remove the economizer valve jet.
17. Remove the needle jet, primary jet x.x. (located below the primary main jet) and an economizer valve tip located under the economizer valve jet.
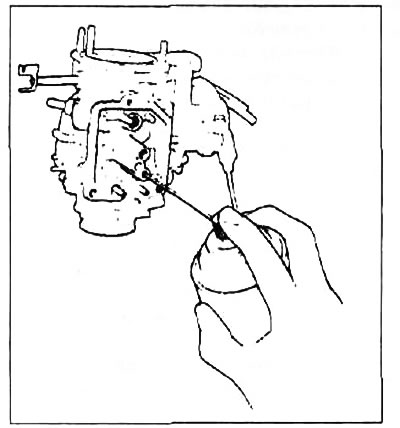
18. Clean all channels with a cleaner; if possible, blow with compressed air.
For installation:
19. Install each jet in the correct position. Use new o-rings and/or filter where necessary.
20. Install float valve, float and lever pin. Set float level.
21. Install the fuel shutoff solenoid valve.
22. Install the air vent cutoff solenoid valve on the right carburetor.
23. Install economizer valve diaphragm, spring and cap.
24. Install the accelerator pump diaphragm, spring and cover.
25. Install the primary and secondary main air jets and the cold air jet.
26. Install jet covers and plate. Use new gaskets.
27. Install o-rings.
28. Install vacuum piston and needle jet.
29. Install the vacuum chamber.
30. Connect the left and right carburetors. Install the carburetor assembly.