


Car manual transmission Honda Accord 3

Shift Lever — Prelude 1988-91
1. Set the parking brake, block the wheels and put the gear lever in neutral. 2. Remove the console. 3. Inspect the adjustment of the selector cable. The groove on the lever mounting bracket should match the marker on...
1. Set the parking brake, block the wheels and put the gear lever in neutral. 2. Remove the console. 3. Inspect the adjustment of the selector cable. The groove on the lever mounting bracket should match the marker on...

Reverse Light Switch — Removal and Installation
The reversing light switch is mounted on the outside of the gearbox housing. It should be removed as follows. Set the lever to neutral. Raise and securely support the car. Disconnect the electrical wiring connectors....
The reversing light switch is mounted on the outside of the gearbox housing. It should be removed as follows. Set the lever to neutral. Raise and securely support the car. Disconnect the electrical wiring connectors....

Half shafts — removal and installation
1. Remove the outer cap from the front wheel, then the center cap. 2. Remove the 4mm cotter pin and loosen, but do not completely remove, the spindle nut. Loosen the mounting nuts. 3. Raise and securely support the...
1. Remove the outer cap from the front wheel, then the center cap. 2. Remove the 4mm cotter pin and loosen, but do not completely remove, the spindle nut. Loosen the mounting nuts. 3. Raise and securely support the...
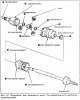
Constant velocity joint (CV joint)
1. Remove the axle shaft. 2. Only the inner hinge can be disassembled. If the outer hinge or casing is out of order, then to gain access to them, it is necessary to disassemble the inner hinge. 3. Remove the large...
1. Remove the axle shaft. 2. Only the inner hinge can be disassembled. If the outer hinge or casing is out of order, then to gain access to them, it is necessary to disassemble the inner hinge. 3. Remove the large...

Transmission — Accord 1984-89, Prelude 1984-87
Before disassembling, all wires and hoses must be marked. This will greatly facilitate the assembly process. 1. Disconnect the ground cable from the battery and the transmission housing. Unlock the steering column. Set...
Before disassembling, all wires and hoses must be marked. This will greatly facilitate the assembly process. 1. Disconnect the ground cable from the battery and the transmission housing. Unlock the steering column. Set...
Transmission — Prelude 1988-91
1. Disconnect the ground cable from the battery and the transmission housing. Unlock the steering column. Set the lever to neutral. 2. Disconnect the following wires: a. Reverse light switch wires. b. Black/white wire...
1. Disconnect the ground cable from the battery and the transmission housing. Unlock the steering column. Set the lever to neutral. 2. Disconnect the following wires: a. Reverse light switch wires. b. Black/white wire...

Gearbox — Accord 1990-91
1. Disconnect the wires from the battery and remove the battery. 2. Raise and securely support the vehicle with stands. 3. Disconnect the air intake hose and remove the battery tray. 4. Disconnect the starter wiring and...
1. Disconnect the wires from the battery and remove the battery. 2. Raise and securely support the vehicle with stands. 3. Disconnect the air intake hose and remove the battery tray. 4. Disconnect the starter wiring and...
Gearbox Overhaul — General Information
WARNING: This procedure requires the use of special types of tools or similar ones. Before disassembling When repairing this manual transmission, it is important to maintain cleanliness. Before opening the unit, it is...
WARNING: This procedure requires the use of special types of tools or similar ones. Before disassembling When repairing this manual transmission, it is important to maintain cleanliness. Before opening the unit, it is...

Transmission Disassembly — Accord 1984-89, Prelude 1984-87
1. End cap 2. Gasket 3. Lock nut 4. Spring washer 5. 5th gear synchronizer sleeve 6. 5th gear shift fork 7. Cylindrical pin (finger) 8. 5th gear synchronizer hub 9. Synchronizer spring 10. 5th gear synchronizer ring 11....
1. End cap 2. Gasket 3. Lock nut 4. Spring washer 5. 5th gear synchronizer sleeve 6. 5th gear shift fork 7. Cylindrical pin (finger) 8. 5th gear synchronizer hub 9. Synchronizer spring 10. 5th gear synchronizer ring 11....

Checking Secondary Shaft Clearances — 1984-89 Accord, 1984-87 Prelude
Before disassembling the secondary shaft, the following measurements should be taken. If any dimensions are outside the tolerance limits, the secondary shaft should be disassembled and the necessary thrust washers...
Before disassembling the secondary shaft, the following measurements should be taken. If any dimensions are outside the tolerance limits, the secondary shaft should be disassembled and the necessary thrust washers...
Secondary Shaft Disassembly — Accord 1984-89, Prelude 1984-87
1. Remove the 5th gear. 2. Remove the ball bearing, 4th gear and spacer bushing. 3. Remove the 3rd gear gear, needle bearing and spacer bushing. 4. Remove the 2nd gear. 5. Remove the synchronizer parts; ring, spring,...
1. Remove the 5th gear. 2. Remove the ball bearing, 4th gear and spacer bushing. 3. Remove the 3rd gear gear, needle bearing and spacer bushing. 4. Remove the 2nd gear. 5. Remove the synchronizer parts; ring, spring,...
Secondary Shaft Inspection — 1984-89 Accord, 1984-87 Prelude
1. Inspect the needle bearing for wear or damage. 2. Check the clearance between each shift fork and its corresponding synchronizer sleeve. The tolerance is 0.35-1.00 mm. If the clearance exceeds the tolerance, measure...
1. Inspect the needle bearing for wear or damage. 2. Check the clearance between each shift fork and its corresponding synchronizer sleeve. The tolerance is 0.35-1.00 mm. If the clearance exceeds the tolerance, measure...
Secondary Shaft Assembly — 1984-89 Accord, 1984-87 Prelude
Clean all parts thoroughly with detergent and dry with compressed air. Lubricate all parts with oil before assembly. NOTE: Each synchronizer sleeve has 3 sets of extended teeth spaced at 120°. During assembly, these...
Clean all parts thoroughly with detergent and dry with compressed air. Lubricate all parts with oil before assembly. NOTE: Each synchronizer sleeve has 3 sets of extended teeth spaced at 120°. During assembly, these...

Checking Input Shaft Clearances — 1984-89 Accord, 1984-87 Prelude
Before disassembling the primary shaft, the following measurements should be taken. If any dimensions are outside the tolerance limits, the primary shaft should be disassembled and the necessary thrust washers should be...
Before disassembling the primary shaft, the following measurements should be taken. If any dimensions are outside the tolerance limits, the primary shaft should be disassembled and the necessary thrust washers should be...
Disassembling the primary shaft — Accord 1984-89, Prelude 1984-87
1. Remove the following synchronizer parts one by one: clutch, hub, spring ring, blocking ring. 2. Remove the 5th gear. 3. Remove the needle bearing, seal and input shaft needle bearing. 4. Remove the sealing cuff and...
1. Remove the following synchronizer parts one by one: clutch, hub, spring ring, blocking ring. 2. Remove the 5th gear. 3. Remove the needle bearing, seal and input shaft needle bearing. 4. Remove the sealing cuff and...
Input Shaft Inspection — 1984-89 Accord, 1984-87 Prelude
1. Inspect the needle bearings for wear and damage. 2. Inspect the inner surface of the synchronizer locking rings for wear. 3. Insert each hub into its respective coupling and check for play. If necessary, replace them...
1. Inspect the needle bearings for wear and damage. 2. Inspect the inner surface of the synchronizer locking rings for wear. 3. Insert each hub into its respective coupling and check for play. If necessary, replace them...

Shift Lever Holder — 1984-89 Accord, 1984-87 Prelude
Disassembly 1. Remove the cylindrical pin at the end of the shaft. 2. Remove the bushing. 3. Remove the washer. 4. Remove the gasket. 5. Remove the spring. 6. Remove the selector lever. Inspection 1. Inspect the spring,...
Disassembly 1. Remove the cylindrical pin at the end of the shaft. 2. Remove the bushing. 3. Remove the washer. 4. Remove the gasket. 5. Remove the spring. 6. Remove the selector lever. Inspection 1. Inspect the spring,...

Transmission Assembly — Accord 1984-89, Prelude 1984-87
1. Install the input shaft bearing into the clutch housing if it was removed. Install a new seal. 2. Install the Primary and Secondary shaft bearings on the gearbox housing. 3. Install the shift rod so that the locking...
1. Install the input shaft bearing into the clutch housing if it was removed. Install a new seal. 2. Install the Primary and Secondary shaft bearings on the gearbox housing. 3. Install the shift rod so that the locking...

Transmission Disassembly — Accord 1990-91, Prelude 1988-91
1. Shift lever arm 2. Spring washer 3. Shift lever shoulder bolt 4. Retainer 5. Saloon pipe 6. Tube clamp 7. Breather clamp 8. Selection lever 9. Seal 10. Shift lever arm cover 11 Thrust gasket 12. Oil guide plate 13....
1. Shift lever arm 2. Spring washer 3. Shift lever shoulder bolt 4. Retainer 5. Saloon pipe 6. Tube clamp 7. Breather clamp 8. Selection lever 9. Seal 10. Shift lever arm cover 11 Thrust gasket 12. Oil guide plate 13....
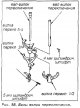
Shift Fork Shafts — 1990-91 Accord, 1988-91 Prelude
Disassembly 1. Remove the roll pins from the 5th/reverse shifter and from the other shift fork shaft. 2. Remove the 1/2 gear shift fork and shift fork shaft from the 5th gear shift fork. 3. Remove the 5th/reverse...
Disassembly 1. Remove the roll pins from the 5th/reverse shifter and from the other shift fork shaft. 2. Remove the 1/2 gear shift fork and shift fork shaft from the 5th gear shift fork. 3. Remove the 5th/reverse...
Shift Lever Cover and Selector Lever Assembly
Disassembly 1. Remove the selector lever arm from the selector lever. 2. Remember the location of the 2 springs and remove the selection lever from the cover. 3. Remove the springs and the selector lever return pin. 4....
Disassembly 1. Remove the selector lever arm from the selector lever. 2. Remember the location of the 2 springs and remove the selection lever from the cover. 3. Remove the springs and the selector lever return pin. 4....

Checking Input Shaft Clearances — 1990-91 Accord, 1988-91 Prelude
Before disassembling the primary shaft, the following measurements should be taken. If any dimensions are outside the tolerance limits, the primary shaft should be disassembled and the non-compliant parts should be...
Before disassembling the primary shaft, the following measurements should be taken. If any dimensions are outside the tolerance limits, the primary shaft should be disassembled and the non-compliant parts should be...
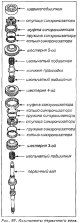
Disassembling the input shaft — Accord 1990-91, Prelude 1988-91
1. Remove the ball bearing from the end of the input shaft. 2. Remove the 5th gear synchronizer parts: hub, sleeve, spring ring, locking ring. 3. Remove the 5th gear. 4. Remove the first needle bearing, sealing collar...
1. Remove the ball bearing from the end of the input shaft. 2. Remove the 5th gear synchronizer parts: hub, sleeve, spring ring, locking ring. 3. Remove the 5th gear. 4. Remove the first needle bearing, sealing collar...
Input Shaft Inspection — 1990-91 Accord, 1988-91 Prelude
1. Inspect the needle bearings for wear and damage. 2. Inspect the inner surface of the synchronizer locking rings for wear. 3. Insert each hub into its original coupling and check for play. If replacement is required,...
1. Inspect the needle bearings for wear and damage. 2. Inspect the inner surface of the synchronizer locking rings for wear. 3. Insert each hub into its original coupling and check for play. If replacement is required,...
Input Shaft Assembly — 1990-91 Accord, 1988-91 Prelude
If it is necessary to replace the standard input shaft linings located above the oil guide plate in the transmission housing, this should be done before assembling the input shaft. 1. Install the needle bearing and 3rd...
If it is necessary to replace the standard input shaft linings located above the oil guide plate in the transmission housing, this should be done before assembling the input shaft. 1. Install the needle bearing and 3rd...
Input Shaft Gasket Selection — 1990-91 Accord, 1988-91 Prelude
1. Remove the thrust lining(s) and oil guide plate from the transmission case if not already removed. 2. Install the 3/4 synchronizer hub, seal, 5th synchronizer hub and ball bearing onto the input shaft. Make sure that...
1. Remove the thrust lining(s) and oil guide plate from the transmission case if not already removed. 2. Install the 3/4 synchronizer hub, seal, 5th synchronizer hub and ball bearing onto the input shaft. Make sure that...

Checking Input Shaft End Play — 1990-91 Accord, 1988-91 Prelude
1. Install the selected gasket(s) into the gearbox housing. 2. Install the spring washer on the input shaft with the concave side facing the first gear pinion. 3. Install the primary shaft into the clutch housing. 4....
1. Install the selected gasket(s) into the gearbox housing. 2. Install the spring washer on the input shaft with the concave side facing the first gear pinion. 3. Install the primary shaft into the clutch housing. 4....
Checking Secondary Shaft Clearances — 1990-91 Accord, 1988-91 Prelude
Before disassembling the secondary shaft, the following measurements should be taken. If any dimensions are outside the tolerance limits, the entire unit should be disassembled and the non-compliant parts replaced. If...
Before disassembling the secondary shaft, the following measurements should be taken. If any dimensions are outside the tolerance limits, the entire unit should be disassembled and the non-compliant parts replaced. If...
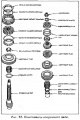
Secondary Shaft Disassembly — 1990-91 Accord, 1988-91 Prelude
1. Loosen the lock nut and remove the lock washer. 2. Remove the ball bearing. 3. Remove the first needle bearing, 5th, 4th, 3rd and 2nd gears, and the second needle bearing. 4. Remove the first friction damper and...
1. Loosen the lock nut and remove the lock washer. 2. Remove the ball bearing. 3. Remove the first needle bearing, 5th, 4th, 3rd and 2nd gears, and the second needle bearing. 4. Remove the first friction damper and...
Secondary Shaft Inspection — 1990-91 Accord, 1988-91 Prelude
1. Inspect the needle bearings for wear and damage. 2. Inspect the inner surface of the synchronizer locking rings for wear. 3. Insert the hub into the appropriate coupling and check for play. If replacement is...
1. Inspect the needle bearings for wear and damage. 2. Inspect the inner surface of the synchronizer locking rings for wear. 3. Insert the hub into the appropriate coupling and check for play. If replacement is...
Secondary Shaft Assembly — 1990-91 Accord, 1988-91 Prelude
1. Install the selected thrust washer, needle bearing and 1st gear. 2. Install the friction damper. 3. Install the synchronizer parts: the first locking ring, the first spring ring, the reverse gear, the second spring...
1. Install the selected thrust washer, needle bearing and 1st gear. 2. Install the friction damper. 3. Install the synchronizer parts: the first locking ring, the first spring ring, the reverse gear, the second spring...

Transmission Assembly — Accord 1990-91, Prelude 1988-91
1. Install the differential assembly into the clutch housing. 2. Install the primary and secondary shaft bearings into the clutch housing. 3. Install the spring washer onto the end of the input shaft and install the...
1. Install the differential assembly into the clutch housing. 2. Install the primary and secondary shaft bearings into the clutch housing. 3. Install the spring washer onto the end of the input shaft and install the...
Tightening torques for threaded connections
Manual transmission Component Tightening torque Prelude Reverse switch 25 Nm Box mounting bolts 65 Nm Box mounting bracket 3 bolts 39 Nm Horizontal bolt 75 Nm Fastening the box to the rear engine mount bracket 75 Nm...
Manual transmission Component Tightening torque Prelude Reverse switch 25 Nm Box mounting bolts 65 Nm Box mounting bracket 3 bolts 39 Nm Horizontal bolt 75 Nm Fastening the box to the rear engine mount bracket 75 Nm...
This section is available on: russian, bulgarian, belarusian, ukrainian, serbian, croatian, romanian, polish, slovak, hungarian
Link in different formats to this section
TEXTHTMLBB Code
- General information
- Introduction to the guide
- User manual
- Maintenance
- Power unit
- Four-cylinder engines
- Six-cylinder engines
- Engine overhaul
- Cooling system
- Heater and air conditioner
- Power and exhaust systems
- Engine electrical equipment
- Engine management
- Transmission
- Mechanical gearbox
- Automatic gearbox
- Clutch and drive shafts
- Chassis and running gear
- Brake system
- Car suspension
- Steering
- Body and interior
- Exterior (external elements)
- Interior (internal elements)
- Electrical equipment
- Equipment and devices
- Electrical circuits
- General information
- Maintenance
- Power unit
- Engine adjustment
- Engine repair
- Engine electrics
- Emission management
- Engine management (carburetor)
- Electronic injection
- Programmable injection
- Schematic of emission system
- Fuel system
- Feedback management
- Transmission
- Manual gearbox
- Automatic gearbox
- Clutch
- Chassis and running gear
- Front suspension
- Rear suspension
- Steering
- Brake system
- Electrical equipment
- Ventilation and heating
- Air conditioner
- Cruise control system
- Equipment and devices