
Make sure the carbs are synchronized before checking the idle speed and mixture. You will also need to remove the ECU fuse from the fuse box for 10 seconds to reset the control unit after this procedure is completed.
1. Start the engine and warm it up to normal operating temperature. The fans should turn on at least once.
2. Disconnect the vacuum hose from the air inlet control diaphragm and pinch or plug the end of the hose.
3. Attach the tachometer. Check that the fast idle lever is not opposite the fast idle cam.
4. Check the idle speed with all power consumers disconnected. The idle speed should be 800±50 rpm (750+50 rpm with automatic transmission). Adjust idle speed, if necessary, by turning the throttle adjusting screw.
If the idle speed is excessively high, check the throttle control.
5. On 1987 automatic vehicles only, disconnect the connector from the "A" frequency solenoid and use a jumper wire to connect the valve to 12V. On all other vehicles, disconnect the two connectors from the EACV valve, disconnect the hose from the vacuum manifold and plug the end of the hose.
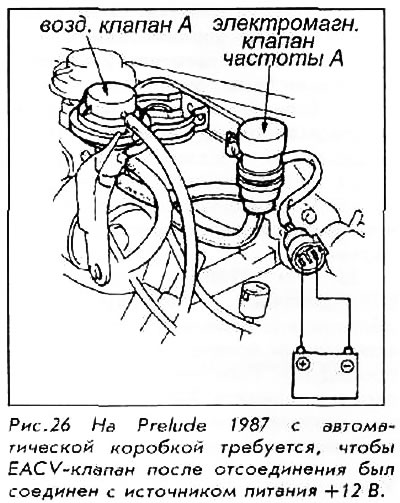
6. Disconnect the vacuum tubes and connect the lower hose to the air control valve A. Disconnect the vacuum hose from the air conditioning idle speed control valve. Disconnect the air cleaner inlet tube from the air intake duct.
7. Insert the enriched propane hose into the inlet tube opening approximately 10 cm.
Propane is a highly flammable gas. Do not smoke or work near an open flame. Keep a dry powder fire extinguisher handy.
8. With the engine idling, depress the button on top of the propane unit, then slowly open the control valve until the engine reaches full RPM. The engine RPM should increase as propane injection begins.
Open the propane control valve slowly; if you start it up too quickly, the engine may stall.
9. Maximum RPM increase when enriched with propane:
- 1984-86 with manual transmission - at 45±25 rpm;
- 1984-86 with automatic transmission - at 110±25 rpm (on D3 or D4);
- 1987 with manual transmission - 65+25 rpm;
- 1987 with automatic transmission - at 130+25 rpm (on D3 or D4);
- 1988-90 with manual transmission - at 170x20 rpm;
- 1988-90 with automatic transmission - 50+10 rpm.
10. If the rpm changes as expected, the procedure is complete. Remove the test equipment and reconnect the tubes and hoses. If the engine speed does not increase to specification, the mixture needs to be adjusted. On Preludes through 1987, remove the carburetors and use steps 11-13 below. On later cars, the plugs can be removed without removing the carburetors; continue with step 15.
11. Place the stopper on the tip of the drill so that only 3 mm remains. Drill holes in the center of each plug.
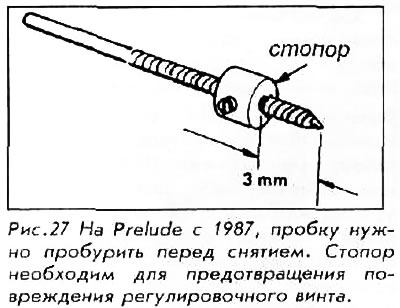
If you drill too deep, the tip of the drill can damage the mixture adjustment screw.
12. Screw 5mm metal screws into the plugs.
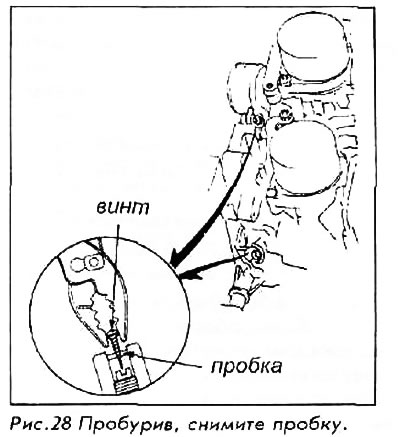
13. Using pliers to grasp the screw heads, remove the plugs.
14. Install the carburetors.
15. Start the engine and warm it up to normal operating temperature. The fan(s) should turn on at least once.
16. Recheck the propane rich maximum RPM. If the mixture is too rich, turn both mixture screws 1/4 turn counterclockwise.
17. Close the propane control valve.
18. Run the engine at 2500 rpm for 10 seconds to stabilize the mixture conditions, then check the idle speed. Adjust the speed if necessary.
19. On 1984-86 models, remove the propane kit and connect the air intake diaphragm control hose. Install new plugs in the idle mixture adjustment screw holes.
20. On 1987-89 models, disconnect the #5 vacuum hose from the air intake valve and plug the end.
21. On a 1987 Prelude, disconnect the #22 upper vacuum hose from the air leak solenoid on the air flow regulator bracket and plug the end. Connect a vacuum gauge to the solenoid.
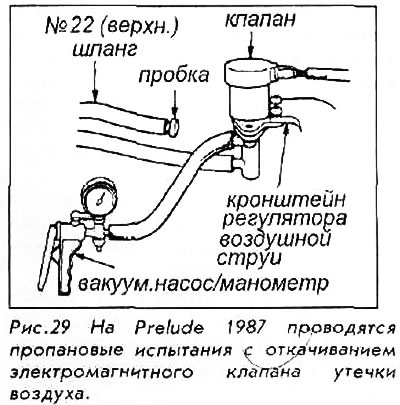
22. With the engine idling, depress the button on top of the propane unit, then slowly open the propane control valve and check for vacuum. Vacuum should develop.
23. If there is no vacuum, check the air leak solenoid valve.
24. Check thermal valve C.
25. Remove the propane enrichment kit and reconnect the connectors.
26. On 1988-90 cars equipped with air conditioning, the idle speed should be checked with the air conditioning on at the end of the procedure. If adjustment is necessary, remove the small cap from the adjusting screw and make an external adjustment.