


Vehicle power and exhaust systems Honda Avancier 1


Checking fuel lines
1. Check the reliability of the connections of the components listed below. 2. Check the following components for damage, wear due to contact with other components, fuel leaks, corrosion, etc. Fuel tank Fuel supply pipe...
1. Check the reliability of the connections of the components listed below. 2. Check the following components for damage, wear due to contact with other components, fuel leaks, corrosion, etc. Fuel tank Fuel supply pipe...

Removal and installation fuel pipes with quick-release couplings
Preliminary remarks A fuel line with quick-release couplings is installed between the fuel pump located in the fuel tank and the fuel supply line. When removing and installing the fuel pump and fuel tank, the...
Preliminary remarks A fuel line with quick-release couplings is installed between the fuel pump located in the fuel tank and the fuel supply line. When removing and installing the fuel pump and fuel tank, the...

Fuel pressure relief
Attention. Observe fire safety regulations. To prevent leaking fuel from getting on the engine, lay down a cloth. 1. Disconnect the (-) battery cable. 2. Install the wrench on the fuel pulsation damper. 3. Place the...
Attention. Observe fire safety regulations. To prevent leaking fuel from getting on the engine, lay down a cloth. 1. Disconnect the (-) battery cable. 2. Install the wrench on the fuel pulsation damper. 3. Place the...

Checking fuel pressure
1. Relieve fuel pressure. 2. Assemble the fuel pressure gauge adapter. 3. Remove the fuel pulsation damper and install the adapter and fuel pressure gauge. 4. Disconnect the vacuum tube from the pressure regulator and...
1. Relieve fuel pressure. 2. Assemble the fuel pressure gauge adapter. 3. Remove the fuel pulsation damper and install the adapter and fuel pressure gauge. 4. Disconnect the vacuum tube from the pressure regulator and...

Checking fuel injectors
After checking the fuel injectors, be sure to check and adjust the idle speed, ignition timing, and CO and CH concentrations in the exhaust gases. When the engine does not start 1. Disconnect the fuel injector connector...
After checking the fuel injectors, be sure to check and adjust the idle speed, ignition timing, and CO and CH concentrations in the exhaust gases. When the engine does not start 1. Disconnect the fuel injector connector...

Removal and installation fuel injectors
Attention. Observe fire safety regulations. Removal 1. Disconnect the (-) battery cable. 2. Relieve fuel pressure (see above). 3. Disconnect the fuel injector connectors, EGR valve, remove the carbon filter purge...
Attention. Observe fire safety regulations. Removal 1. Disconnect the (-) battery cable. 2. Relieve fuel pressure (see above). 3. Disconnect the fuel injector connectors, EGR valve, remove the carbon filter purge...

Checking the pressure regulator
Attention. Observe fire safety regulations. When the fuel pressure is not normal, check the fuel pump for proper operation, and then check the pressure regulator. 1. Check the vacuum tube for cracks, cuts and...
Attention. Observe fire safety regulations. When the fuel pressure is not normal, check the fuel pump for proper operation, and then check the pressure regulator. 1. Check the vacuum tube for cracks, cuts and...

Removal and installation the pressure regulator
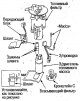
Attention. Observe fire safety regulations. To prevent fuel leaking from the pressure regulator and fuel lines from getting onto the engine, place a rag underneath. 1. Disconnect the (-) battery cable. 2. Relieve fuel...
Attention. Observe fire safety regulations. To prevent fuel leaking from the pressure regulator and fuel lines from getting onto the engine, place a rag underneath. 1. Disconnect the (-) battery cable. 2. Relieve fuel...
Replacing the fuel filter
Attention. Observe fire safety regulations. To prevent fuel leaking from the pressure regulator and fuel lines from getting onto the engine, lay down a cloth. When replacing the fuel filter, be sure to turn off the...
Attention. Observe fire safety regulations. To prevent fuel leaking from the pressure regulator and fuel lines from getting onto the engine, lay down a cloth. When replacing the fuel filter, be sure to turn off the...

Checking the fuel pump
Caution: Before disconnecting and connecting the connector, turn the ignition key to the OFF position. Turn the ignition key to the ON (II) position and check that the; the sound of a running pump can be heard. If you...
Caution: Before disconnecting and connecting the connector, turn the ignition key to the OFF position. Turn the ignition key to the ON (II) position and check that the; the sound of a running pump can be heard. If you...

Removal and installation the fuel pump
Attention. Observe fire safety regulations. 2WD models 1. Disconnect the (-) battery cable. 2. Relieve the fuel pressure (see above). 3. Relieve the pressure in the fuel tank by opening the fuel filler cap. 4. Remove...
Attention. Observe fire safety regulations. 2WD models 1. Disconnect the (-) battery cable. 2. Relieve the fuel pressure (see above). 3. Relieve the pressure in the fuel tank by opening the fuel filler cap. 4. Remove...

Checking the injection pump (4WD models)
Attention. Observe fire safety regulations. 1. Remove the cover of the left inspection hole in the luggage compartment. 2. Relieve the pressure in the fuel tank by opening the fuel filler cap. 3. Remove the fuel hose...
Attention. Observe fire safety regulations. 1. Remove the cover of the left inspection hole in the luggage compartment. 2. Relieve the pressure in the fuel tank by opening the fuel filler cap. 3. Remove the fuel hose...

Replacing the injection pump
Attention. Observe fire safety regulations. 1. Remove the fuel pump from the fuel tank (see above). 2. Remove the injection pump from the tube. Do not bend the fuel pipe. When installing the new injection pump, be...
Attention. Observe fire safety regulations. 1. Remove the fuel pump from the fuel tank (see above). 2. Remove the injection pump from the tube. Do not bend the fuel pipe. When installing the new injection pump, be...

Checking the fuel level sensor/sender unit
Attention. Observe fire safety regulations. 1. Check the serviceability of the fuse (10A) for the instrument cluster illumination, installed in the fuse box on the driver's side. If the fuse is good, check for a break...
Attention. Observe fire safety regulations. 1. Check the serviceability of the fuse (10A) for the instrument cluster illumination, installed in the fuse box on the driver's side. If the fuse is good, check for a break...

Checking the Low Fuel Warning Light
1. Check the transmitting unit (see above). If it is in good condition, check according to point 2. If it is faulty, replace it (see above). 2. Turn the ignition key to the ON (II) position. 3. Set the float to position...
1. Check the transmitting unit (see above). If it is in good condition, check according to point 2. If it is faulty, replace it (see above). 2. Turn the ignition key to the ON (II) position. 3. Set the float to position...

Checking the PGM-Fi Main Relay
1. Remove the PGM-Fi main relay from the rear of the front console. 2. Connect the battery (+) to terminal #2 of the PGM-Fi main relay and the battery (-) to terminal #1 and check for continuity between terminals #5 and...
1. Remove the PGM-Fi main relay from the rear of the front console. 2. Connect the battery (+) to terminal #2 of the PGM-Fi main relay and the battery (-) to terminal #1 and check for continuity between terminals #5 and...

Removal the fuel tank
Attention. Store drained fuel in a safe place. Observe fire safety regulations. Removal 1. Disconnect the (-) battery cable. 2. Relieve the fuel pressure (see above). 3. Relieve the pressure in the fuel tank by opening...
Attention. Store drained fuel in a safe place. Observe fire safety regulations. Removal 1. Disconnect the (-) battery cable. 2. Relieve the fuel pressure (see above). 3. Relieve the pressure in the fuel tank by opening...

Installing a fuel tank
1. Align the hooks of the bandage with the holes in the rear suspension subframe and tighten the fuel tank mounting bolts. 2. Support the rear suspension with a jack, align the holes in the rear suspension subframe with...
1. Align the hooks of the bandage with the holes in the rear suspension subframe and tighten the fuel tank mounting bolts. 2. Support the rear suspension with a jack, align the holes in the rear suspension subframe with...

Intake Air Management System
Replacing the air cleaner filter element 1. Remove the filter element from the air cleaner housing. 2. Install in the reverse order of removal.
Replacing the air cleaner filter element 1. Remove the filter element from the air cleaner housing. 2. Install in the reverse order of removal.

Checking the throttle cable
1. Start the engine and warm it up until the radiator fan runs twice, then warm it up for more than 2 minutes at 3000 rpm without load. 2. Check the cable for damage and replace it if necessary. 3. Check the free play...
1. Start the engine and warm it up until the radiator fan runs twice, then warm it up for more than 2 minutes at 3000 rpm without load. 2. Check the cable for damage and replace it if necessary. 3. Check the free play...

Replacing and adjusting the throttle cable
1. Open the throttle valve fully and disconnect the cable from the throttle linkage. 2. Loosen the lock nut and remove the cable housing from the rack. 3. Unscrew the two nuts and disconnect the cable from the...
1. Open the throttle valve fully and disconnect the cable from the throttle linkage. 2. Loosen the lock nut and remove the cable housing from the rack. 3. Unscrew the two nuts and disconnect the cable from the...

Checking the throttle body
Caution: The throttle limit screw is factory set. Do not adjust it. Start the engine and warm it up until the radiator fan runs twice, then warm it up for more than 2 minutes at 3000 rpm without load. Turn off the...
Caution: The throttle limit screw is factory set. Do not adjust it. Start the engine and warm it up until the radiator fan runs twice, then warm it up for more than 2 minutes at 3000 rpm without load. Turn off the...

Removal and installation the throttle body
Caution: After installing the housing, adjust the throttle cable (see above).
Caution: After installing the housing, adjust the throttle cable (see above).

Exhaust gas testing
Take measurements in a well-ventilated area, protected from rain and wind. Measure the concentration of carbon monoxide (CO) and the concentration of hydrocarbons (CH) at idle speed without load. Make sure the engine...
Take measurements in a well-ventilated area, protected from rain and wind. Measure the concentration of carbon monoxide (CO) and the concentration of hydrocarbons (CH) at idle speed without load. Make sure the engine...

Checking a three-way catalytic converter
1. Remove the catalyst ( see chapter Mechanical part of the engine ). 2. Using a flashlight, shine it on one side of the catalytic converter and visually check that the light reaches the other side. 3. Install in the...
1. Remove the catalyst ( see chapter Mechanical part of the engine ). 2. Using a flashlight, shine it on one side of the catalytic converter and visually check that the light reaches the other side. 3. Install in the...

Checking the crankcase ventilation system
1. Check the PCV (positive crankcase ventilation) and breather hoses for damage, blockages and tight connections. 2. At idle speed, lightly pinch the hose between the PCV valve and the intake manifold and make sure you...
1. Check the PCV (positive crankcase ventilation) and breather hoses for damage, blockages and tight connections. 2. At idle speed, lightly pinch the hose between the PCV valve and the intake manifold and make sure you...

Checking the fuel vapor recovery system
1. Disconnect the tubes from the 2-way valve side and the carbon filter side, connect the hand vacuum pump to the carbon filter, create a vacuum and make sure air passes. 2. Check the tubes for damage and secure...
1. Disconnect the tubes from the 2-way valve side and the carbon filter side, connect the hand vacuum pump to the carbon filter, create a vacuum and make sure air passes. 2. Check the tubes for damage and secure...
This section is available on: russian, bulgarian, belarusian, ukrainian, serbian, croatian, romanian, polish, slovak, hungarian
Link in different formats to this section
TEXTHTMLBB Code
- General information
- Controls and instruments
- User manual
- Power unit
- Engine maintenance
- Engine repair
- Cooling system
- Engine management
- Power and exhaust system
- Transmission
- Automatic gearbox
- Drive shafts and differential
- Chassis and running gear
- Steering
- Car suspension
- Brake system
- Body and interior
- Doors, locks and windows
- Interior (internal elements)
- Exterior (external elements)
- Air conditioner
- Electrical equipment
- Power devices
- Equipment and devices
- Headlights and lighting
- Electrical circuits