


Fuel and exhaust system of the car Honda HR-V 1
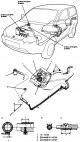
Fuel lines of the power supply system
Note: Check fuel lines, hoses and fuel filter for damage, leaks or failure and replace if necessary. 1. PADDING. Replace. 2. FUEL PUMP/FUEL LEVEL GAUGE SENSOR 3. FUEL TANK 4. FUEL PIPE/QUICK COUPLINGS 5. TO THE FUEL...
Note: Check fuel lines, hoses and fuel filter for damage, leaks or failure and replace if necessary. 1. PADDING. Replace. 2. FUEL PUMP/FUEL LEVEL GAUGE SENSOR 3. FUEL TANK 4. FUEL PIPE/QUICK COUPLINGS 5. TO THE FUEL...

Fuel line and quick release couplings
Precautionary measures Warning! Do not smoke when working on the fuel system. Do not produce sparks or open flames in the work area. The fuel pipe/quick coupling assembly connects the fuel pump built into the fuel tank...
Precautionary measures Warning! Do not smoke when working on the fuel system. Do not produce sparks or open flames in the work area. The fuel pipe/quick coupling assembly connects the fuel pump built into the fuel tank...

Fuel supply system — description
The fuel system consists of a fuel tank, an in-tank high-pressure fuel pump, a PGM-FI main relay, a fuel filter, a fuel pressure regulator, fuel injectors, and fuel supply and return lines. This system supplies...
The fuel system consists of a fuel tank, an in-tank high-pressure fuel pump, a PGM-FI main relay, a fuel filter, a fuel pressure regulator, fuel injectors, and fuel supply and return lines. This system supplies...

Relieving pressure in the fuel system
Before disconnecting fuel lines or hoses, relieve pressure in the system by loosening the 12mm banjo bolt on top of the fuel filter. Warning! Do not smoke when working on the fuel system. Do not produce sparks or open...
Before disconnecting fuel lines or hoses, relieve pressure in the system by loosening the 12mm banjo bolt on top of the fuel filter. Warning! Do not smoke when working on the fuel system. Do not produce sparks or open...

Checking the fuel system pressure
1. Release the pressure ( see above ). 2. Remove the 12mm banjo bolt on the fuel filter while holding the filter with another wrench. Screw on the 12mm adapter fitting and secure the special tool. 1. FUEL PRESSURE GAUGE...
1. Release the pressure ( see above ). 2. Remove the 12mm banjo bolt on the fuel filter while holding the filter with another wrench. Screw on the 12mm adapter fitting and secure the special tool. 1. FUEL PRESSURE GAUGE...
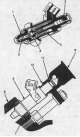
Fuel injectors — description and testing
1. plunger body; 2. filter; 3. solenoid coil; 4. core; 5. plunger; 6. fuel distribution line; 7. sealing ring; 8. intake manifold; 9. fuel injector; 10. spacer ring; 11. O-ring seal Description Fuel injectors -...
1. plunger body; 2. filter; 3. solenoid coil; 4. core; 5. plunger; 6. fuel distribution line; 7. sealing ring; 8. intake manifold; 9. fuel injector; 10. spacer ring; 11. O-ring seal Description Fuel injectors -...

Fuel injectors — testing
1. Disconnect the connector from the fuel injector and measure the resistance between the 2 terminals of the fuel injector. There should be a resistance of 12-15 ohms. If the resistance is different from the specified...
1. Disconnect the connector from the fuel injector and measure the resistance between the 2 terminals of the fuel injector. There should be a resistance of 12-15 ohms. If the resistance is different from the specified...

Fuel injectors — replacement
1. 12 Nm (1.2 kgf/m) 2. FUEL DISTRIBUTION LINE 3. O-RING. Replace 4. SEAL RING. Replace 5. FUEL INJECTOR 6. SEAL RING. Replace. 7. FUEL PRESSURE REGULATOR 8. WASHER. Replace. 9. FUEL SUPPLY HOSE 10. FUEL PULSATION...
1. 12 Nm (1.2 kgf/m) 2. FUEL DISTRIBUTION LINE 3. O-RING. Replace 4. SEAL RING. Replace 5. FUEL INJECTOR 6. SEAL RING. Replace. 7. FUEL PRESSURE REGULATOR 8. WASHER. Replace. 9. FUEL SUPPLY HOSE 10. FUEL PULSATION...

Fuel pressure regulator
Description The regulator maintains a constant fuel pressure supplied to the injectors. When the difference between the fuel pressure and the manifold pressure exceeds 290 kPa, the diaphragm is pressed upwards and the...
Description The regulator maintains a constant fuel pressure supplied to the injectors. When the difference between the fuel pressure and the manifold pressure exceeds 290 kPa, the diaphragm is pressed upwards and the...
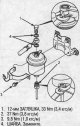
Fuel filter — replacement
Warning! Do not smoke when working on the fuel system. Do not produce sparks or open flames in the work area. When replacing the fuel filter, maintain a safe distance between the battery terminals and the tool. The fuel...
Warning! Do not smoke when working on the fuel system. Do not produce sparks or open flames in the work area. When replacing the fuel filter, maintain a safe distance between the battery terminals and the tool. The fuel...

Fuel pump — testing
Warning! Do not smoke when working on the fuel system. Do not produce sparks or open flames in the work area. If you suspect that the fuel pump is not working, check to see if it is working; when you turn the ignition...
Warning! Do not smoke when working on the fuel system. Do not produce sparks or open flames in the work area. If you suspect that the fuel pump is not working, check to see if it is working; when you turn the ignition...
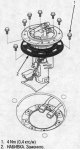
Fuel pump — replacement
Warning! Do not smoke when working on the fuel system. Do not produce sparks or open flames in the work area. 1. Relieve the fuel pressure ( see above ). 2. Remove the inspection panel from the floor. 3. Turn the...
Warning! Do not smoke when working on the fuel system. Do not produce sparks or open flames in the work area. 1. Relieve the fuel pressure ( see above ). 2. Remove the inspection panel from the floor. 3. Turn the...

Fuel gauge — testing
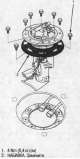
Note: See fuel gauge wiring diagram in Chapter. " Body electrical equipment ". 1. Before testing, check the INSTRUMENT UGHT (7.5A) fuse in the under-dash fuse/relay box. 2. Remove the inspection panel from the floor. 3....
Note: See fuel gauge wiring diagram in Chapter. " Body electrical equipment ". 1. Before testing, check the INSTRUMENT UGHT (7.5A) fuse in the under-dash fuse/relay box. 2. Remove the inspection panel from the floor. 3....
Fuel Level Gauge Sensor — Testing
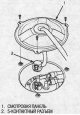
1. Relieve the fuel pressure ( see above ). 2. Remove the inspection panel from the floor. 3. Turn the ignition switch to the OFF position, then disconnect the 5-pin connector from the fuel pump. 4. Disconnect the...
1. Relieve the fuel pressure ( see above ). 2. Remove the inspection panel from the floor. 3. Turn the ignition switch to the OFF position, then disconnect the 5-pin connector from the fuel pump. 4. Disconnect the...
Low fuel warning light
Testing the signal lamp Note: See fuel gauge wiring diagram in Chapter. "Body electrical equipment ". 1. Before testing, check the INSTRUMENT LIGHT (7.5A) fuse in the under-dash fuse/relay box. 2. Park the car on a...
Testing the signal lamp Note: See fuel gauge wiring diagram in Chapter. "Body electrical equipment ". 1. Before testing, check the INSTRUMENT LIGHT (7.5A) fuse in the under-dash fuse/relay box. 2. Park the car on a...

Inertia switch (models KG, KE)
Description The inertia switch is a safety device that automatically cuts off the fuel supply in the event of a collision or sudden impact. The switch is located behind the glove box. Before restarting the engine after...
Description The inertia switch is a safety device that automatically cuts off the fuel supply in the event of a collision or sudden impact. The switch is located behind the glove box. Before restarting the engine after...

PGM-FI Main Relay — Description and Testing
Description The PGM-I main relay is actually two separate relays. It is located under the instrument panel on the driver's side. One relay is energized when the ignition key is turned to the ON position and supplies...
Description The PGM-I main relay is actually two separate relays. It is located under the instrument panel on the driver's side. One relay is energized when the ignition key is turned to the ON position and supplies...
Fuel tank — replacement
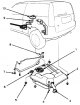
1. FUEL PUMP 2. FUEL TANK 3. FILLER CONNECTING HOSE 4. FUEL BREATHER HOSE 5. 22 Nm (2.2 kgf/m) 6. EVAP CARBON FILTER TWO-WAY VALVE 7. 22 Nm (2.2 kgf/m) 8. FUEL TANK SUSPENSION ELEMENT 9. 5-PIN CONNECTOR 10. VIEWING...
1. FUEL PUMP 2. FUEL TANK 3. FILLER CONNECTING HOSE 4. FUEL BREATHER HOSE 5. 22 Nm (2.2 kgf/m) 6. EVAP CARBON FILTER TWO-WAY VALVE 7. 22 Nm (2.2 kgf/m) 8. FUEL TANK SUSPENSION ELEMENT 9. 5-PIN CONNECTOR 10. VIEWING...

Air supply system — description
The system supplies air to the engine. It consists of an air intake pipe, an air filter (ACL), an air duct, a throttle body (TB), an idle air control valve (IAC) and an intake manifold. A resonator built into the air...
The system supplies air to the engine. It consists of an air intake pipe, an air filter (ACL), an air duct, a throttle body (TB), an idle air control valve (IAC) and an intake manifold. A resonator built into the air...

Air Filter (ACL) — Replacement
Note: Do not clean the ACL filter element by blowing it with compressed air. For maintenance schedule, see chap. " Maintenance ".
Note: Do not clean the ACL filter element by blowing it with compressed air. For maintenance schedule, see chap. " Maintenance ".

Throttle cable
Checking/adjusting 1. Start the engine. Maintain the engine speed at 3000 rpm (rpm) with no load (in Park or Neutral) until the radiator fan comes on, then let it idle. Check that the throttle cable moves smoothly...
Checking/adjusting 1. Start the engine. Maintain the engine speed at 3000 rpm (rpm) with no load (in Park or Neutral) until the radiator fan comes on, then let it idle. Check that the throttle cable moves smoothly...

Throttle body
Description 1. throttle valve 2. (1-pin) throttle position sensor 3. idle speed adjustment screw. 4. Throttle limit screw (do not adjust) The throttle body is a single-chamber design with a side draft. The bottom of the...
Description 1. throttle valve 2. (1-pin) throttle position sensor 3. idle speed adjustment screw. 4. Throttle limit screw (do not adjust) The throttle body is a single-chamber design with a side draft. The bottom of the...
Exhaust emission control system
Description of the system The emission control system consists of a three-way catalytic converter (TWC), a positive crankcase ventilation (PCV) system and an evaporative emission control (EVAP) system.
Description of the system The emission control system consists of a three-way catalytic converter (TWC), a positive crankcase ventilation (PCV) system and an evaporative emission control (EVAP) system.

Exhaust gases — check
Warning! Do not smoke when working on the fuel system. Do not produce sparks or open flames in the work area. 1. Connect the tachometer. 2. Start the engine. Maintain the speed at 3000 rpm without load (in Park or...
Warning! Do not smoke when working on the fuel system. Do not produce sparks or open flames in the work area. 1. Connect the tachometer. 2. Start the engine. Maintain the speed at 3000 rpm without load (in Park or...

Three-way catalytic converter (TWC)
Description The three-way catalytic converter (TWC) is used to convert hydrocarbons (HC), carbon monoxide (CO) and nitrogen oxides (Nox) contained in the exhaust gases into carbon dioxide (CO₂), nitrogen (N₂) and water...
Description The three-way catalytic converter (TWC) is used to convert hydrocarbons (HC), carbon monoxide (CO) and nitrogen oxides (Nox) contained in the exhaust gases into carbon dioxide (CO₂), nitrogen (N₂) and water...

Positive Crankcase Ventilation (PCV) System
Description The positive crankcase ventilation (PCV) system prevents crankcase gases from escaping into the atmosphere. The PCV valve has a spring-loaded plunger. When the engine is started, the plunger in the PCV valve...
Description The positive crankcase ventilation (PCV) system prevents crankcase gases from escaping into the atmosphere. The PCV valve has a spring-loaded plunger. When the engine is started, the plunger in the PCV valve...

Fuel Evaporative Emissions (EVAP) System
1. EVAP VALVE IN FUEL TANK 2. EVAP TWO-WAY VALVE 3. EVAP PURGE SOLENOID VALVE 4. BLACK-YELLOW WIRE 5. IGNITION COIL FUSE (15 A) 6. VARIOUS SENSORS 7. ECM/PCM MODULE 8. RED WIRE 9. BLACK WIRE 10. EVAP PURGE VALVE 11....
1. EVAP VALVE IN FUEL TANK 2. EVAP TWO-WAY VALVE 3. EVAP PURGE SOLENOID VALVE 4. BLACK-YELLOW WIRE 5. IGNITION COIL FUSE (15 A) 6. VARIOUS SENSORS 7. ECM/PCM MODULE 8. RED WIRE 9. BLACK WIRE 10. EVAP PURGE VALVE 11....

This section is available on: russian, bulgarian, belarusian, ukrainian, serbian, croatian, romanian, polish, slovak, hungarian
Link in different formats to this section
TEXTHTMLBB Code
- General information
- User manual
- Maintenance
- Power unit
- Engine repair
- Lubrication system
- Cooling system
- Fuel injection and control
- Power and exhaust system
- Engine electrical equipment
- Transmission
- Clutch
- Mechanical gearbox
- Automatic gearbox
- Rear differential
- Drive shafts and cardan
- Chassis and running gear
- Steering
- Car suspension
- Brake system
- Body and interior
- Exterior (external elements)
- Interior (internal elements)
- Doors, locks and windows
- Electrical equipment
- Equipment and devices
- Lighting system
- Electrical circuits