
HondaBook.ru
Auto companies Volkswagen Auto companies Ford Auto companies Lada Auto companies Skoda Auto companies BMW Auto companies Mazda Auto companies Peugeot
English Русский
Български
Беларускі
Український
Српски
Hrvatski
Română
Polski
Slovenský
Magyar
Bookmark Contacts Sitemap   


Accord Civic Fit / Jazz CR-V HR-V Others Articles
CR-V 1 (1995-2001, petrol) CR-V 2 (2002-2006, petrol)

Testing the fuel gauge sensor (Honda CR-V 2)

  • Main
  • Honda CR-V
  • 2 (2002-2006, petrol)
  • Power unit
  • Fuel system
  • Testing the fuel gauge sensor
0
1. Before testing, check the METER fuse (7.5A) in the under-dash fuse/relay box.

2. Perform a check of the indicator excitation circuit.
  • If the fuel gauge needle moves from the minimum scale division to the maximum and returns to the minimum, the gauge is OK. Proceed to p. 3.
  • If the fuel gauge needle does not move as indicated above, replace the fuel gauge assembly.

3. Turn the ignition key to the OFF position.

4. Remove the rear seat cushion.

5. Remove the inspection panel (A) from the floor.

5. Remove the inspection panel (A) from the floor.


*: The picture shows models KG, KS, KE, KR, KZ.

6. Disconnect the 5-pin connector (B) from the fuel pump.

7. Measure the voltage between terminals #1 and #2 of the 5-pin fuel pump connector with the ignition switch in the ON (II) position. There should be battery voltage.
  • If the voltage is within normal limits, proceed to step. 8.
  • If the voltage is different from the norm, check:
    • did the yellow wire with the black stripe short circuit to ground?;
    • is there a break in the yellow wire with a black stripe or the black wire;
    • poor grounding (G551).

poor grounding (G551).


8. Turn the ignition switch to the OFF position. Remove fuse #9 BACK UP (10 A) from the underhood fuse/relay box for at least 30 seconds and replace.


9. Insert a 12 ohm resistor between terminals #1 and #2 of the fuel pump 5-pin connector, then turn the ignition switch to the ON (II) position.
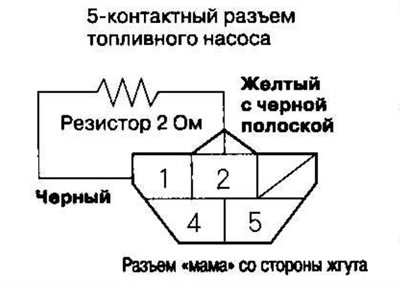
9. Insert a 12 ohm resistor between terminals #1…


10. Make sure that the fuel gauge needle points to the "F" mark.
  • If the pointer does not point to the "F" mark, replace the fuel gauge.
  • If the fuel gauge is OK, check the fuel gauge sensor.

Note: When the ignition switch is turned to the OFF position, the fuel gauge needle returns to the bottom of the scale regardless of the fuel level.


11. Relieve the fuel pressure.

12. Remove the cap from the fuel tank filler neck.

13. Disconnect the quick-release fitting from the fuel pump.

14. Using the special tool, loosen the lock nut (A) and remove the fuel pump assembly from the fuel tank.
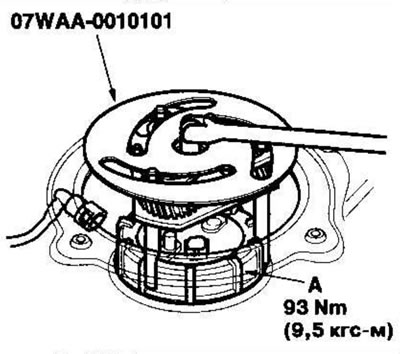
14. Using the special tool, loosen the lock nut…


*: The picture shows models KG, KS, KE, KR.


15. KZ model: Remove the fuel pump assembly.

15. KZ model: Remove the fuel pump assembly.


16. Measure the resistance between contacts No. 1 and No. 2 in positions E (EMPTY), 1/2 (HALF TANK) and F (FULL) by moving the float. If the measurements do not match the table values, replace the fuel gauge sensor.

Except for KZ model:

Float positionF1/2LOWE
Resistance, Ohm11-1367,6-73,6113,5-121,2130-132

Model KZ:

Float positionF1/2LOWE
Resistance, Ohm11-1367,6-73,6110,8-116,8130-132


Note: After troubleshooting is complete, remove the #9 BACK UP (10A) fuse FROM the underhood fuse/relay box for at least 10 seconds, otherwise it may take up to 20 minutes before the gauge returns to showing true fuel level.


Except for KZ model:


Except for KZ model:


Model KZ:


Model KZ:
This article is available at: russian, bulgarian, belarusian, ukrainian, serbian, croatian, romanian, polish, slovak, hungarian
This information has been verified: Mikhail Kopasov
Share with friends:
◀ Previous
CR-V 2: Fuel system
Next ▶

Replacing the fuel tank
Replacing the fuel pump/fuel level gauge sensor
Replacing the fuel filter
Replacing the fuel pressure regulator
Connecting fuel pipes and quick-release fittings
Testing the Low Fuel Warning Light
Air supply system — location of components
Troubleshooting the IMRC System
Testing the Throttle Body with a HONDA PGM Scanner or Tester
Testing the air supply bypass thermostat valve
See also other articles from Honda manuals:
Low fuel level sensor Honda Accord 3 (1985-1989)
Replacing the water level sensor in the fuel filter (N22A) Honda Civic 8 (2005-2011)
Fuel level sensor Honda Fit 1 (2001-2008)
Fuel Level Gauge Sensor — Testing Honda HR-V 1 (1998-2006, petrol)
Checking the fuel level sensor/sender unit Honda Avancier 1 (1999-2003, petrol)
Link in different formats to this article
Comments and feedback from visitors
No comments yet


How much will 29 + 22 ?


CR-V 2 (2002-2006, petrol) 
  • General information
  • User manual
  • Technical data
  • Maintenance
  • Power unit
  • Engine repair
  • Lubrication system
  • Cooling system
  • Exhaust system
  • Fuel system
  • Engine management
  • Engine electrical equipment
  • Transmission
  • Clutch
  • Manual gearbox
  • Automatic gearbox
  • Rear differential
  • Drive shafts
  • Chassis and running gear
  • Steering
  • Front suspension
  • Rear suspension
  • Brake system
  • Body and interior
  • Exterior (external elements)
  • Interior (internal elements)
  • Doors, locks and windows
CR-V 1 (1995-2001, petrol) 
  • General information
  • Maintenance
  • Tips for car owner
  • Power unit
  • Engine repair
  • Engine overhaul
  • Cooling and lubrication system
  • Engine electrical equipment
  • Control system
  • Fuel system
  • Transmission
  • Clutch and drive shafts
  • Car gearbox
  • Chassis and running gear
  • Front suspension
  • Rear suspension
  • Steering
  • Brake system
  • Body and interior
  • Body service
  • Exterior (external elements)
  • Interior (internal elements)
  • Electrical equipment
  • Equipment and devices
  • Electrical circuits
HondaBook.ru © 2018–2026 • Mobile version • Sitemap: EN BG BY UA RS HR RO PL SK HU • Feedback • Driver Information • Search system • Bookmark
Accord 3 (1985-1989) • Accord 6 (1997-2002) • Civic 3 and 4 (1983-1991) • Civic 5 and 6 (1991-2000) • Civic 6 (1995-2000) • Civic 7 (2000-2005) • Civic 8 (2005-2011) • Fit 1 (2001-2008) • CR-V 1 (1995-2001) • CR-V 2 (2002-2006) • HR-V 1 (1998-2006) • Avancier 1 (1999-2003) •
 
This website uses cookies to ensure proper functioning. By clicking "OK," you agree.