HondaBook.ru
Auto companies Volkswagen Auto companies Ford Auto companies Lada Auto companies Skoda Auto companies BMW Auto companies Mazda Auto companies Peugeot
English Русский
Български
Беларускі
Український
Српски
Hrvatski
Română
Polski
Slovenský
Magyar
Bookmark Contacts Sitemap   


Accord Civic Fit / Jazz CR-V HR-V Others Articles
CR-V 1 (1995-2001, petrol) CR-V 2 (2002-2006, petrol)

Connecting fuel pipes and quick-release fittings (Honda CR-V 2)

  • Main
  • Honda CR-V
  • 2 (2002-2006, petrol)
  • Power unit
  • Fuel system
  • Connecting fuel pipes and quick-release fittings
0
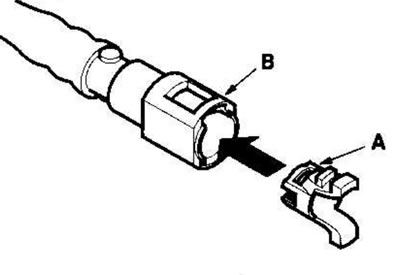
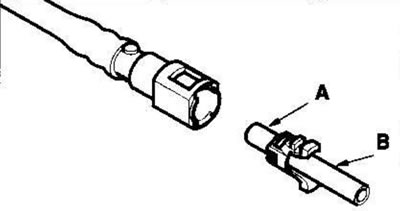
1. Check the contact area (A) of the tube (B) for dirt and damage and clean if necessary.

1. Check the contact area (A) of the tube (B) for…


2. Insert a new retainer (A) into the coupling (B) if the retainer is damaged or after:
  • replacement of fuel distribution line;
  • fuel line replacement;
  • fuel pump replacement;
  • fuel filter replacement;
  • replacing the fuel level indicator sensor;
  • removing the retainer from the tube.

removing the retainer from the tube.


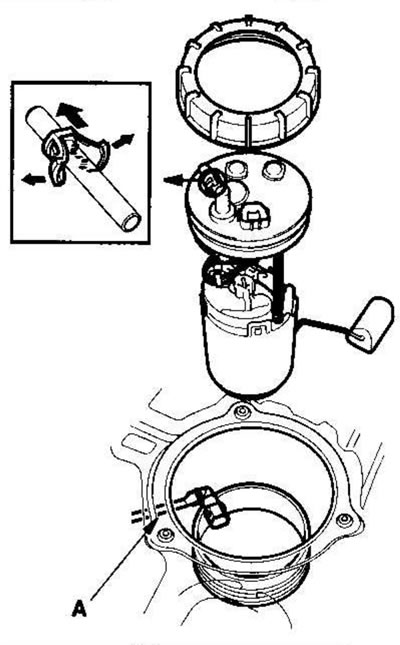
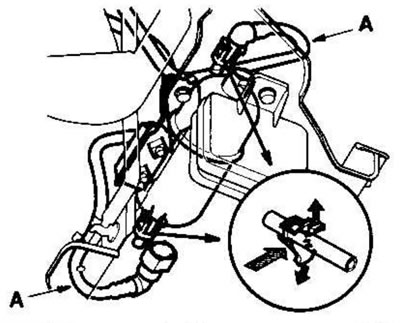
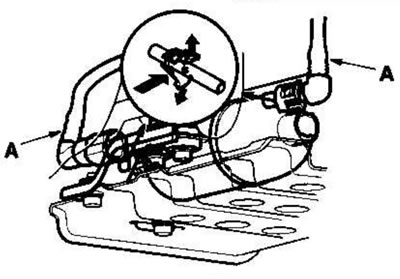
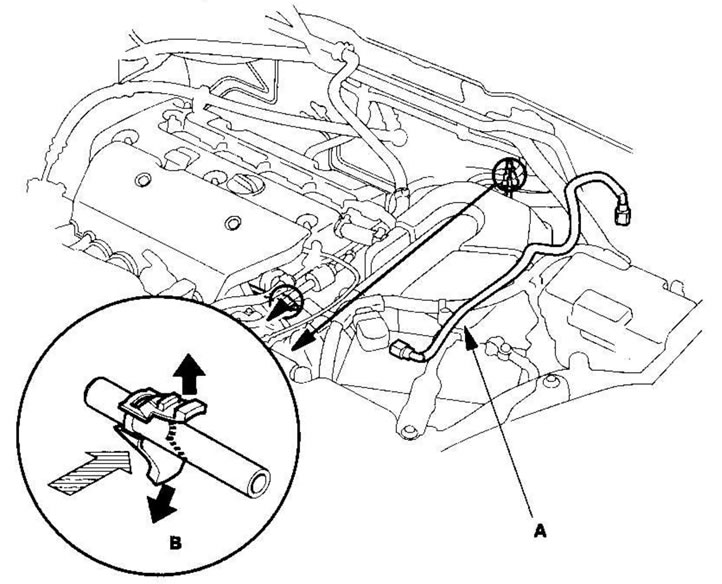
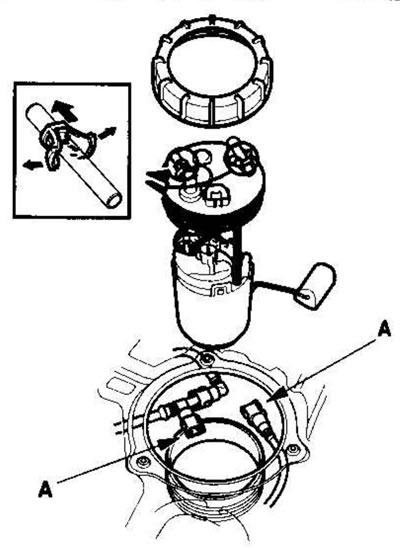
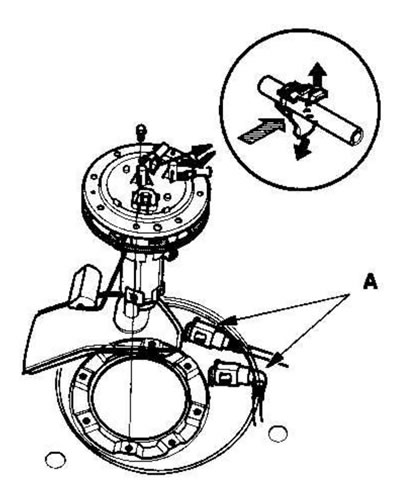
3. Before connecting the new fuel pipe/quick connector assembly (A), remove the old retainer (B) from the connecting pipe.
3. Before connecting the new fuel pipe/quick…


Models KG, KS, KE, KR


Models KG, KS, KE, KR


Except for models KG, KS, KE, KY, KZ


Except for models KG, KS, KE, KY, KZ


Model KZ


Model KZ


Models PH, FO, IN, MA


Models PH, FO, IN, MA


Model KZ


Model KZ


4. Align the quick-release fitting with the tube (A) and the retainer latches (B) with the grooves of the coupling (C). Then push the quick-release fitting onto the tube until both retainer latches click into place.


Note: If it is difficult to put on, lubricate the end of the tube with fresh engine oil.


Connection with new retainer
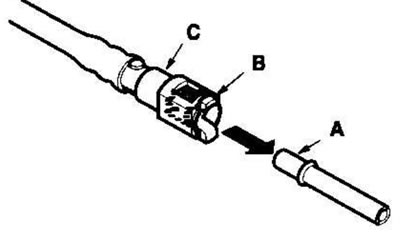
Connection with new retainer


Connection with existing retainer
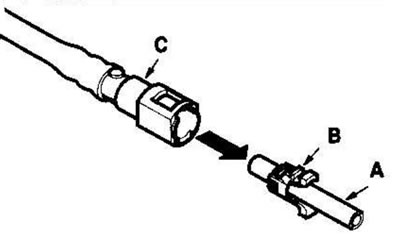
Connection with existing retainer


5. Make sure that the coupling is locked and that the latches are firmly secured; check visually and by pulling on the coupling.
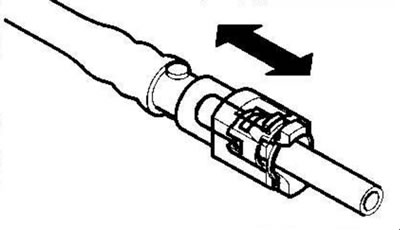
5. Make sure that the coupling is locked and that…


6. Connect the cable to the negative battery terminal and turn the ignition key to the ON (II) position. The fuel pump will turn on for approximately 2 seconds and pressurize the fuel system. Repeat the operation two or three times and make sure there are no leaks in the fuel system.

(The article was copied from the website: Hondabook.ru)
This article is available at: russian, bulgarian, belarusian, ukrainian, serbian, croatian, romanian, polish, slovak, hungarian
This information has been verified: Mikhail Kopasov
Share with friends:
◀ Previous
CR-V 2: Fuel system
Next ▶

Disconnecting fuel pipes and quick-release fittings
Precautions when handling fuel pipes/quick couplings
Checking fuel lines
Checking fuel pressure
Fuel pressure relief
Replacing the fuel pressure regulator
Replacing the fuel filter
Replacing the fuel pump/fuel level gauge sensor
Replacing the fuel tank
Testing the fuel gauge sensor
See also other articles from Honda manuals:
Fuel filter — removal and installation Honda Accord 3 (1985-1989)
Checking the condition and replacing fuel lines and their fittings Honda Civic 6 (1995-2000)
Fuel quantity indicator Honda Fit 1 (2001-2008)
Fuel line and quick release couplings Honda HR-V 1 (1998-2006, petrol)
Removal and installation fuel pipes with quick-release couplings Honda Avancier 1 (1999-2003, petrol)
Link in different formats to this article
Comments and feedback from visitors
No comments yet


How much will 23 + 27 ?


CR-V 2 (2002-2006, petrol) 
  • General information
  • User manual
  • Technical data
  • Maintenance
  • Power unit
  • Engine repair
  • Lubrication system
  • Cooling system
  • Exhaust system
  • Fuel system
  • Engine management
  • Engine electrical equipment
  • Transmission
  • Clutch
  • Manual gearbox
  • Automatic gearbox
  • Rear differential
  • Drive shafts
  • Chassis and running gear
  • Steering
  • Front suspension
  • Rear suspension
  • Brake system
  • Body and interior
  • Exterior (external elements)
  • Interior (internal elements)
  • Doors, locks and windows
CR-V 1 (1995-2001, petrol) 
  • General information
  • Maintenance
  • Tips for car owner
  • Power unit
  • Engine repair
  • Engine overhaul
  • Cooling and lubrication system
  • Engine electrical equipment
  • Control system
  • Fuel system
  • Transmission
  • Clutch and drive shafts
  • Car gearbox
  • Chassis and running gear
  • Front suspension
  • Rear suspension
  • Steering
  • Brake system
  • Body and interior
  • Body service
  • Exterior (external elements)
  • Interior (internal elements)
  • Electrical equipment
  • Equipment and devices
  • Electrical circuits
HondaBook.ru © 2018–2026 • Mobile version • Sitemap: EN BG BY UA RS HR RO PL SK HU • Feedback • Driver Information • Search system • Bookmark
Accord 3 (1985-1989) • Accord 6 (1997-2002) • Civic 3 and 4 (1983-1991) • Civic 5 and 6 (1991-2000) • Civic 6 (1995-2000) • Civic 7 (2000-2005) • Civic 8 (2005-2011) • Fit 1 (2001-2008) • CR-V 1 (1995-2001) • CR-V 2 (2002-2006) • HR-V 1 (1998-2006) • Avancier 1 (1999-2003) •
 
This website uses cookies to ensure proper functioning. By clicking "OK," you agree.