
HondaBook.ru
Auto companies Volkswagen Auto companies Ford Auto companies Lada Auto companies Skoda Auto companies BMW Auto companies Mazda Auto companies Peugeot
English Русский
Български
Беларускі
Український
Српски
Hrvatski
Română
Polski
Slovenský
Magyar
Bookmark Contacts Sitemap   


Accord Civic Fit / Jazz CR-V HR-V Others Articles
CR-V 1 (1995-2001, petrol) CR-V 2 (2002-2006, petrol)

Replacing the fuel tank (Honda CR-V 2)

  • Main
  • Honda CR-V
  • 2 (2002-2006, petrol)
  • Power unit
  • Fuel system
  • Replacing the fuel tank
0
Contents: Except for the KZ model ⇊ Model KZ ⇊

Except for the KZ model


1. Empty the fuel tank:
  • Remove the fuel pump assembly.
  • Drain the gasoline into a suitable container using a hand pump and hose.

2. Raise the vehicle with a jack and secure it to safety stands.

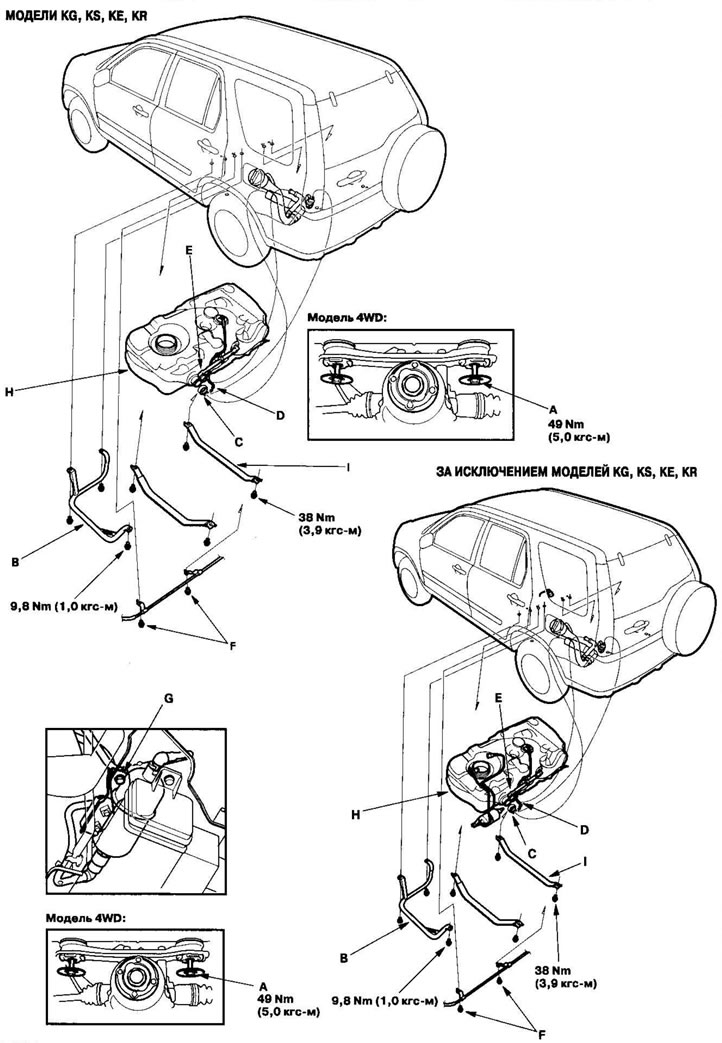
3. 4WD models: Remove the propeller shaft. Remove the rear differential mounting bolt (A), then secure the differential to the safety stands.
3. 4WD models: Remove the propeller shaft. Remove…


4. Loosen the bracket bolt of the fuel vapor Capture carbon filter (EVAP).

5. Remove the fuel tank protective element (B).

6. Loosen the clamp (C).

7. Disconnect the fuel vapor vent hose (D), hoses (E), and remove the harness stand bolts (F). Tighten the clamps, then reel in the hoses as you pull them out to avoid damaging them.

8. Except for KG, KS, KE, KR models:

Remove the bolt (G) of the fuel filter bracket,

9. Support the fuel tank (H) with a jack or other device.

10. Unscrew the bolts of the tank mounting strap and remove the strap clamp (I).

11. Remove the fuel tank.

12. Installation is carried out in the reverse order of removal.

Model KZ


1. Relieve fuel pressure.

2. Fold the rear seats forward and roll up the carpet until the viewing panel is accessible.


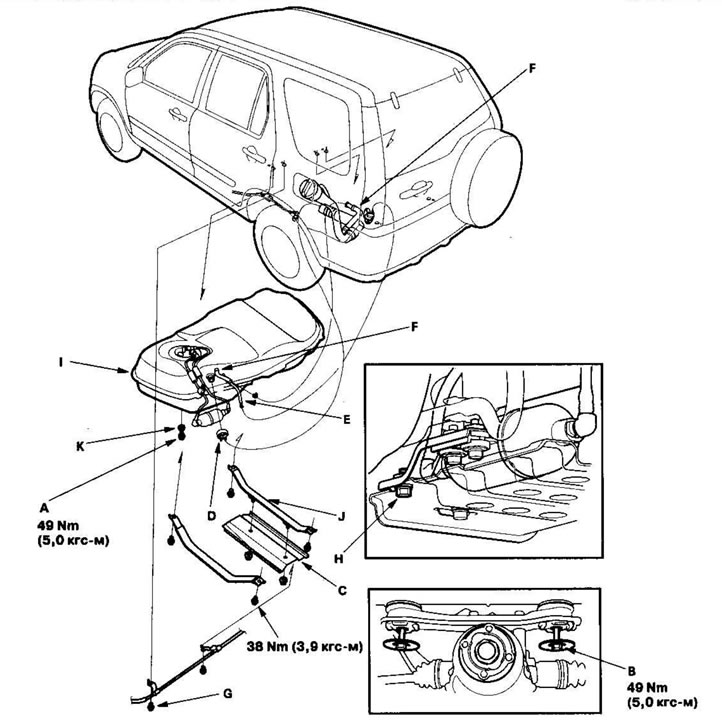
3. Remove the inspection panel (A) in the floor, disconnect the quick-release fitting from the fuel pump.

4. Raise the vehicle with a jack and secure it to safety stands.

5. Remove the drain plug (A) and drain the fuel into a suitable container.

6. Remove the driveshaft. Remove the rear differential mounting bolt (B), then secure the differential to the safety stands.

7. Loosen the bracket bolt of the fuel vapor Capture carbon filter (EVAP).

8. Remove the fuel tank protective element (C).

9. Loosen the clamp (D).
9. Loosen the clamp (D).


10. Disconnect the fuel vapor vent hose (E), hoses (F) and remove the harness stand bolts (G). Tighten the clamps, then reel in the hoses as you pull them out to avoid damaging them.

11. Remove the fuel filter bracket (H).

12. Support the fuel tank (I) with a jack or other device.

13. Loosen the tank mounting strap bolts and remove the strap clamp (J).

14. Remove the fuel tank.

15. Screw the plug into the drain hole, using a new washer (K), then coat the plug with Noxrust 124B or equivalent. Allow the mixture to dry for 20 minutes.

16. Installation is carried out in the reverse order of removal.
This article is available at: russian, bulgarian, belarusian, ukrainian, serbian, croatian, romanian, polish, slovak, hungarian
This information has been verified: Mikhail Kopasov
Share with friends:
◀ Previous
CR-V 2: Fuel system
Next ▶

Replacing the fuel pump/fuel level gauge sensor
Replacing the fuel filter
Replacing the fuel pressure regulator
Connecting fuel pipes and quick-release fittings
Disconnecting fuel pipes and quick-release fittings
Testing the fuel gauge sensor
Testing the Low Fuel Warning Light
Air supply system — location of components
Troubleshooting the IMRC System
Testing the Throttle Body with a HONDA PGM Scanner or Tester
See also other articles from Honda manuals:
Fuel Tank — Accord 1984-89, Prelude 1984-85 Honda Accord 3 (1985-1989)
Replacing the fuel tank (N22A) Honda Civic 8 (2005-2011)
Fuel tank Honda Fit 1 (2001-2008)
Fuel tank — replacement Honda HR-V 1 (1998-2006, petrol)
Fuel tank filler neck Honda Avancier 1 (1999-2003, petrol)
Link in different formats to this article
Comments and feedback from visitors
No comments yet


How much will 41 + 49 ?


CR-V 2 (2002-2006, petrol) 
  • General information
  • User manual
  • Technical data
  • Maintenance
  • Power unit
  • Engine repair
  • Lubrication system
  • Cooling system
  • Exhaust system
  • Fuel system
  • Engine management
  • Engine electrical equipment
  • Transmission
  • Clutch
  • Manual gearbox
  • Automatic gearbox
  • Rear differential
  • Drive shafts
  • Chassis and running gear
  • Steering
  • Front suspension
  • Rear suspension
  • Brake system
  • Body and interior
  • Exterior (external elements)
  • Interior (internal elements)
  • Doors, locks and windows
CR-V 1 (1995-2001, petrol) 
  • General information
  • Maintenance
  • Tips for car owner
  • Power unit
  • Engine repair
  • Engine overhaul
  • Cooling and lubrication system
  • Engine electrical equipment
  • Control system
  • Fuel system
  • Transmission
  • Clutch and drive shafts
  • Car gearbox
  • Chassis and running gear
  • Front suspension
  • Rear suspension
  • Steering
  • Brake system
  • Body and interior
  • Body service
  • Exterior (external elements)
  • Interior (internal elements)
  • Electrical equipment
  • Equipment and devices
  • Electrical circuits
HondaBook.ru © 2018–2026 • Mobile version • Sitemap: EN BG BY UA RS HR RO PL SK HU • Feedback • Driver Information • Search system • Bookmark
Accord 3 (1985-1989) • Accord 6 (1997-2002) • Civic 3 and 4 (1983-1991) • Civic 5 and 6 (1991-2000) • Civic 6 (1995-2000) • Civic 7 (2000-2005) • Civic 8 (2005-2011) • Fit 1 (2001-2008) • CR-V 1 (1995-2001) • CR-V 2 (2002-2006) • HR-V 1 (1998-2006) • Avancier 1 (1999-2003) •
 
This website uses cookies to ensure proper functioning. By clicking "OK," you agree.